Roles and permissions functionality can be used to separate areas of responsibility for company employees.
What is it?
A role is a set of certain capabilities that depend on the configuration of combinations of access rights. Its purpose is to simplify the management and control of actions that users can perform in the Space.
Permissions - determine the scope of interaction with certain system tools. Their purpose is to grant permission or prohibit users of a certain role from working with specific elements of the Space.

How to go to role and permissions settings?
To do this, select Roles and permissions in the Settings section. A page for managing roles and permissions settings will open.
💡 It is available only to the administrator and Space owner.

Management of roles and permissions
The number of roles depends on the plan ⬇️
There are 5 predefined roles on commercial plans. Namely:
- Employee
- Head
- Head of the sales department
- Manager of the sales department
- HR
In addition, you can create your own roles. On the Professional plan - an unlimited number. On the Standard plan - 1.
And for the Free plan, work with two predefined roles Employee and Manager is provided.

How to create a new role and configure permissions?
To do this, click on the Create button.

A window will open where you need to give a name (1) to the role and select the users (2) to whom you intend to assign it.

Then go to the most important - setting permissions.
💡 Currently, permissions can be configured to work with CRM elements, Smart Objects and the company structure ( Company and people section).

Let's consider an example of the setup for CRM.
When creating a new role, you can grant permissions to interact with CRM entities and tools, namely leads, deals, contacts, companies, activities, and call log.

Configure whether the employee to whom the role will be assigned can create, view, edit or delete elements of these entities (tools).

💡 Please note that for the Call log, permissions are available only for viewing and editing.

Please note that in the Editing section of the CRM, it refers to the ability to make changes to the call note, as well as to the connection with CRM entity elements (only if it's not related to the base entity, that is:
To do this, set a ban (1) or grant permission (3) to interact with all entity elements. Alternatively, configure limited access (2), which means the employee will only be able to work with the elements they are directly responsible for, or those their department colleagues (including the manager) are responsible for.
💡Permissions can be configured by department using the Professional plan.

💡 Additionally, if you are a user of the Professional plan, there is an option to configure permissions separately for funnels for leads and deals.
This option appears when you have more than one funnel created for these entities.


In other words, the restriction or permission (full or limited) for working with elements of these entities will be set based on which funnels they belong to.

If necessary, you can Allow everything or Deny everything with one button. This will mean that users of this role will either have full access to all elements or will not be able to interact with any entities at all.


When all permissions are configured, click the Save button.

However, the role may include permissions for working with Smart Objects as well. Therefore, before saving, it is necessary to configure them on a separate tab.
The ability to grant different permissions for separate directions is also available for Smart Objects. This option appears when more than one direction is created within a Smart Object.


Please note that to activate separate permission settings for directions, you must ensure their support is enabled for the specific Smart Object, in case you had previously disabled it.
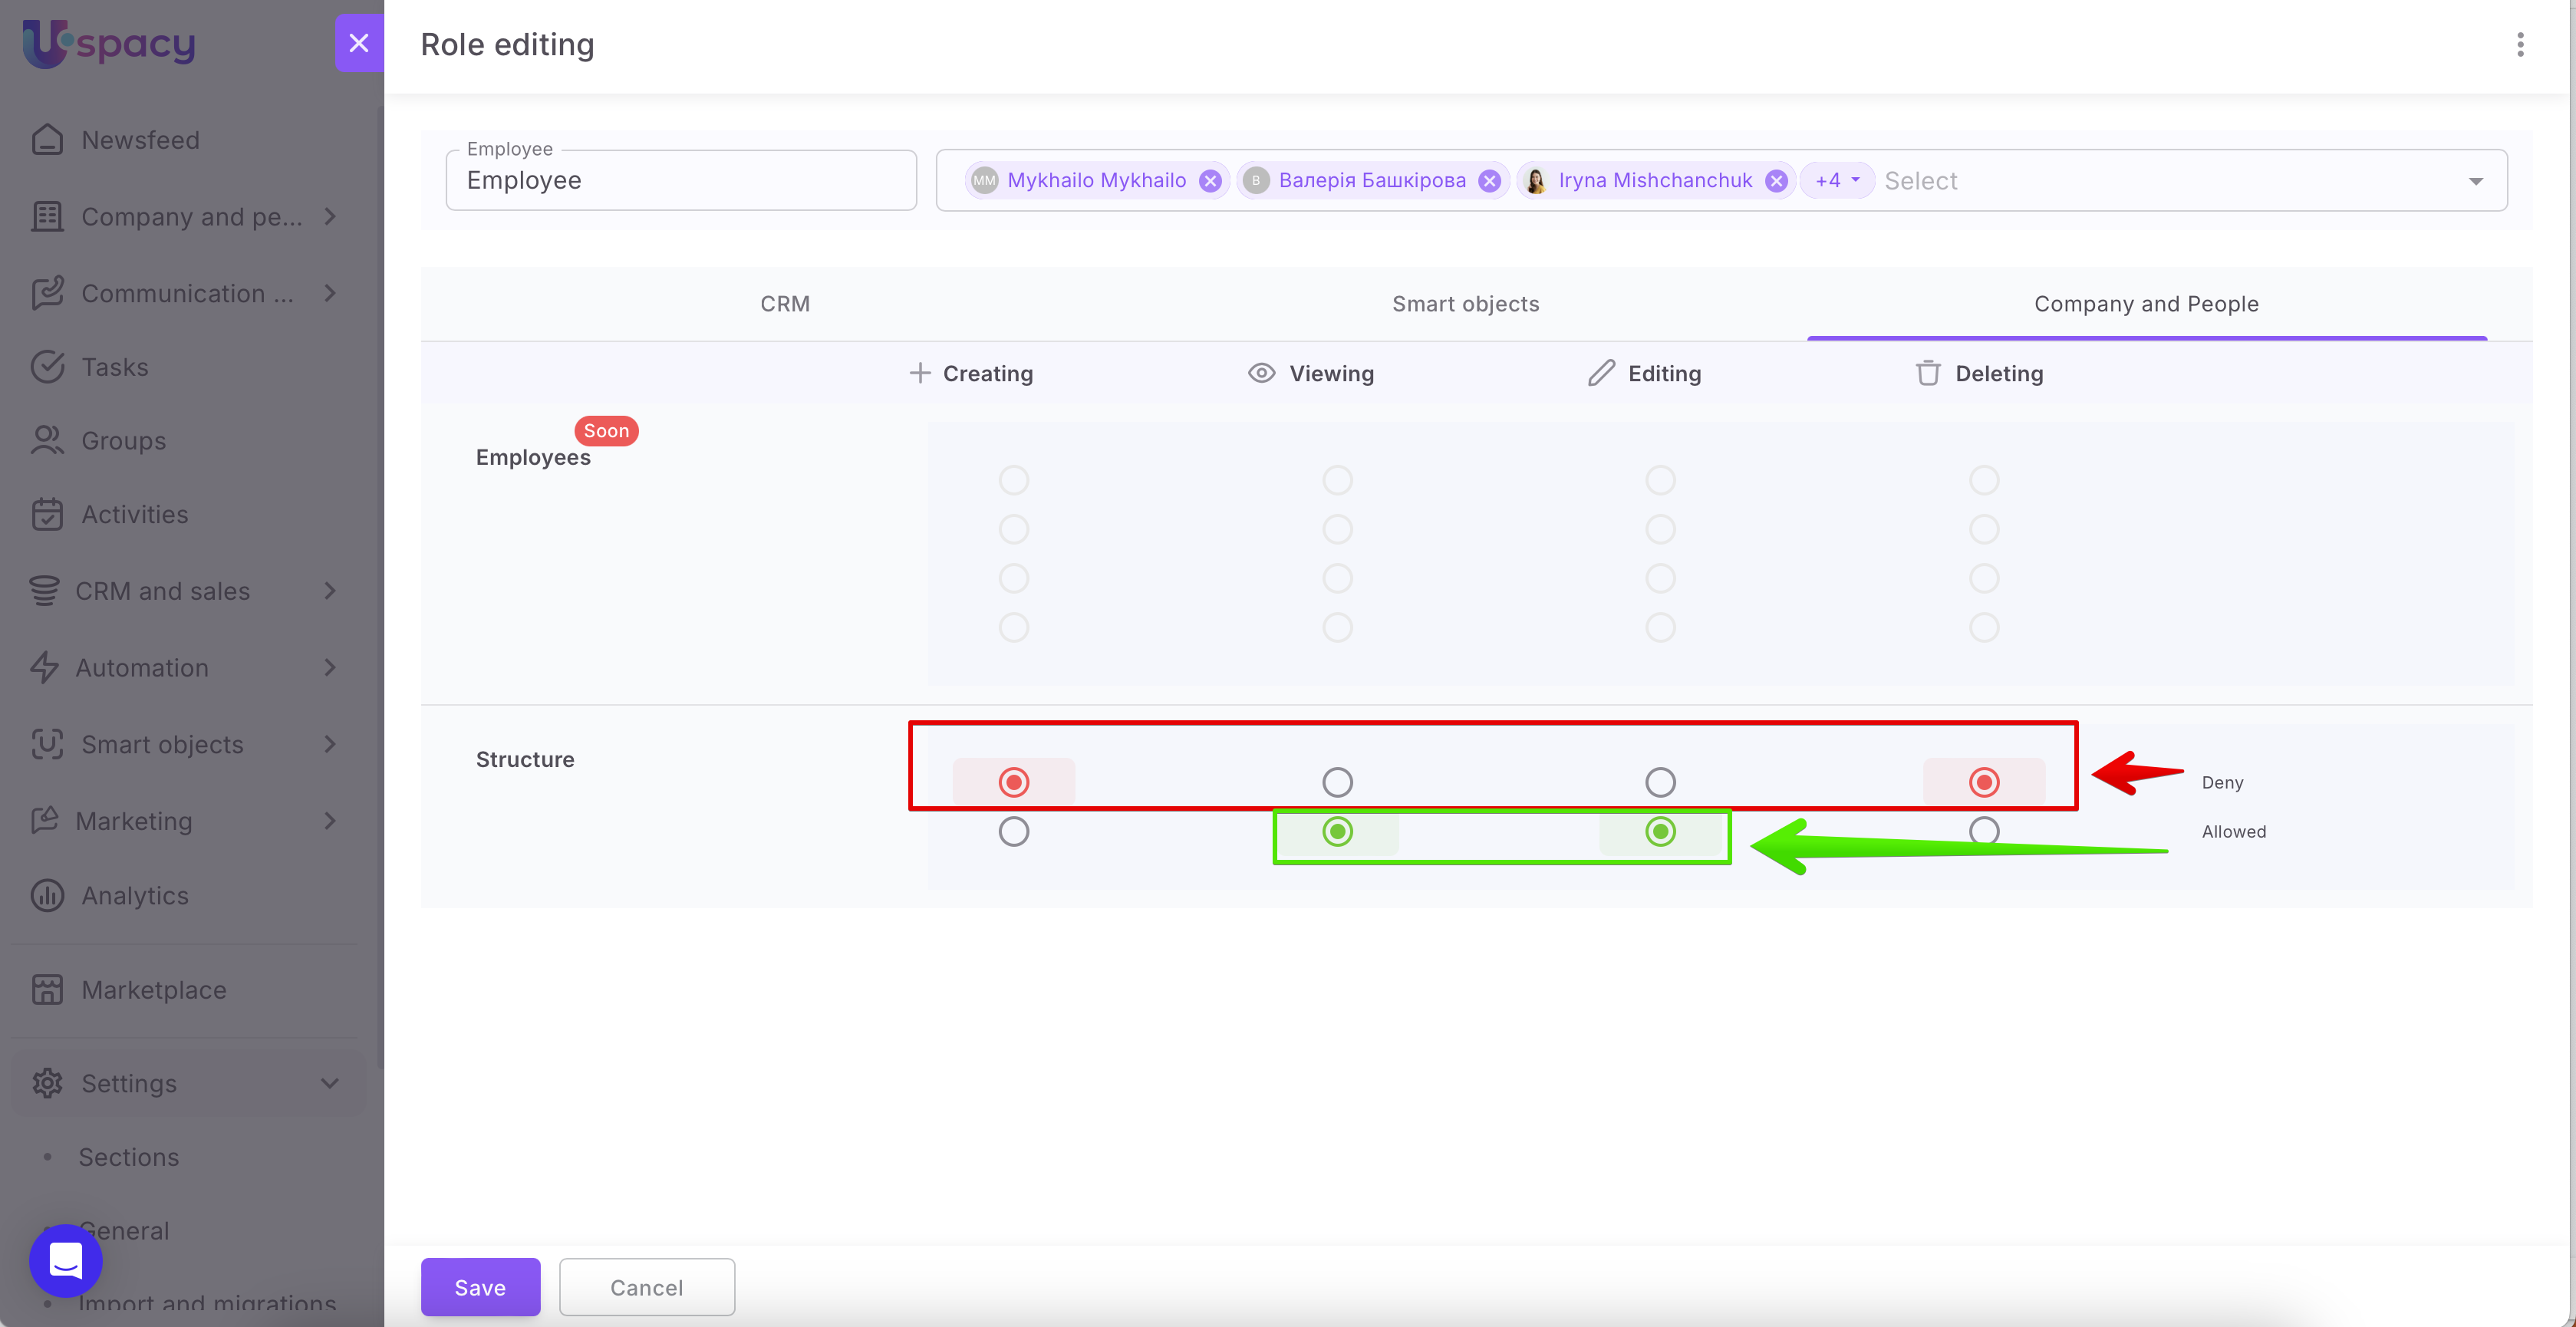
🟣 And of course, you can also define access permissions to the company structure for a given role. To do this, go to the dedicated tab.

There, you can specify whether employees assigned to this role will be allowed to:
The newly created role will be displayed in the list at once.

How to edit an existing role?
To do this, select the role to which you need to make changes and click on its name.

Or call the interaction menu and use the Edit option.

Next, edit the name, users or permissions and click Save.

The system will ask for confirmation of the changes made.

💡 If in the process of editing a role, changes were made to permissions, then all users assigned to this role MUST re-authorize in the system.
How to assign a role to employees?
There are three ways to do this. The first is through the role editing window.

The second is through the role quick view window.

There, you need to use the Change the staff option.

In the editing mode, select the necessary employees. You can also use the search bar to quickly find them. Finally, don’t forget to click the Save changes button.

💡If no role has been assigned yet, clicking the icon will immediately open the staff editing mode.


The third method is to use the user list at the bottom of the page. First, select the required employee.

Then, click on the icon – assign a role (1), select the desired role, and confirm (2).

The system will also display a warning window. Here, you will need to Confirm your actions.

💡Please note that a single employee can be assigned multiple roles simultaneously. In this case, the permissions will be combined.
For example, if role 1 allows interaction with leads but denies interaction with deals, and role 2 does the opposite, the user assigned both roles will be able to work with both leads and deals.
Additionally, when a new role is assigned to a user, they MUST reauthorize in the system for the permissions granted by the role to take effect.
How to delete an employee from a role?
This can also be done in several ways. The first way is through the role editing window.

The second way is through the quick role view window using the Change the staff option.


In editing mode, uncheck the user and click Save changes.


💡When a user is removed from a role, they MUST re-authorize in the system for the permissions granted by the role to be deactivated.
How to delete a role?
To do this, select the appropriate item in the role interaction menu.

The system will display a warning window. Then, you need to assign one of the existing roles to the employees who were previously assigned to the role you are about to delete. Confirm your actions after that.


If no employees are currently assigned to the role, it will be deleted after the system shows the warning.

❗️Please note that you cannot delete the predefined roles Employee and Head. This option is not available in their interaction menu.

Other predefined roles can be deleted following the usual process.

How to view the list of all users of the role?
To do this, use the table at the bottom of the page.

In the appropriate filter, select the role for which you want to view the list of users who have been assigned it.

Then the system will display the results.

By the way, in this table, you can see which departments the users belong to and when the role was assigned to them.

Peculiarities of permissions and role capabilities
In all predefined and user roles, the system provides a certain scheme of permissions to tasks. It cannot be configured or changed. Some features are based on this.
- In all predefined roles, access is provided only to "your" tasks.
Only the Head role does not fall under this rule. An employee assigned to this role can see all tasks in the Space, but edit or delete only "his/her". Only those in which he/she is the task creator.
2. All newly created user roles have the same task access logic. You can only work with "your own".The interaction with the task is determined only by the role of the user in the task itself (task creator, person responsible, participant, observer), and not by the role from the general functionality of roles and rights in the Space.
3. Due to the first peculiarity, the Head role cannot be duplicated. There is no such item in the interaction menu.

For all other predefined and created roles, this can be done.

As a result, a role marked Copy will be created. It will provide similar permissions, but the employees will not be transferred to the duplicate.

If you have additional questions or you need to contact the support, send a request to this email [email protected]
Created: January 24, 2023 / Updated: June 19, 2025