Conditional actions are a concept that is used to identify actions which are supposed to be performed in case the predefined condition or a set of conditions are true. It allows a program or system to decide whether to perform certain actions based on the current state or input data.
Conditional actions in Uspacy are one of the ways to automate work in Space. Namely, to configure automatic performance of certain actions in entities and tools based on conditions defined by the user.
You can work with conditional actions on the page of the same name. Just expand the Automation section.
🌟Please note that only the owner and Space administrators have access to this section.

How to create and configure a conditional action?
To do this, click on the Create button.

A window will open. Here set the parameters for the conditional action.

Namely:
🟣 Specify a name for the conditional action.

🟣 Add its description for a better understanding of the working mechanism.

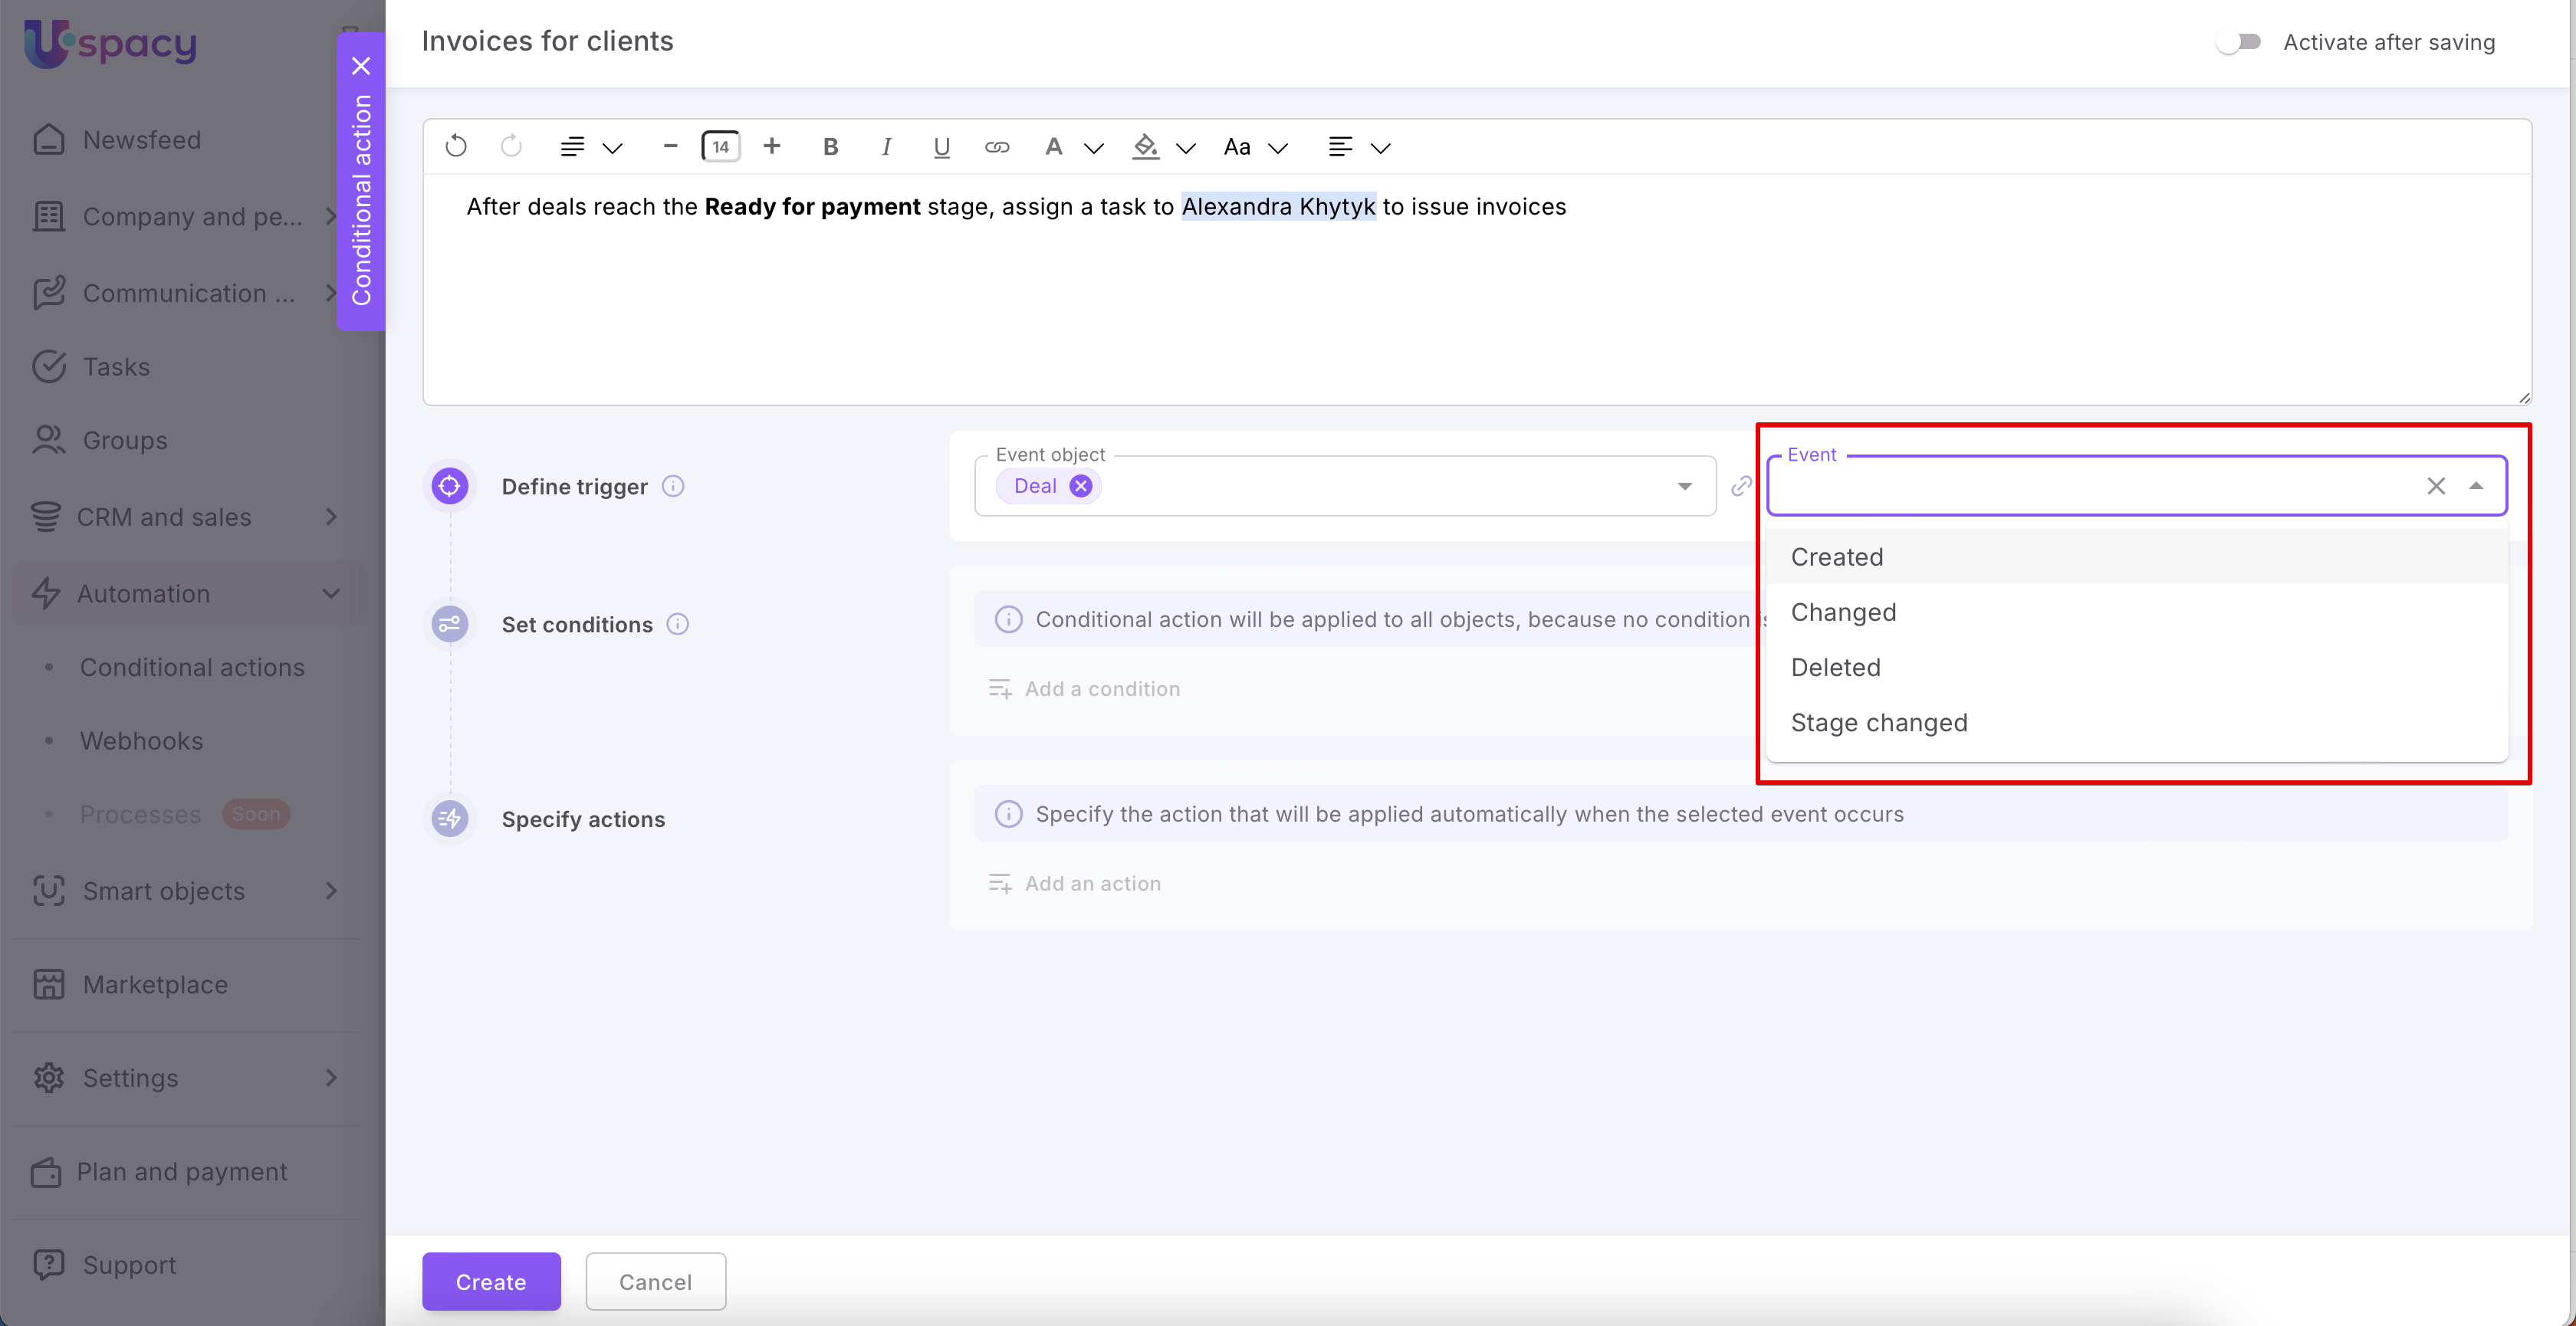
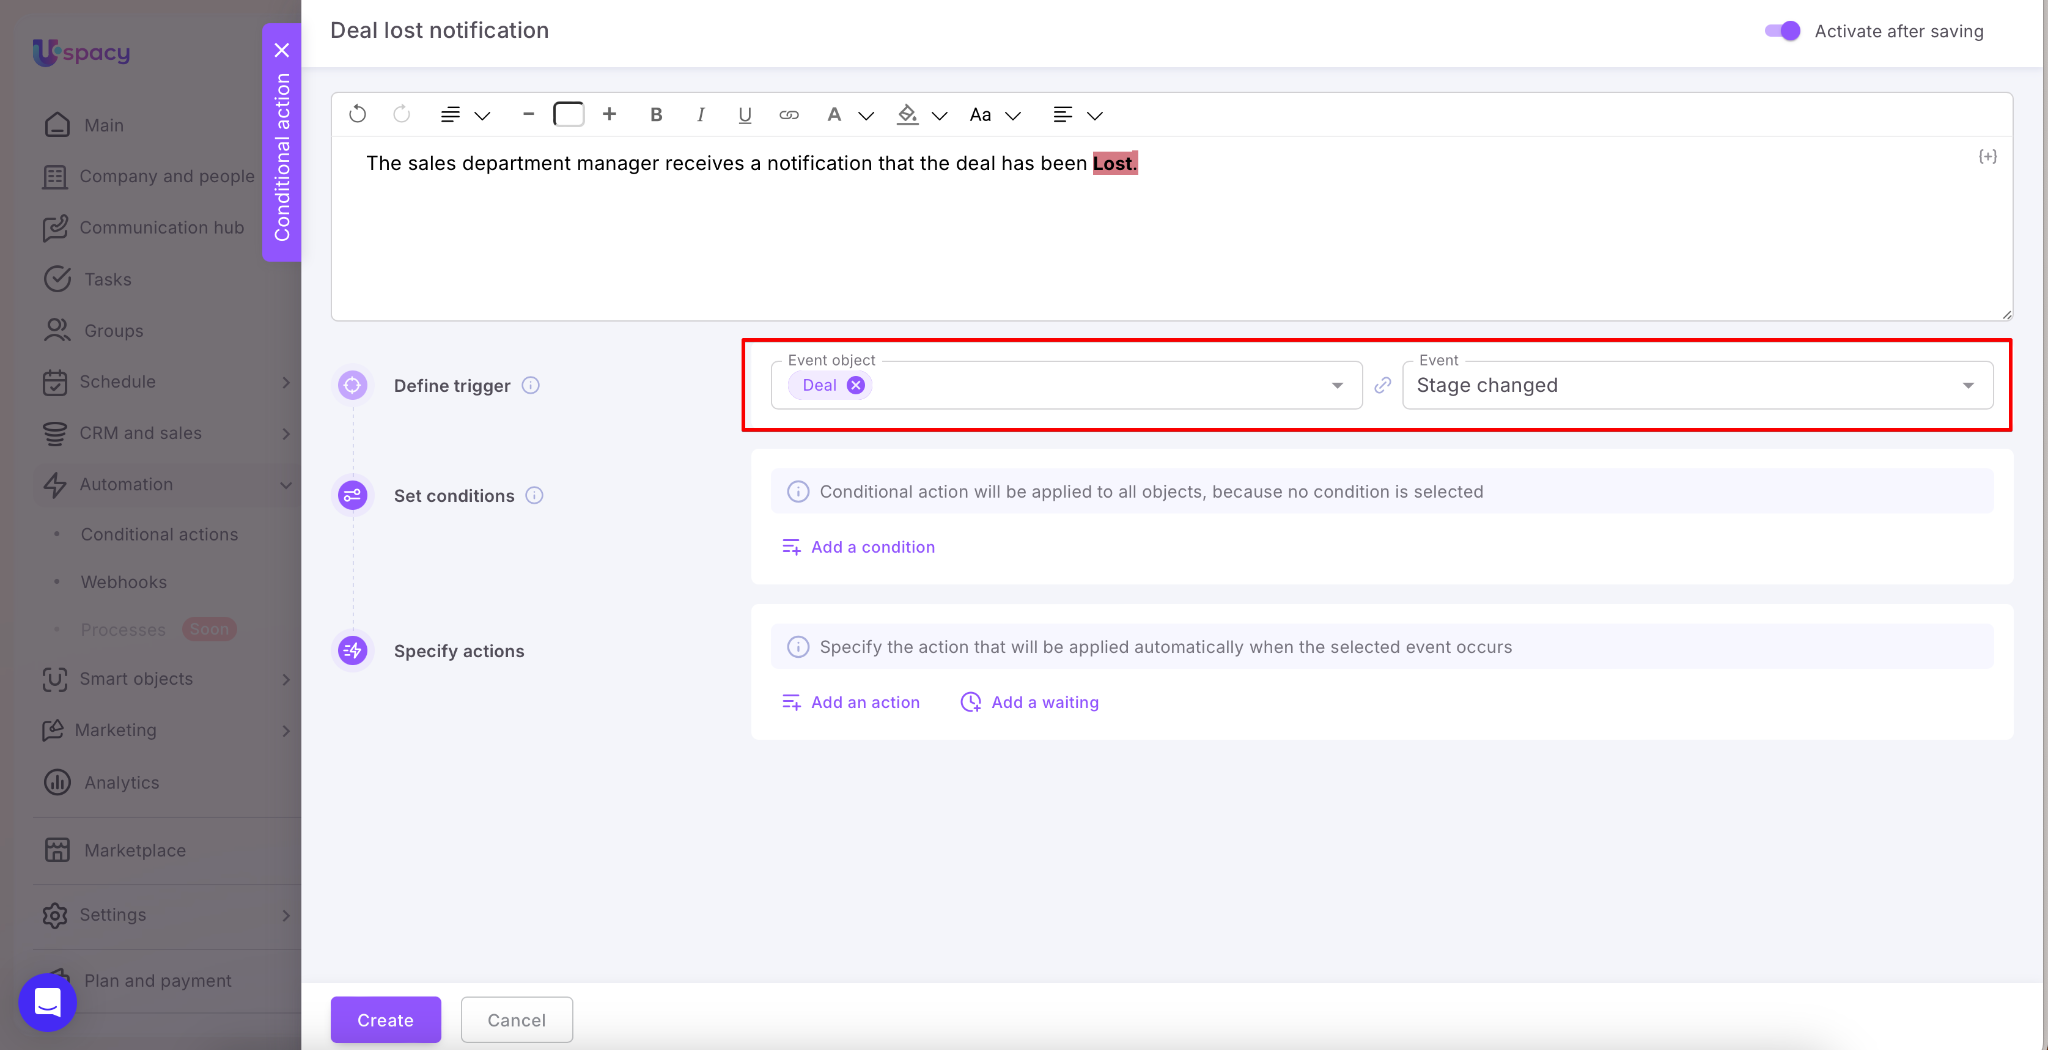
🟣 Specify the trigger, that is, what exactly initiates the conditional action. This block has two components. The first is the event object. It is an entity or tool in the Space, something with which the interaction takes place (lead, deal, contact, company, activity, task, comment or post)

The second is an event. This is a type of interaction, that is, the selected object was created, changed, or deleted.
💡❗️Please note that some objects are incompatible with some events. For example, there is no trigger such as stage change for a contact, company, activity, etc. It is impossible based on the functionality of these entities.
❗️If the trigger should be a stage change in a lead or a deal, then you need to select Stage changed as the event. If you specify Changed, then the configured conditional action will not work as a result.
🟣 Set conditions, that is, the parameters that are required to run the conditional action. First select the entity or tool field.

Then specify its value.

💡If not to set the conditions, then this action will be performed for each element of the entity or tool selected as the event object.

Of course, you can specify several conditions (1) and configure the logic of their combination (2):

- All conditions at the same time. This option assumes that the event object must satisfy all of the provided conditions at the same time. That is, the logical operator "And" is applied.
- At least one condition. This option assumes that the event object must satisfy at least one of the provided conditions. That is, the logical operator "OR" is applied.
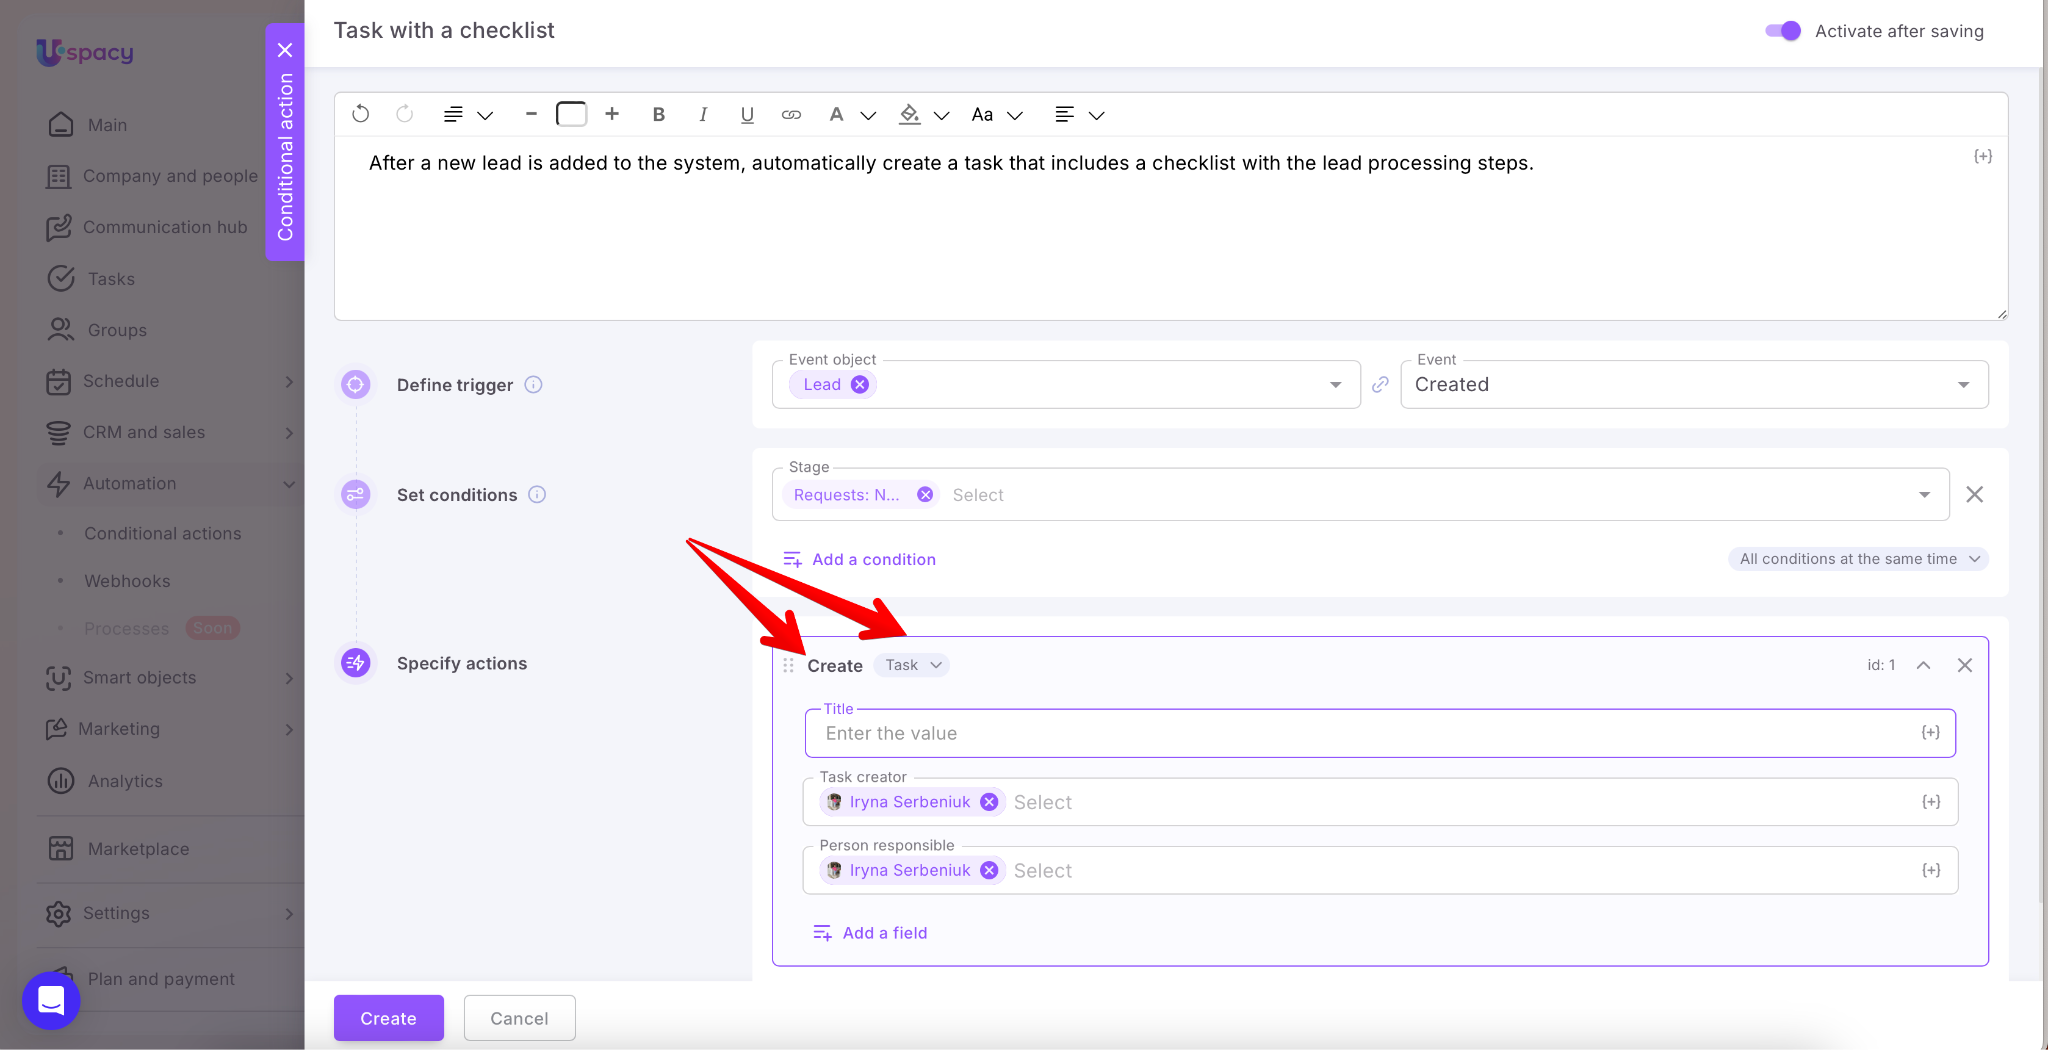
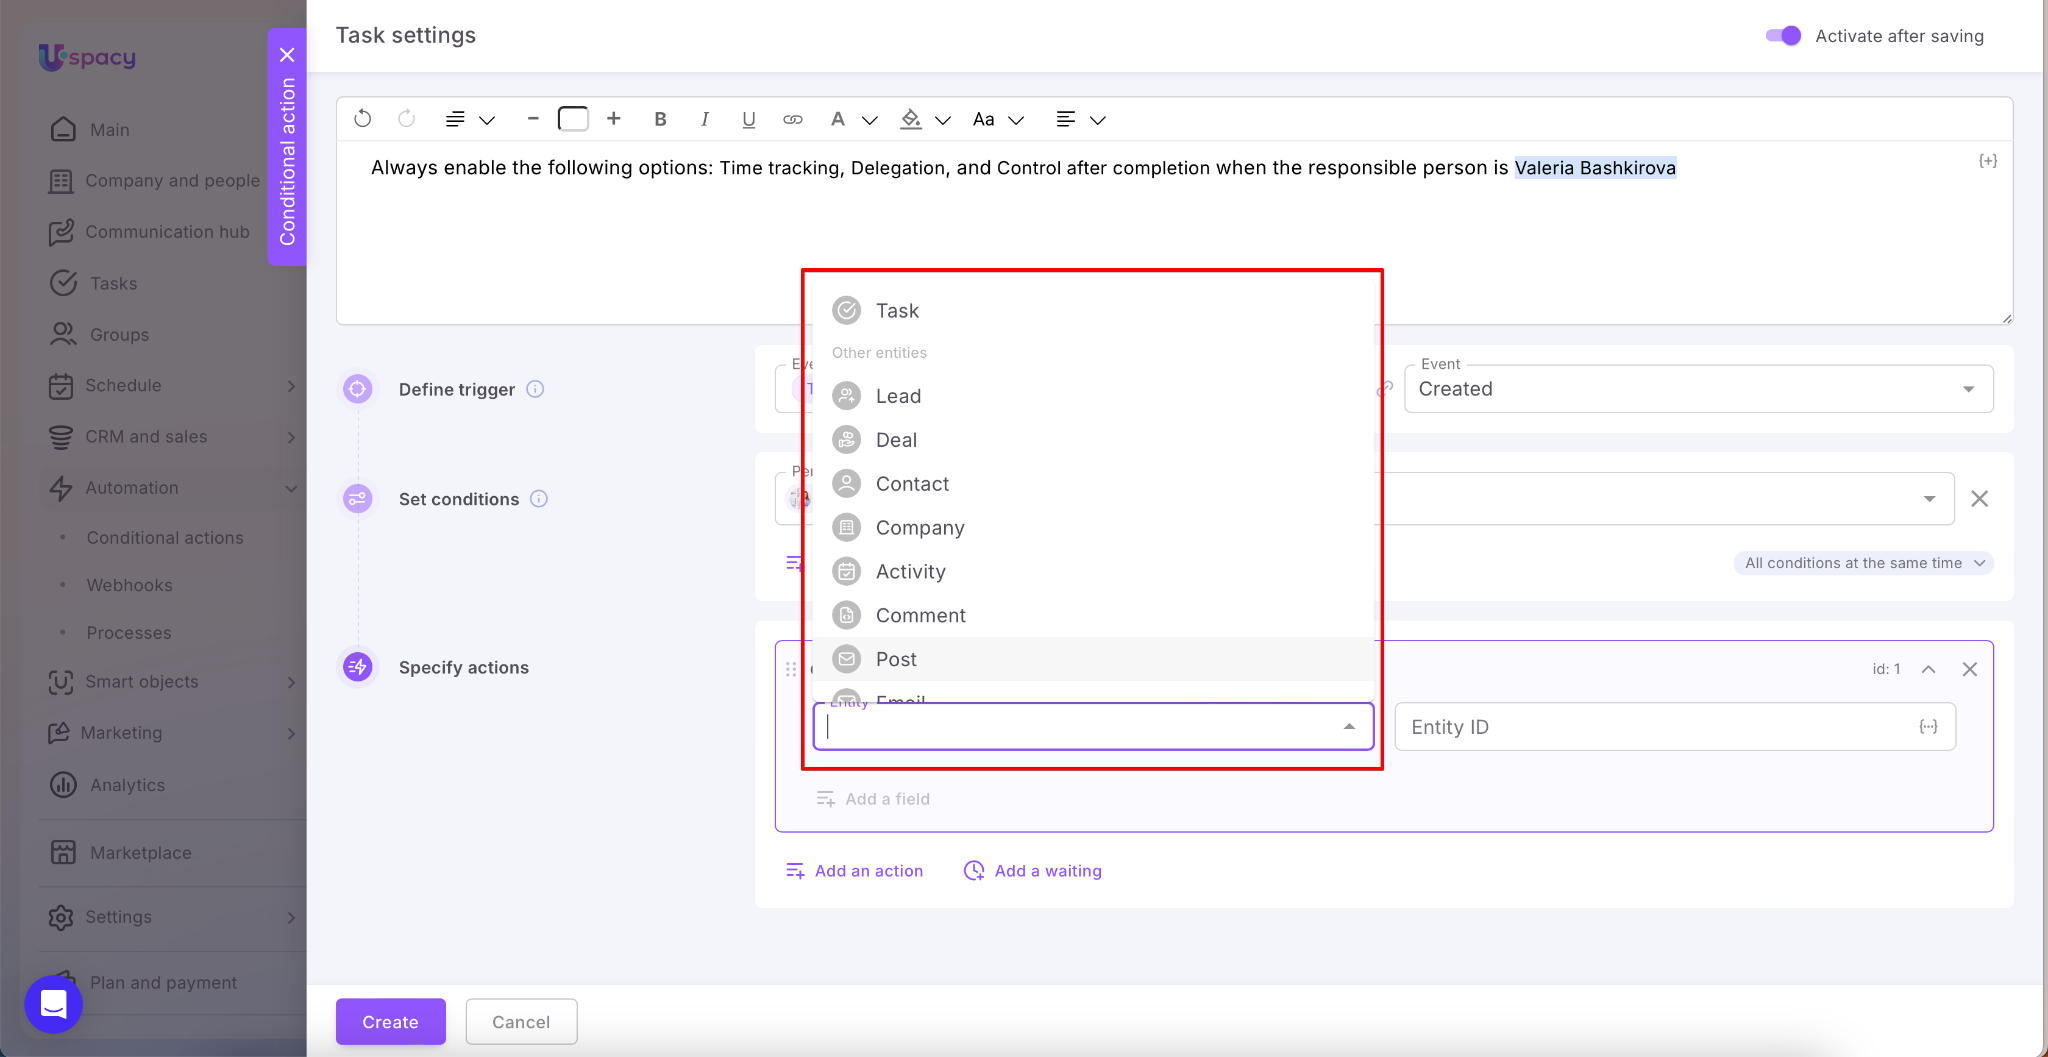
🟣 Specify actions, that is, what exactly needs to be done in the event that meets the conditions.
Action: Create
Select in which entity (lead, deal, contact, company, activity, task or comment) of your Space a new element will be added as a result of the automation.

Fill out the fields. Of course, their set depends on the entity type.

You can select the fields and the content for the element that will be created as a result of the conditional action.

How to do it?
Just click the Add a field.

Then mark which one you need.

And finally, fill out this field.

Action: Create – Email
A very convenient option is the ability to set up automatic email sending. To do this, you need to select Email as the new element to create.

Then, fill out the form, which contains the standard fields: Subject, To (and optionally Copy and Hidden copy), Sender. You also need to add the body of the email, i.e., the text it should contain.

So, once you finish creating and the conditional action starts working, emails will be sent when the specified conditions are met.

💡 Please note 💡
🟣 You can use this option to create and send emails only if you have connected an email account to your Workspace or have the appropriate access to share it with the owner.
🔍 For more details on connecting email accounts to your Workspace, refer to the following article.
🟣 A note for administrators: If you haven’t personally connected an email account and do not have shared access to it, you will not be able to send emails from that account, even as an administrator.
🟣 If the CRM connections option is not enabled in the email account settings, sent emails will not be displayed in the cards of the related elements.
🔍 For more details on email and CRM integration, go to the following article.
Action: Create a task with a checklist
When a process is repeated over and over again—onboarding, approvals, document preparation, or “check and don’t forget” scenarios—the most time-consuming part is routine work: creating a task, adding the same steps, and double-checking that nothing was missed. This is where task checklists come in handy. They help break work down into clear steps, mark completed items, and track progress. A single task can include multiple checklists, which you can organize to match your specific workflow.
When you combine this with Conditional actions, tasks can be created automatically—only when a specific event occurs and the defined conditions are met (for example, when a new item is added or when a stage, status, or another field changes). As a result, the team gets a controlled process: tasks with a clearly structured checklist that guides the next steps and reduces the risk of missing important details. This helps keep processes organized and eliminates the need to manually repeat the same actions every time.
To set up a conditional action for automatically creating a task with a checklist, start by defining the trigger and setting the conditions, as usual.
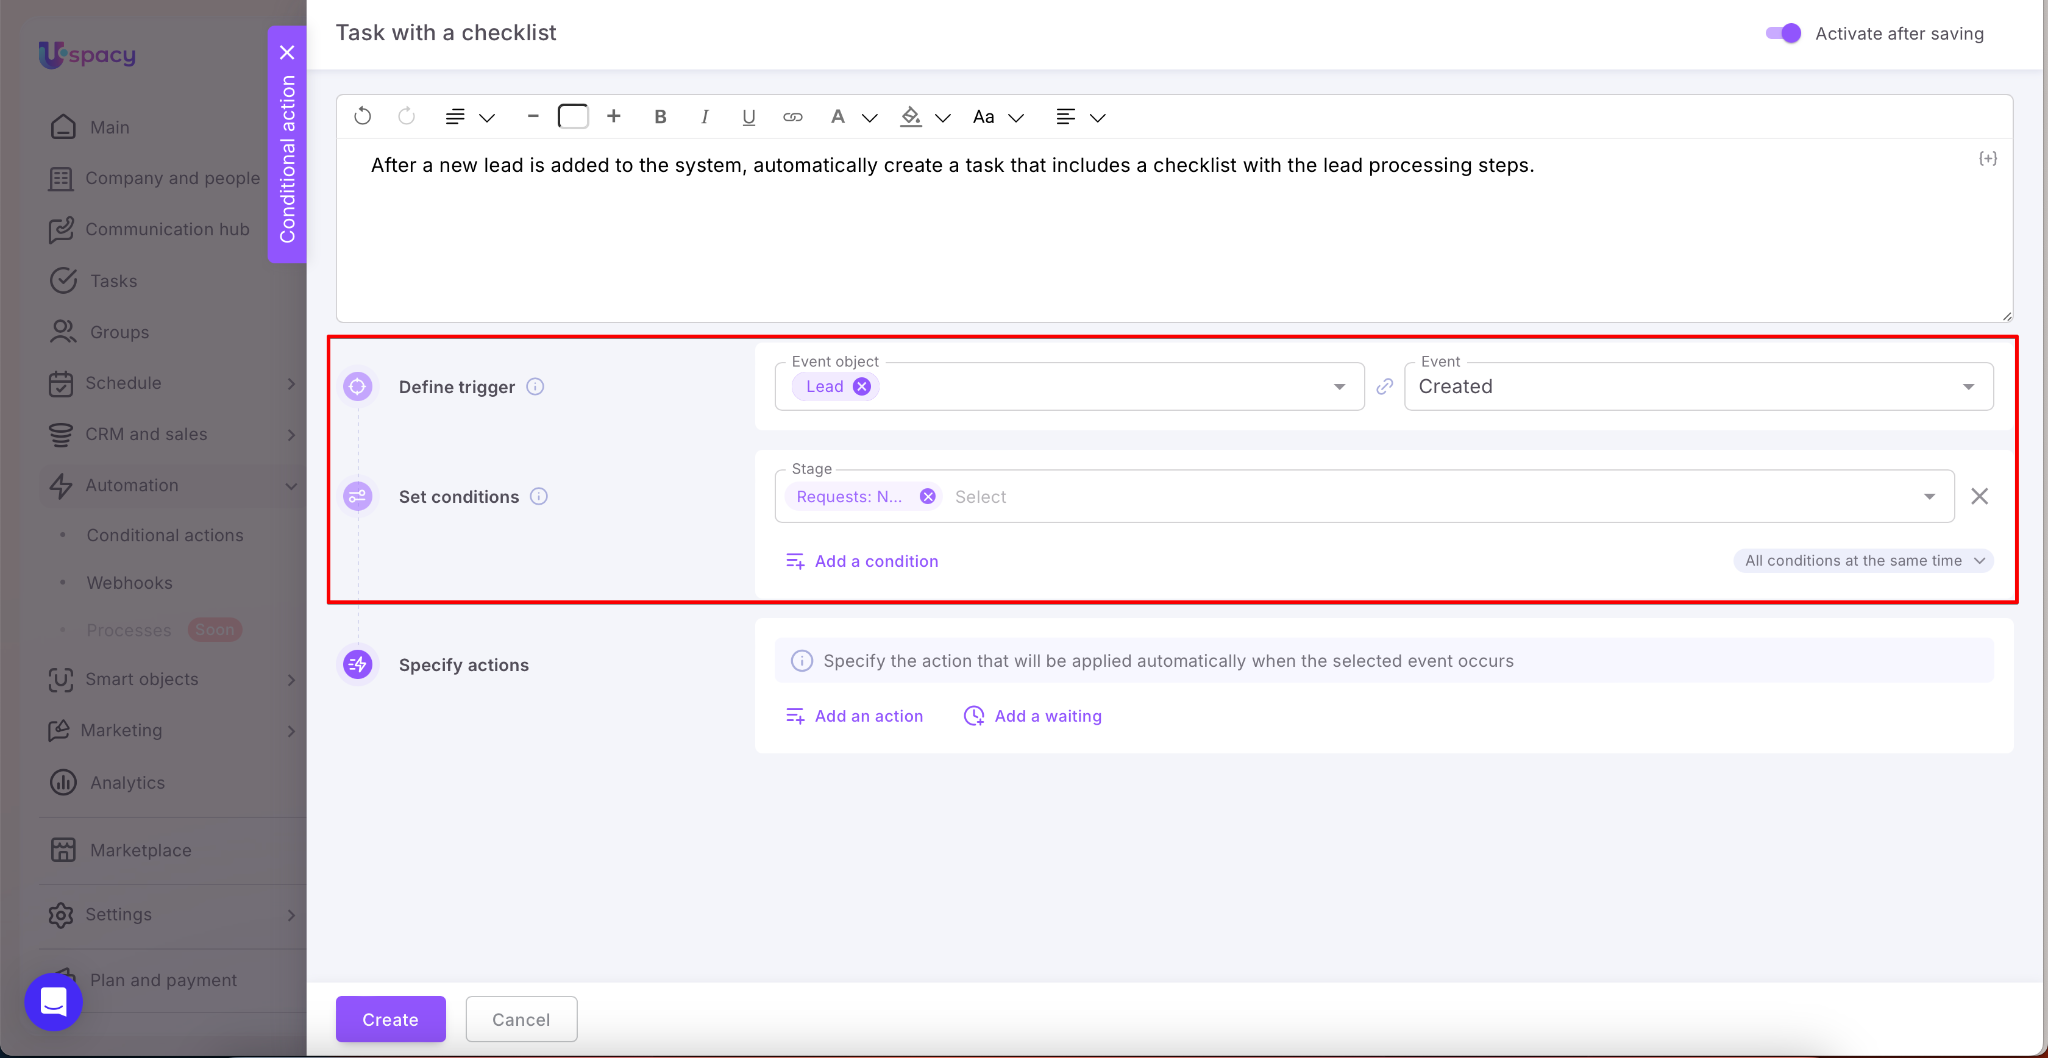
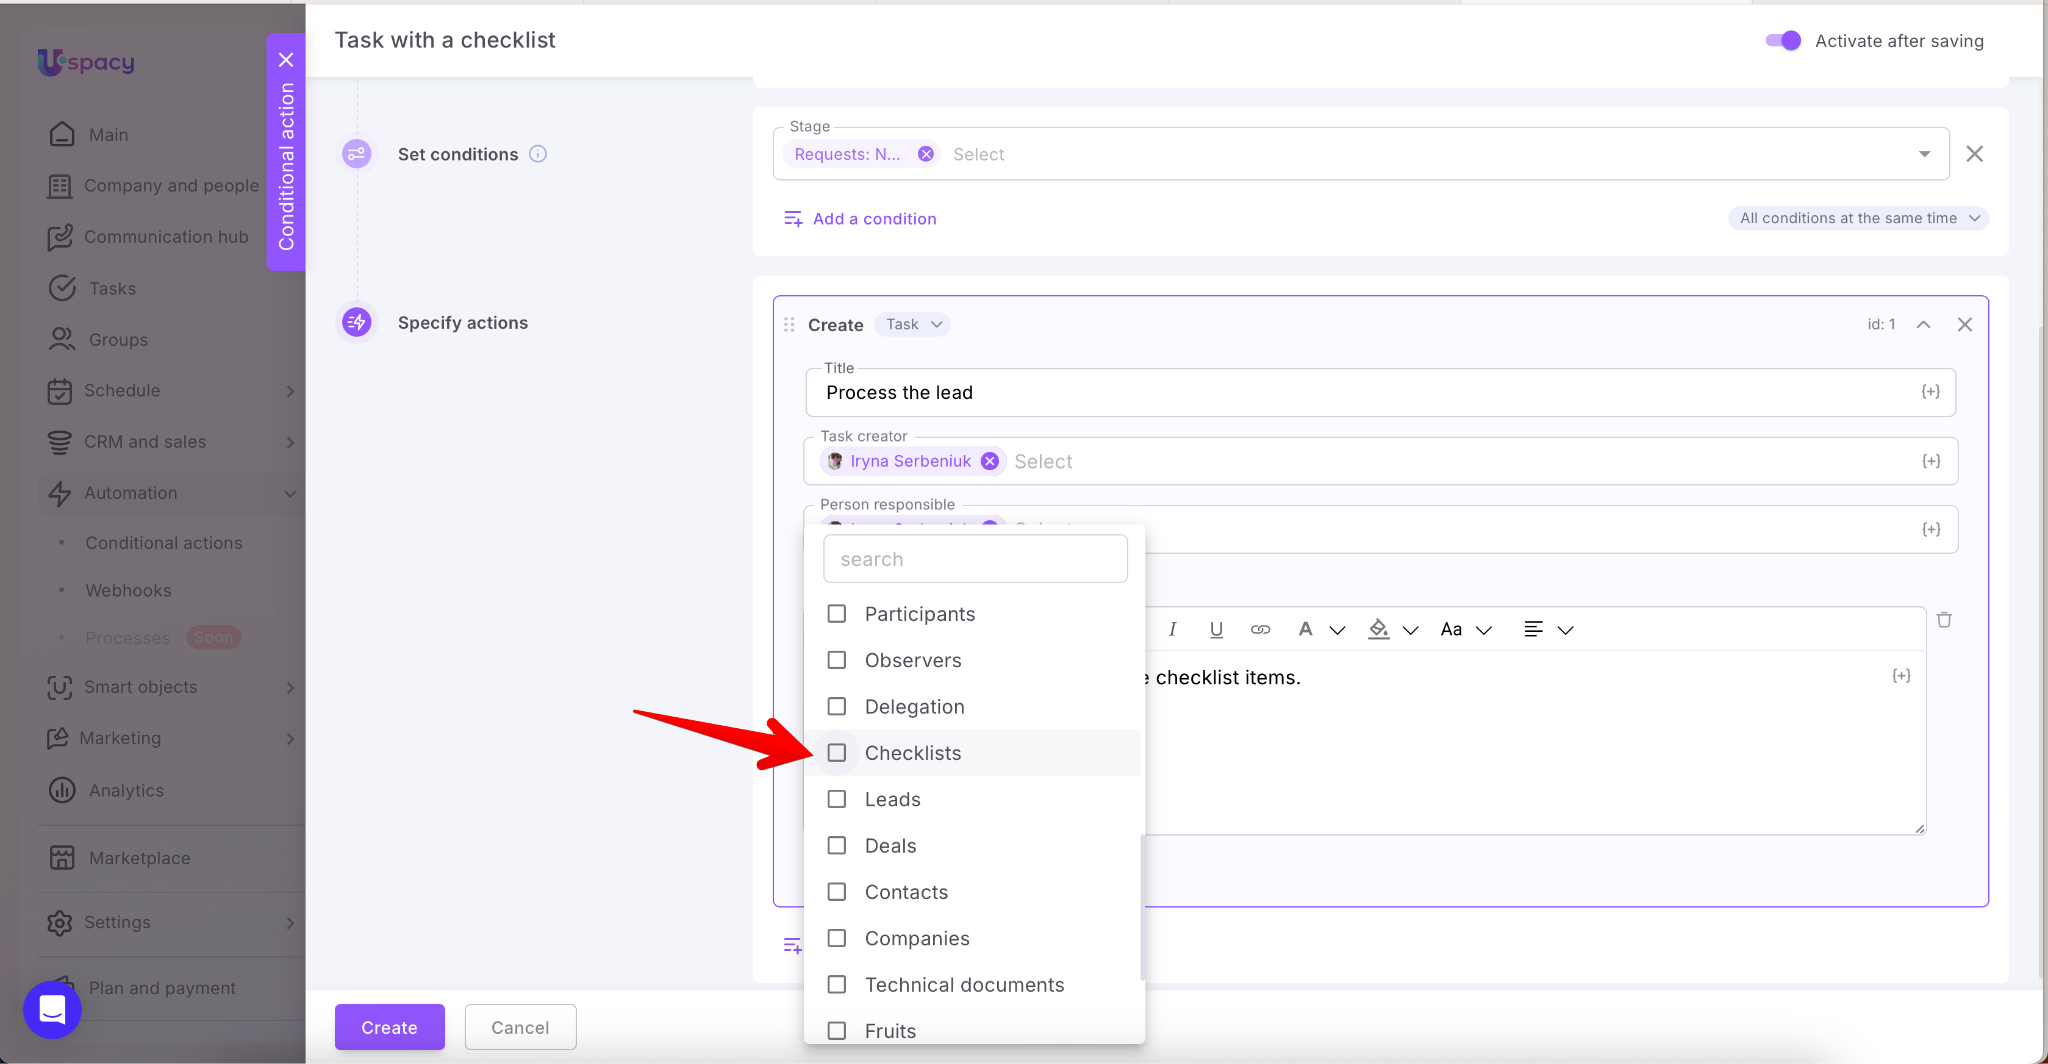
Next, specify the action Create → Task.
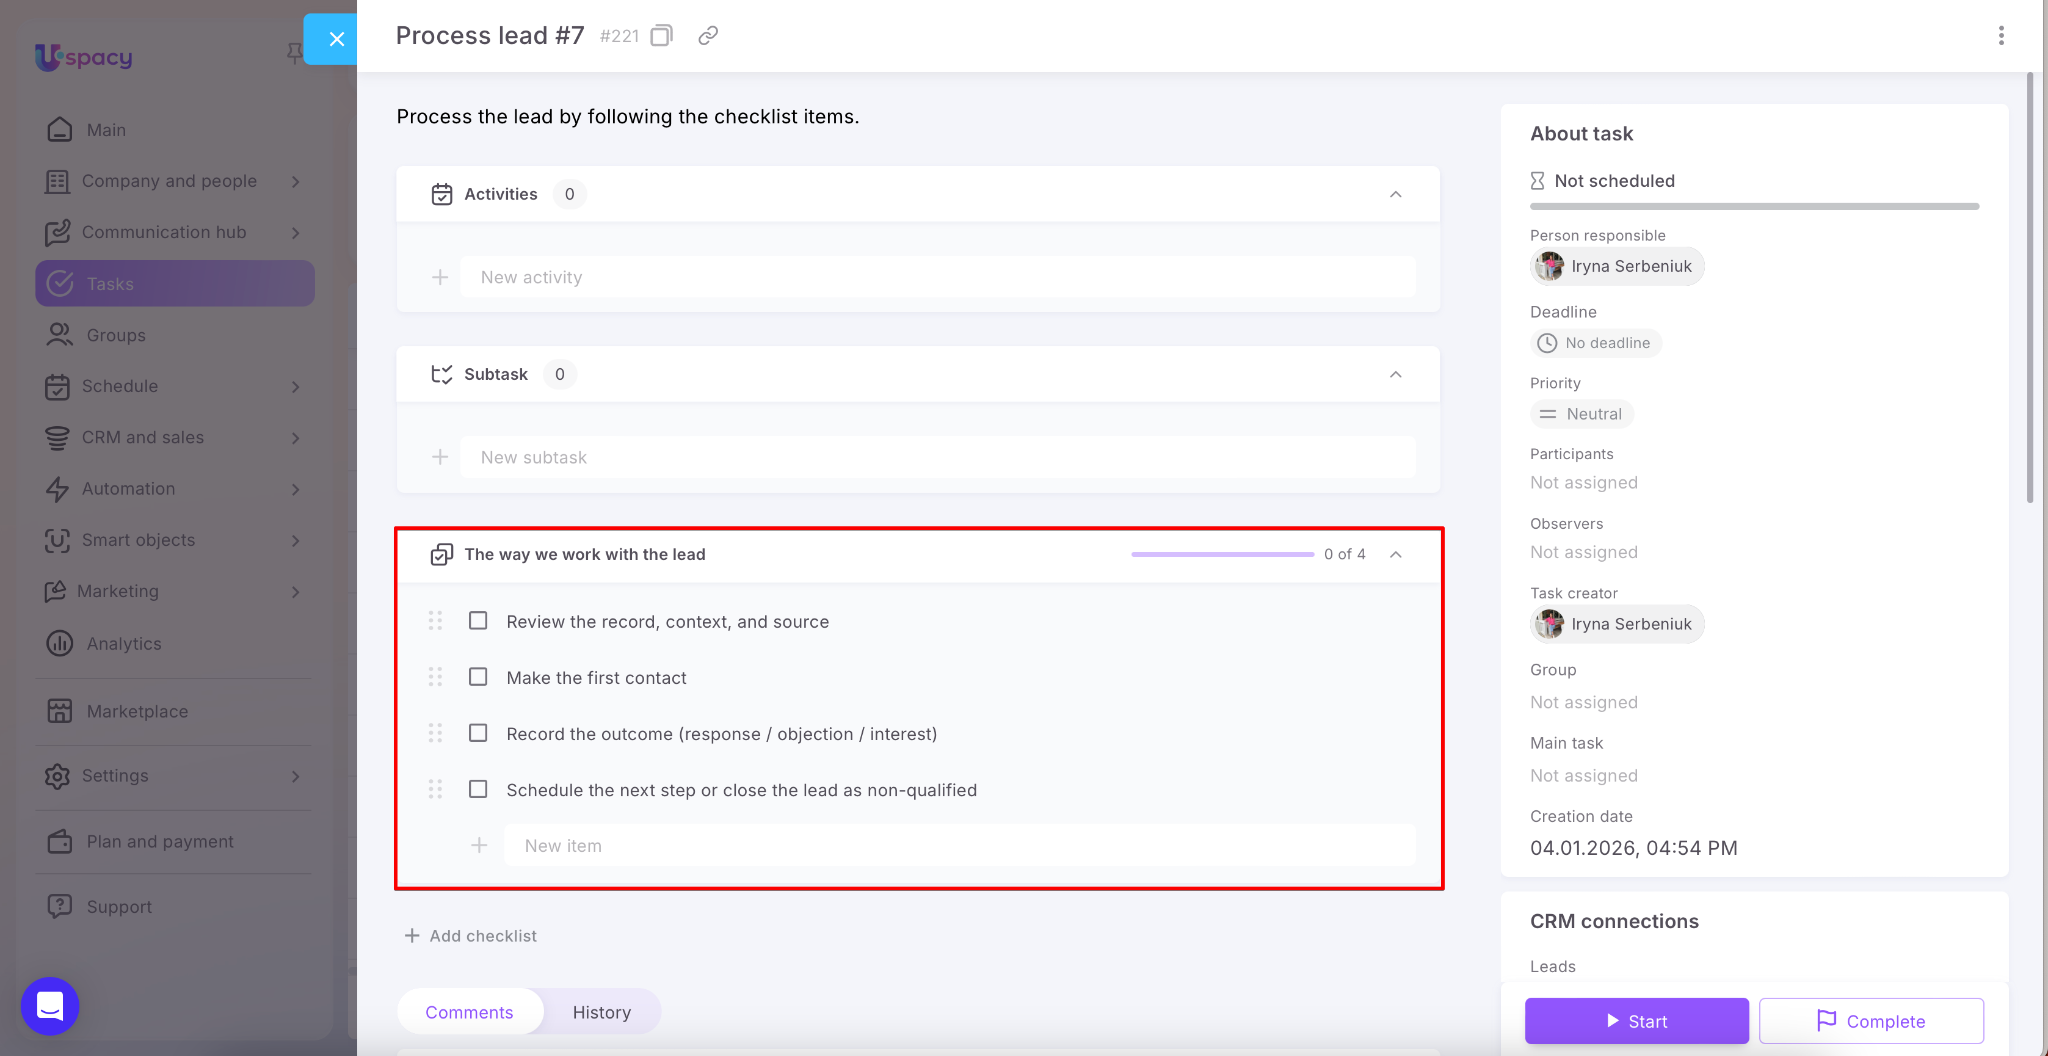
When selecting the fields that should be filled out when the task is created, Checklists will be available in the list.
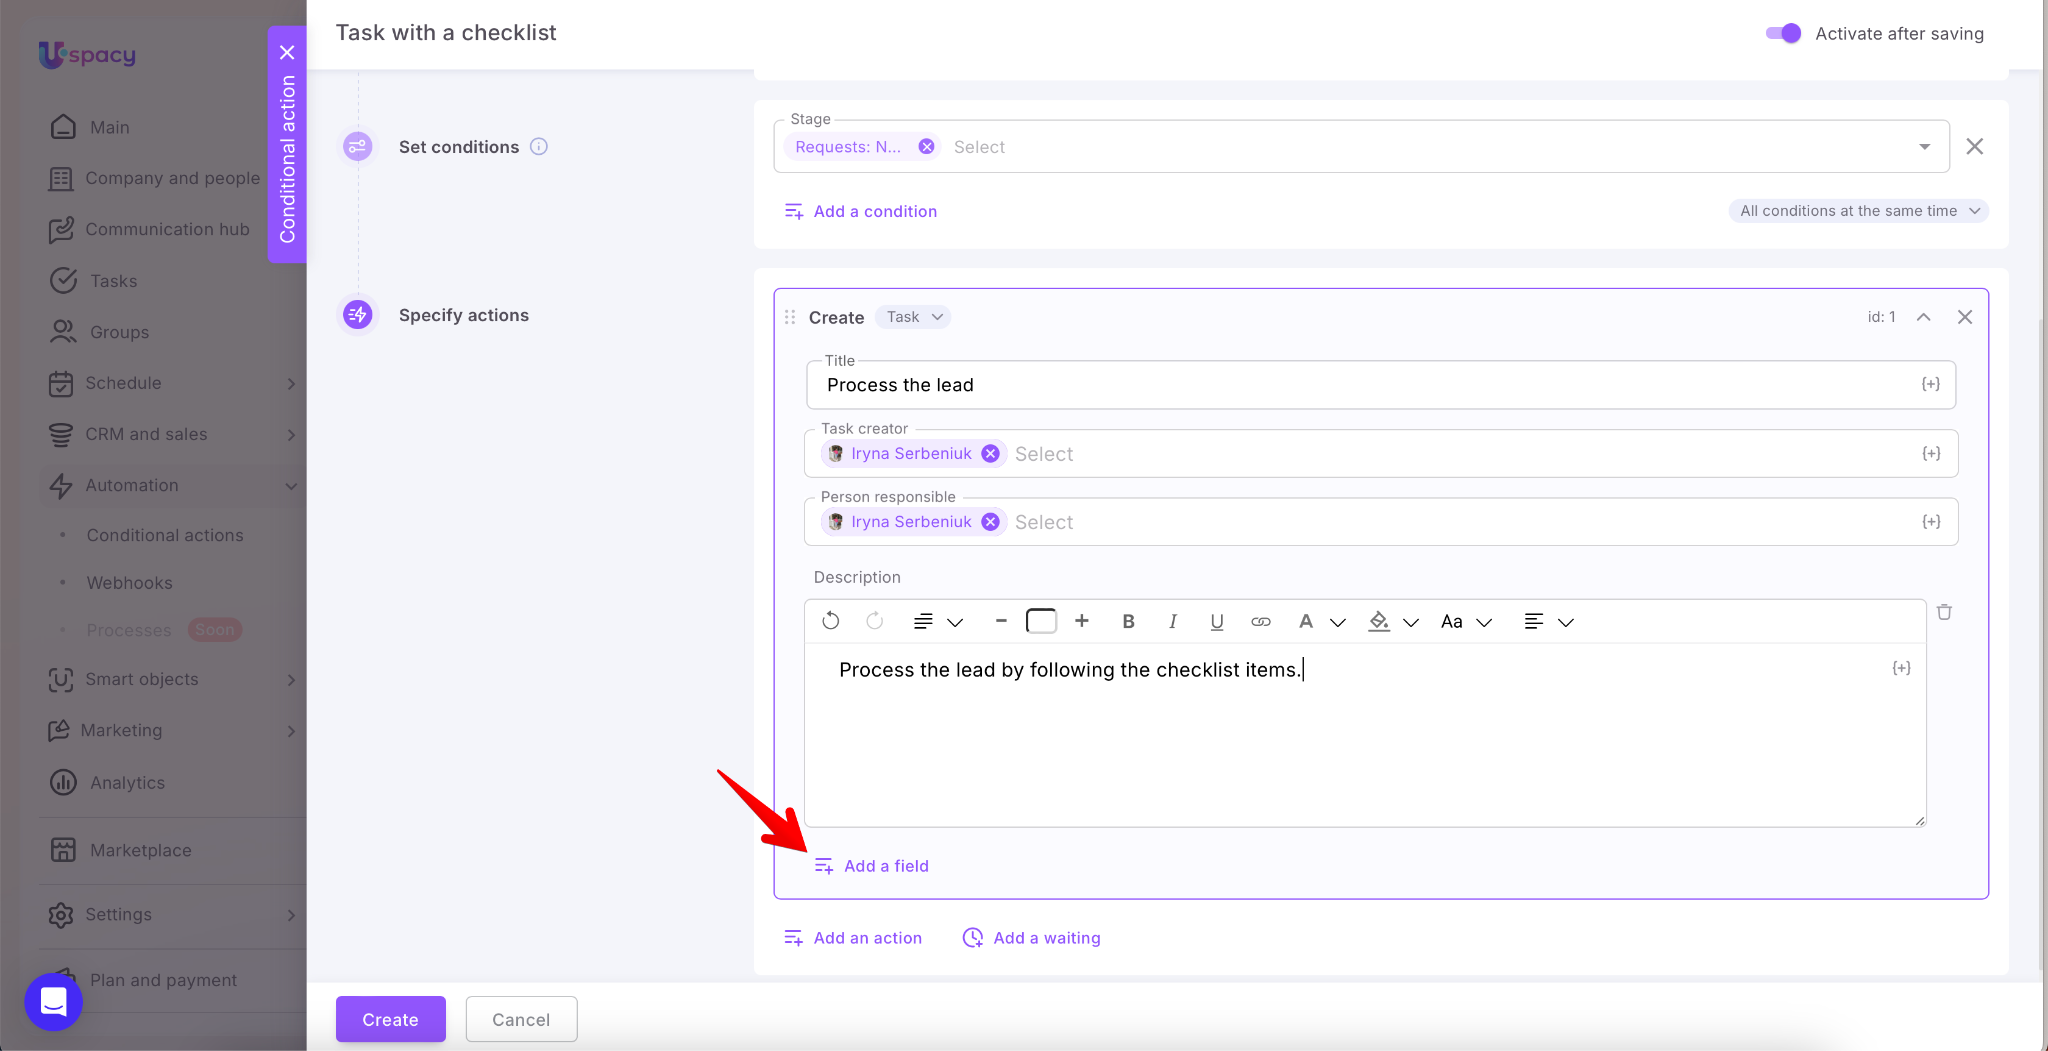
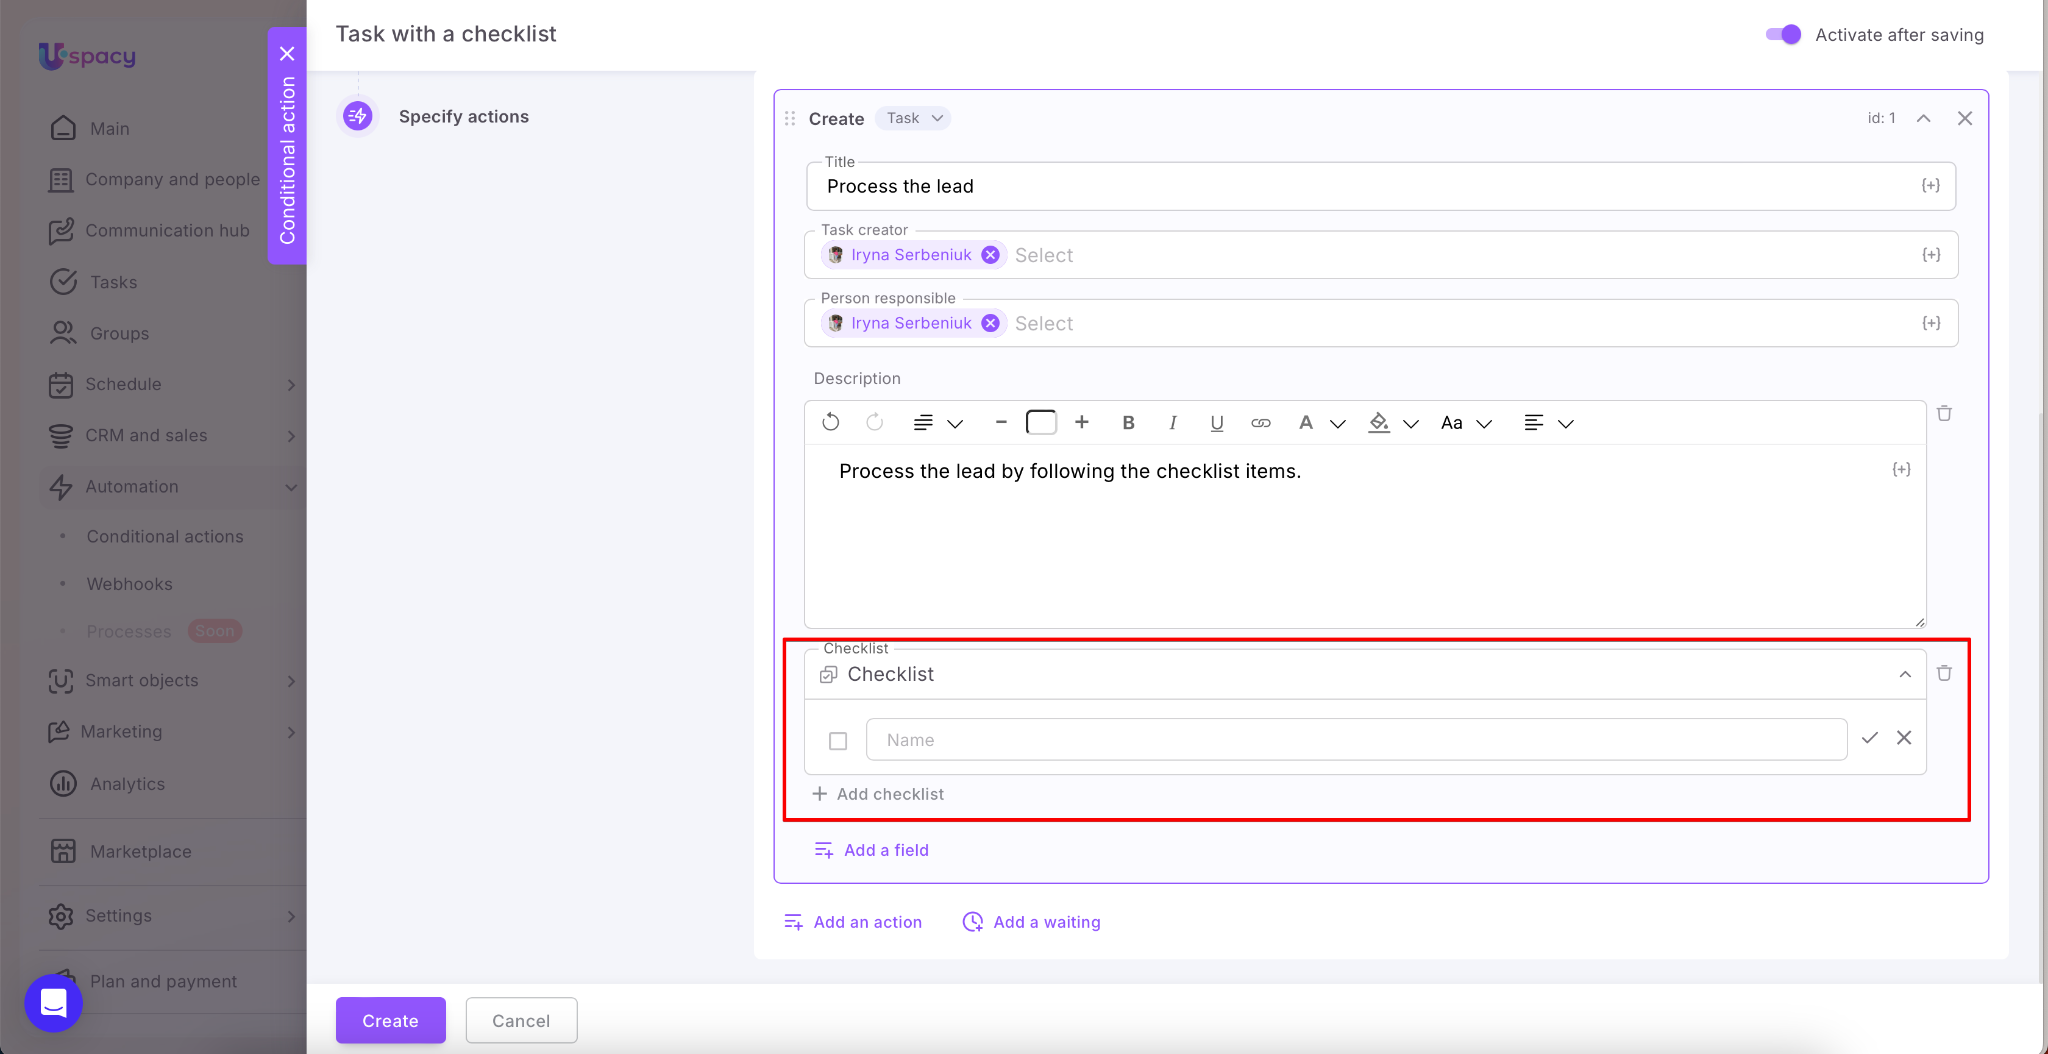
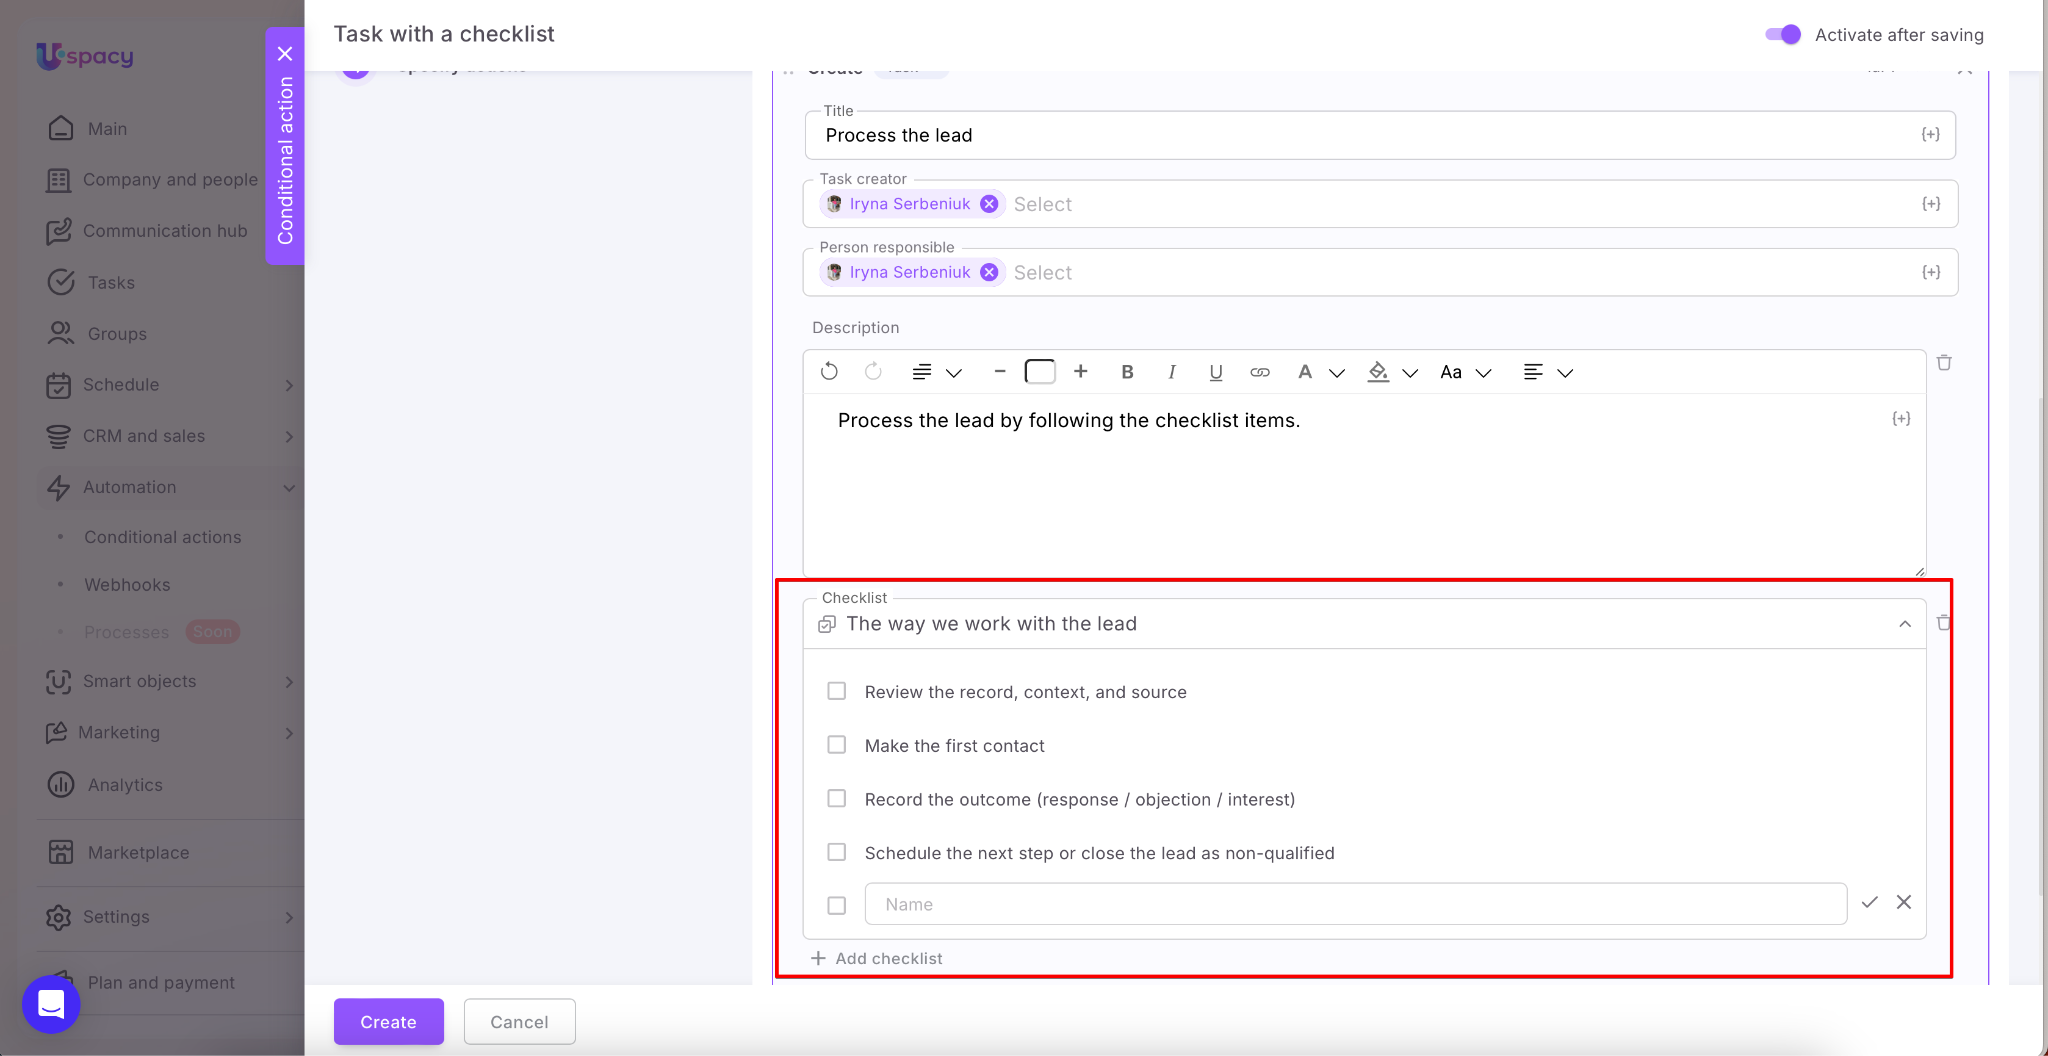
Now, enter a checklist name and add the required checklist items.
If the task requires more than one checklist, use the button that allows you to add another one.
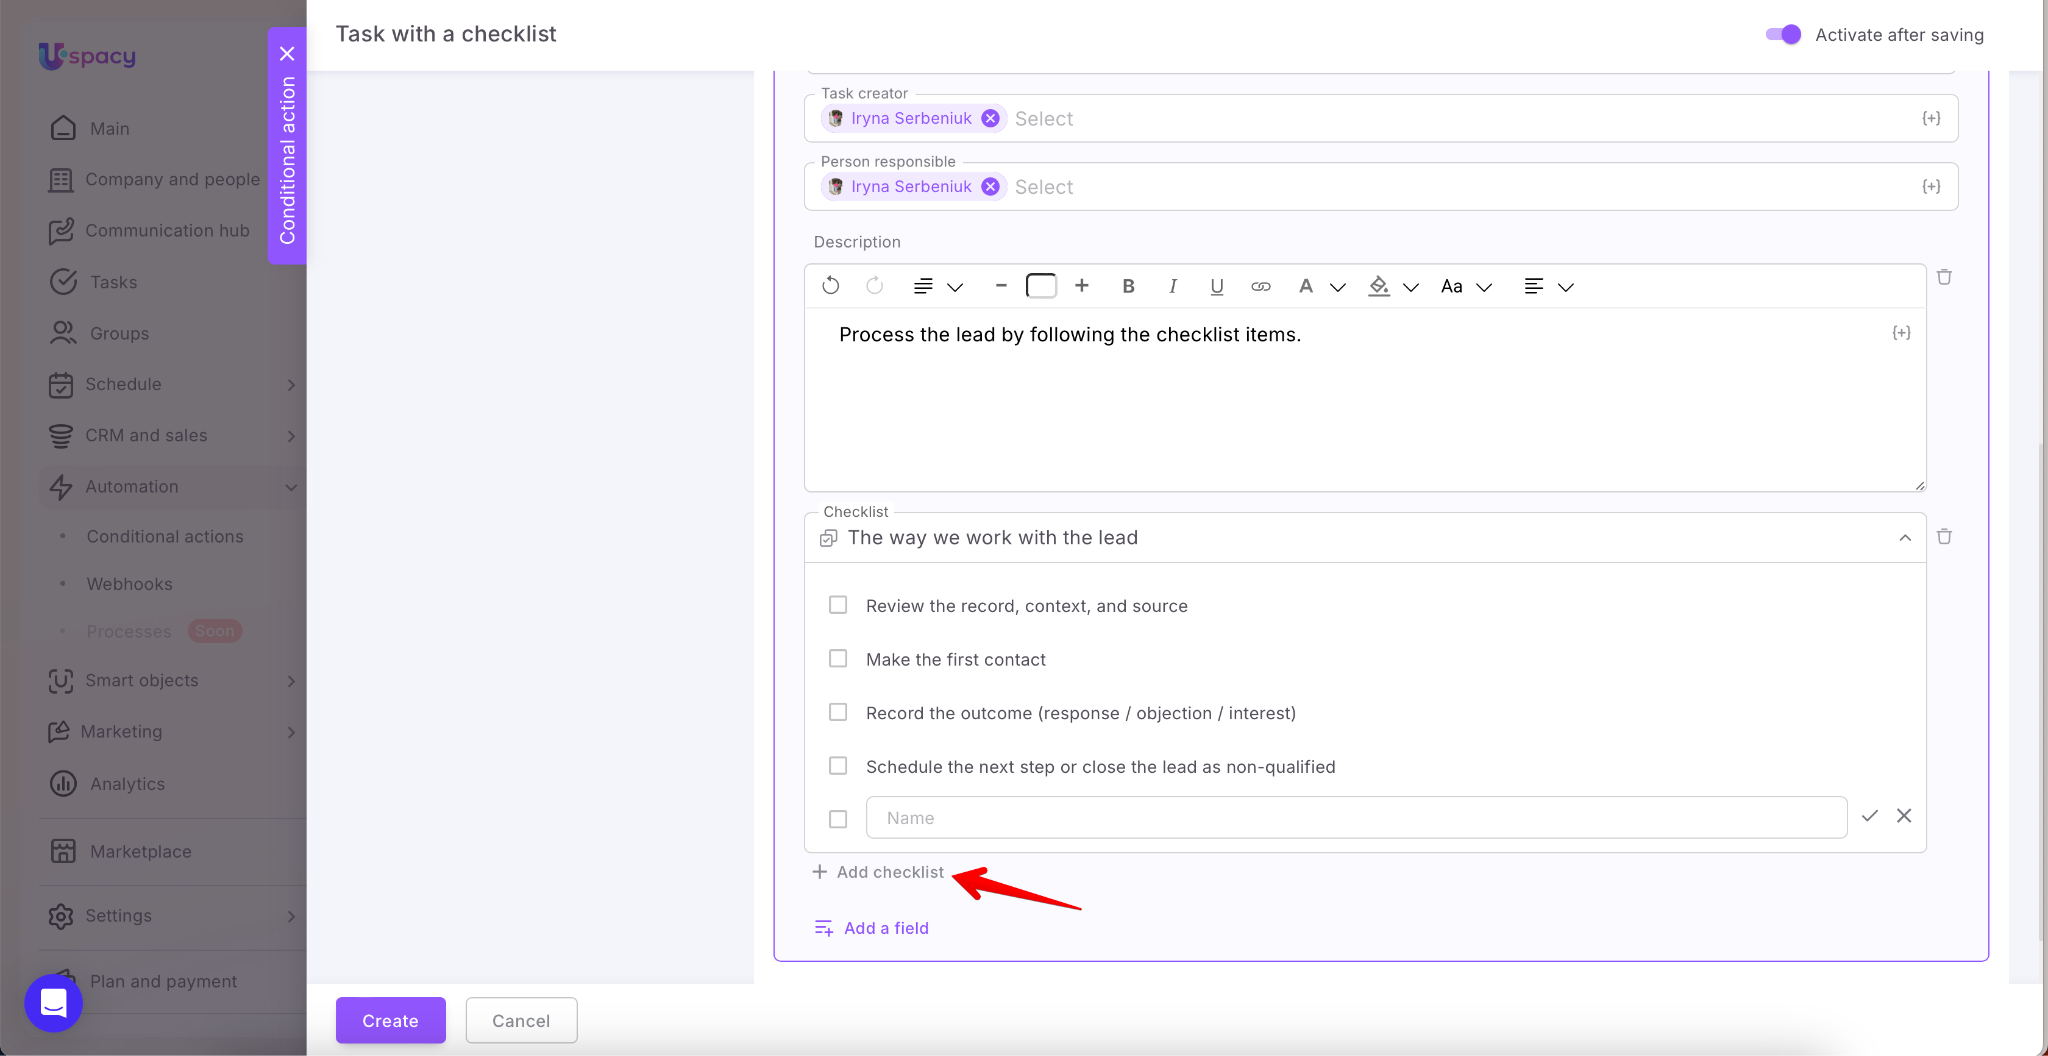
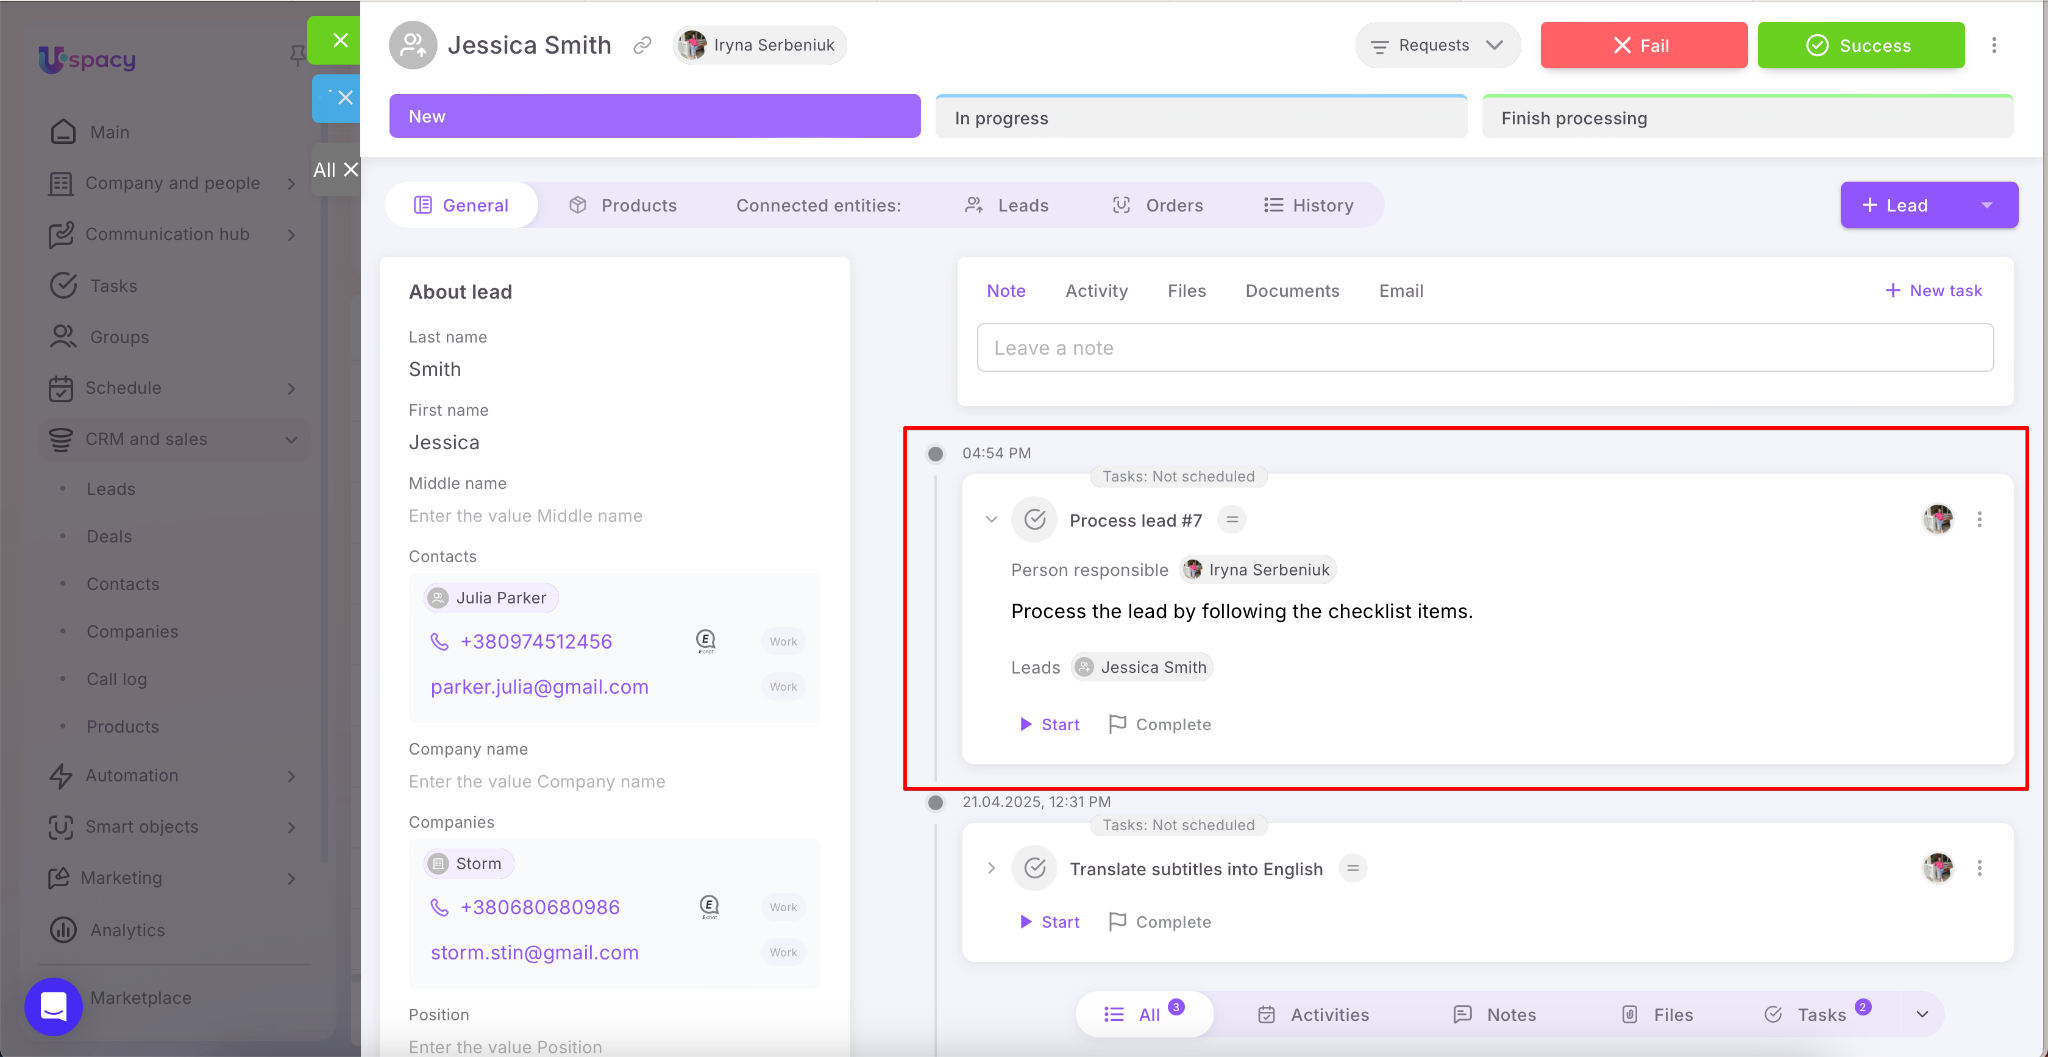
Once the setup is complete and the conditional action starts working, all tasks created through this automation will include the checklists you configured.
Action: Change fields
Select which entity will take place in the event that satisfies the conditions.

How to do it?
First, specify the entity type where you want to change the field values. It can be the same entity that triggers the automation, or others related to it. For example, companies, contacts, deals or activities related to the task.
Next, specify the identifier (ID) so that the conditional action affects the desired element as a result.
💡If you store the entity element ID in some other field, for example, a custom field, then select it from the list.
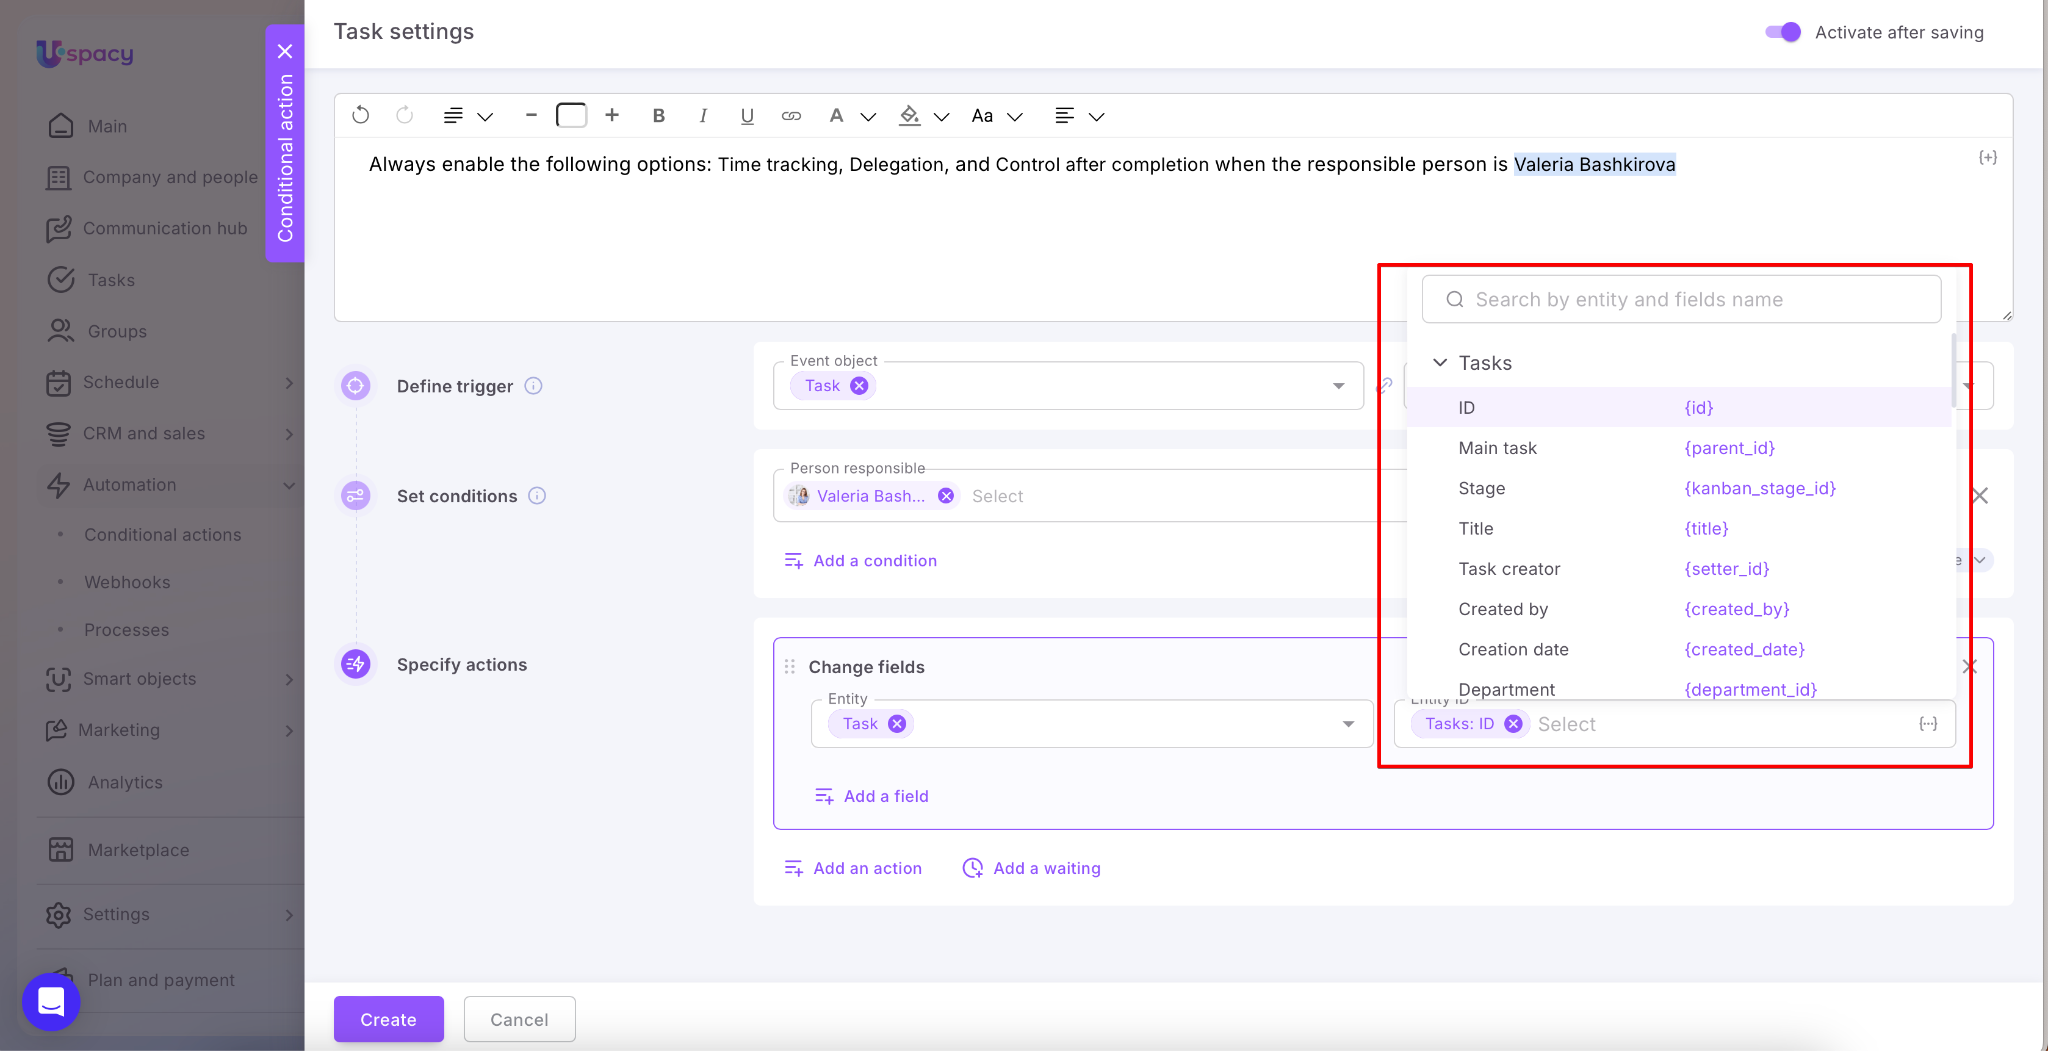
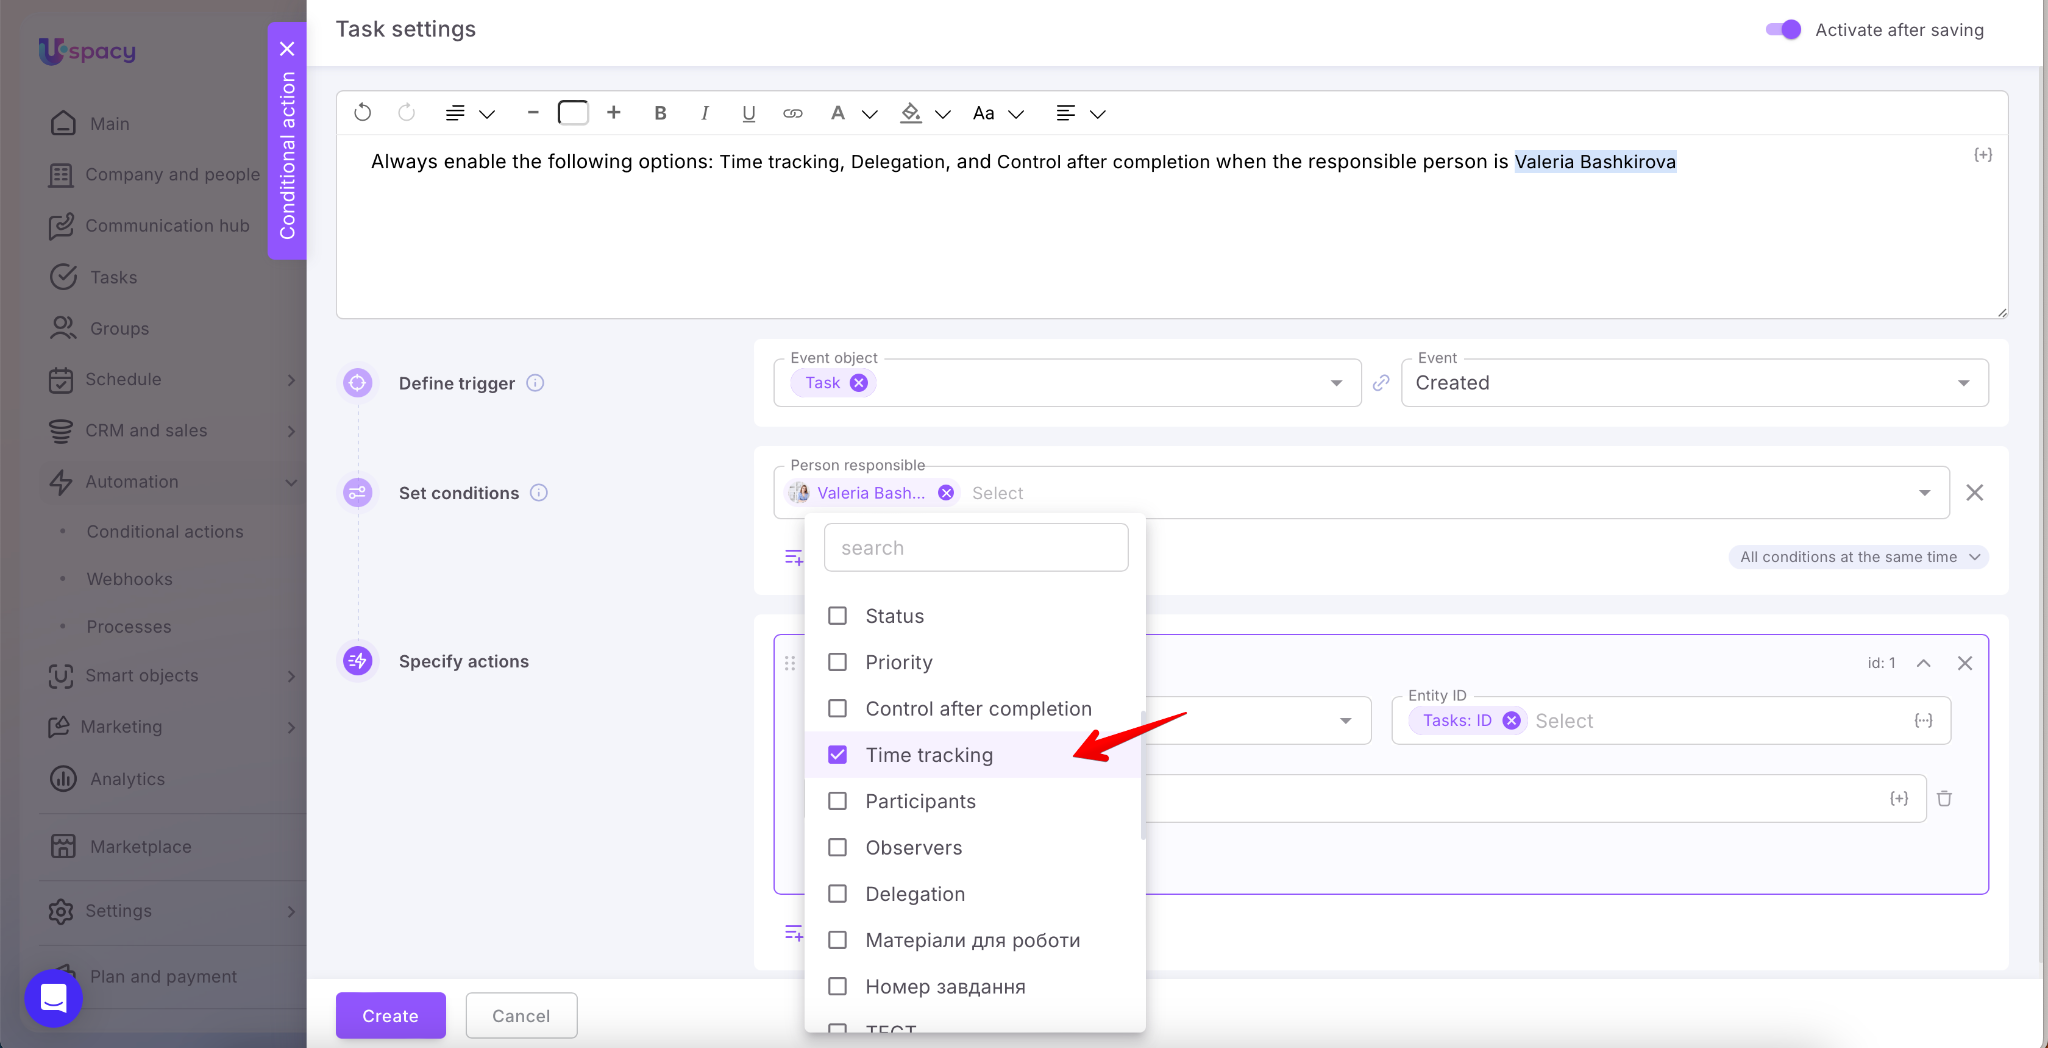
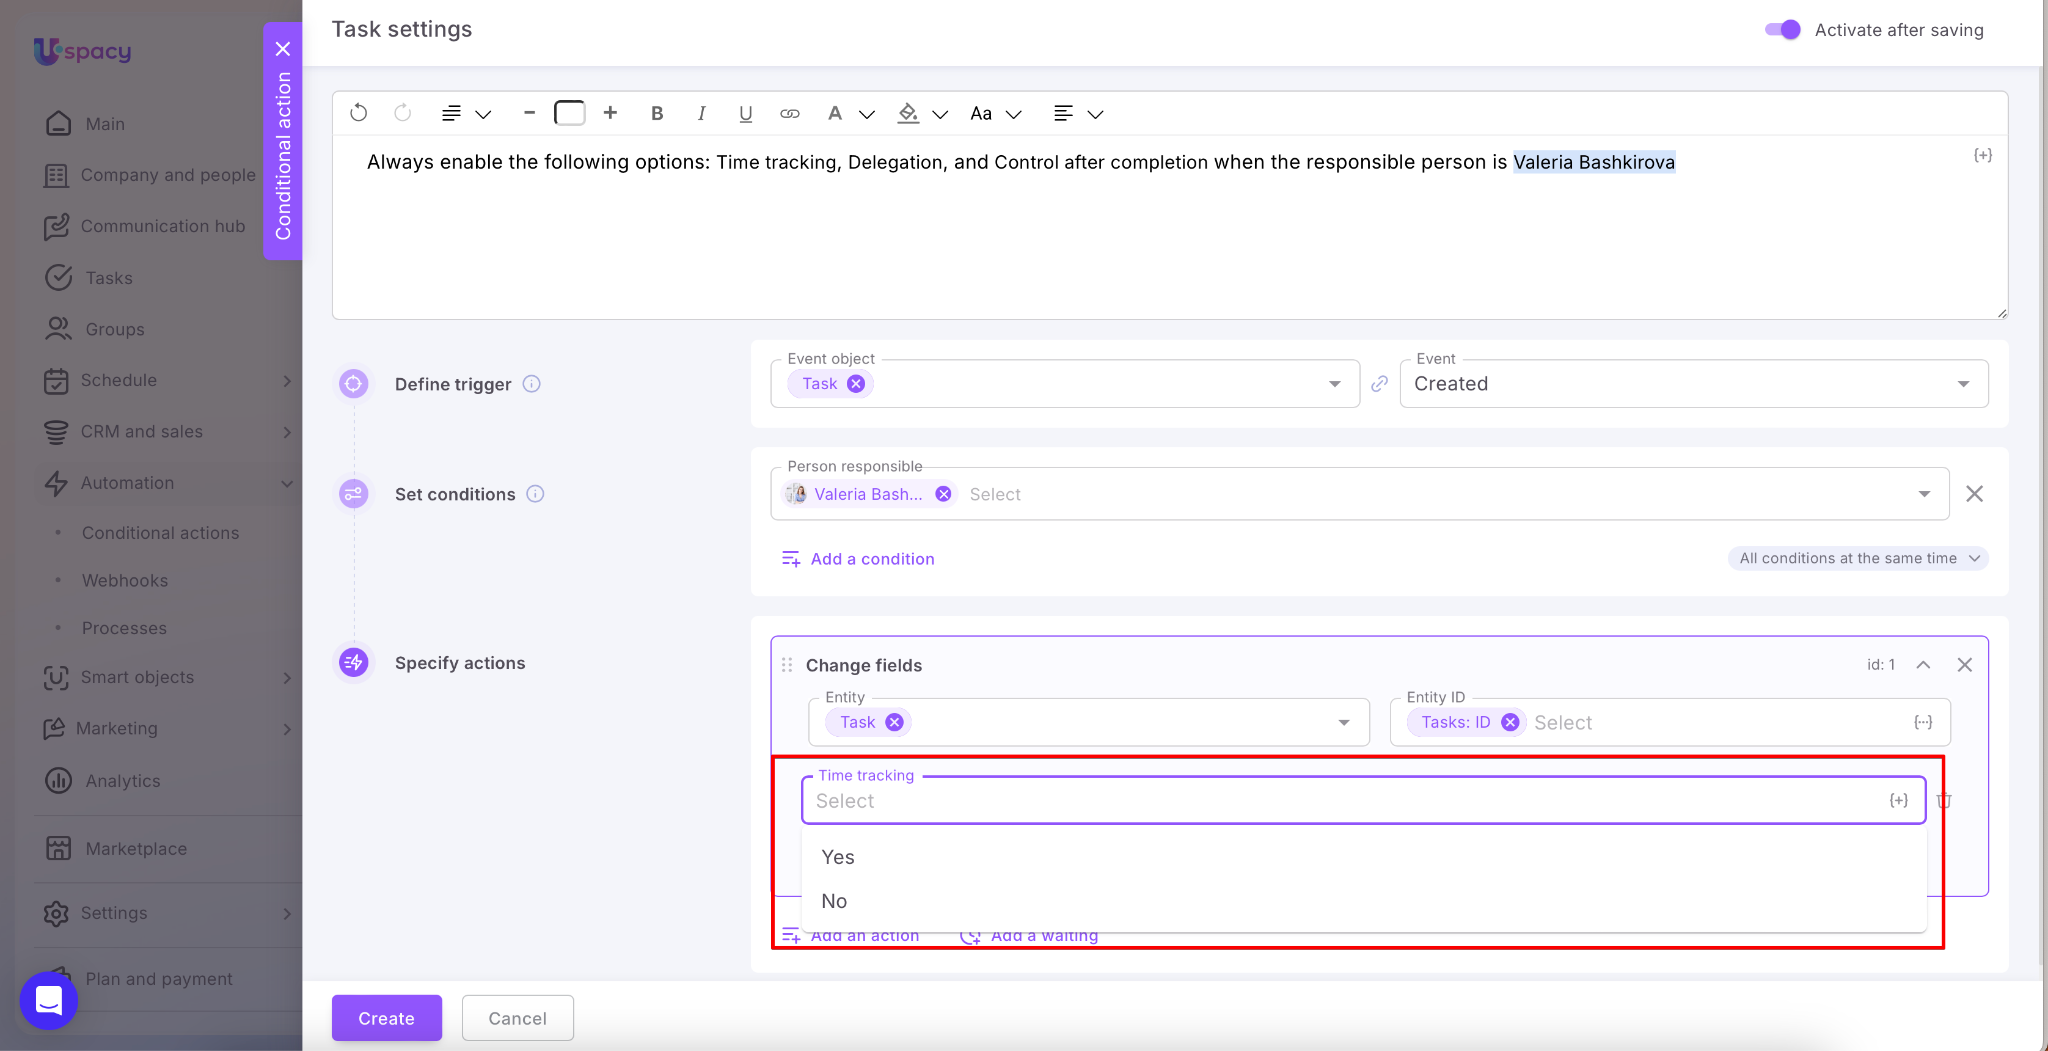
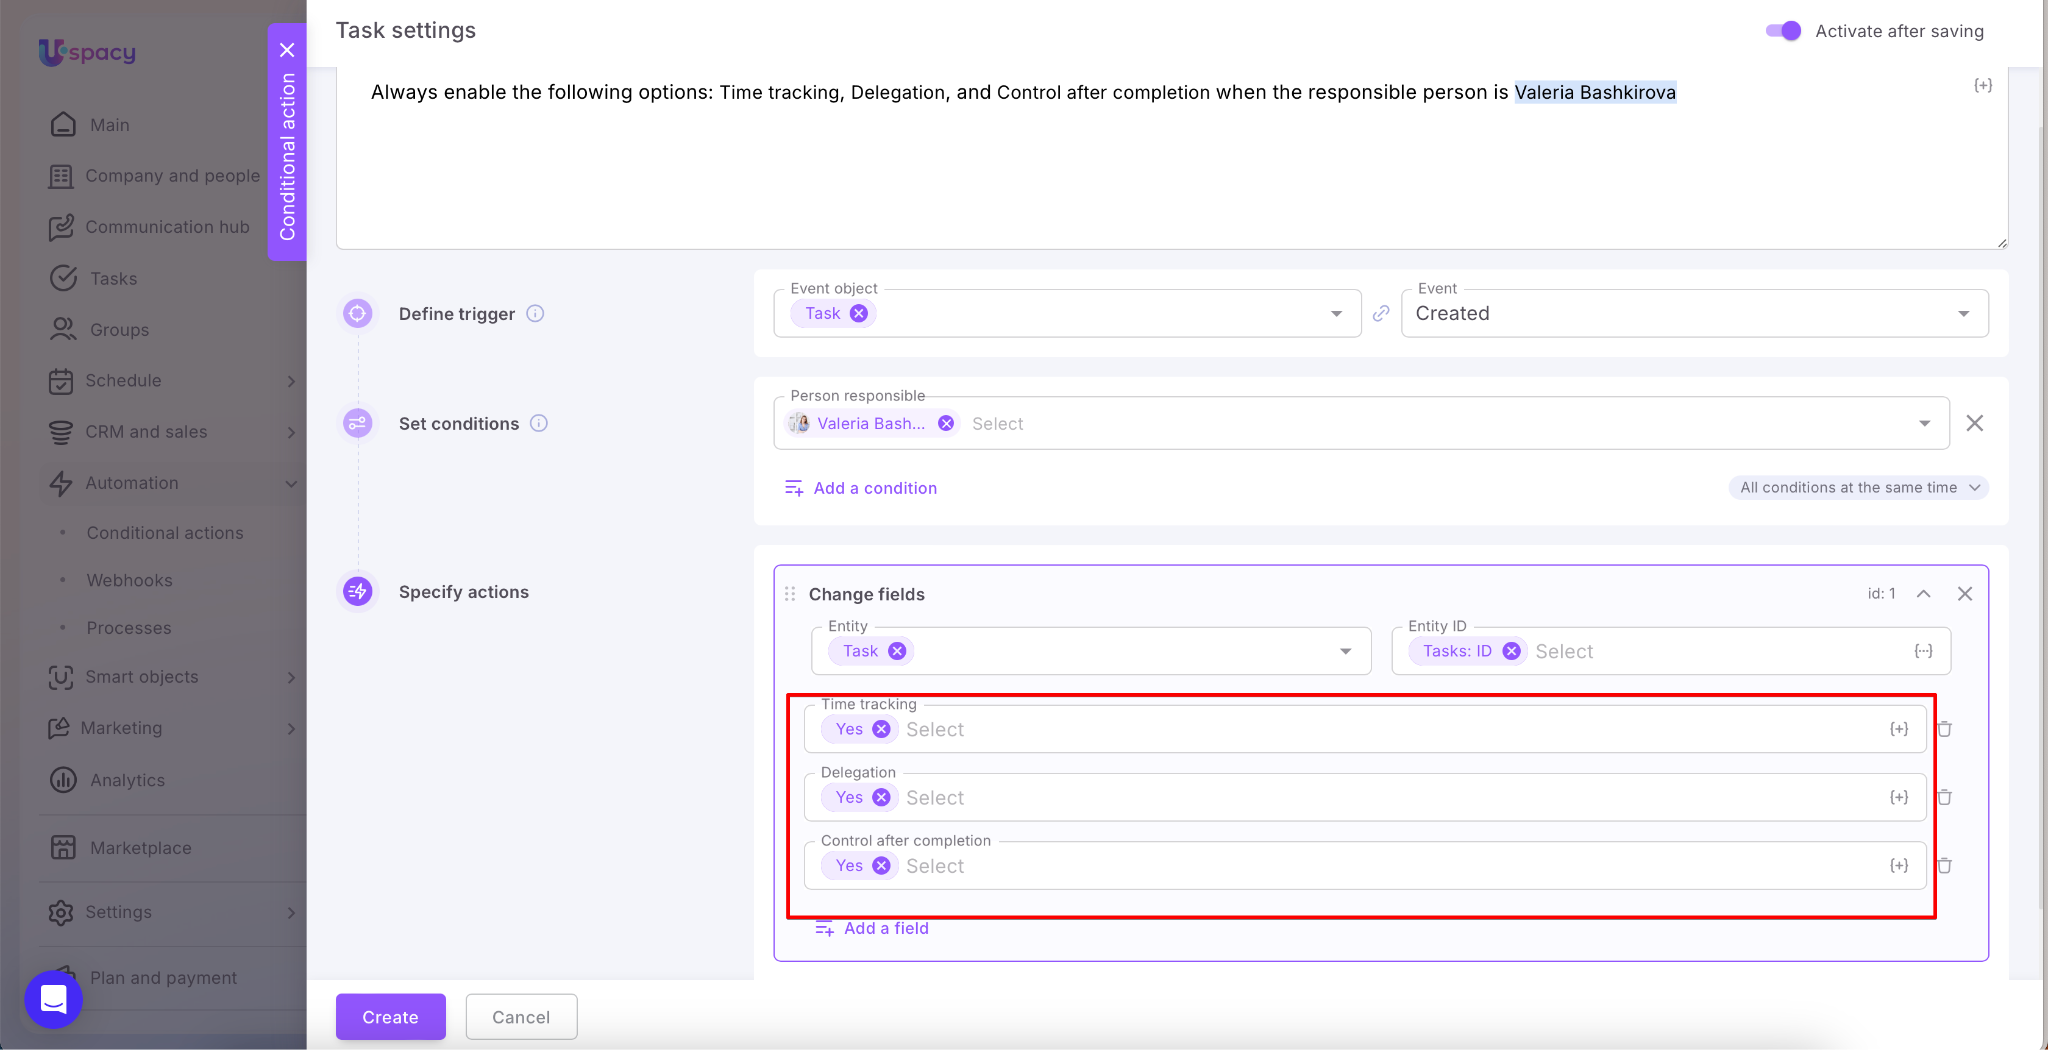
By clicking on the Add a field button, select which field needs to be changed.
☝🏻 In the list, you can find any fields for the required entities, except for the Stage field and its related fields (Group – for tasks; Failure reason – for leads, deals, and smart objects). To change the stage, use the separate Change stage action.
And the value for this field.
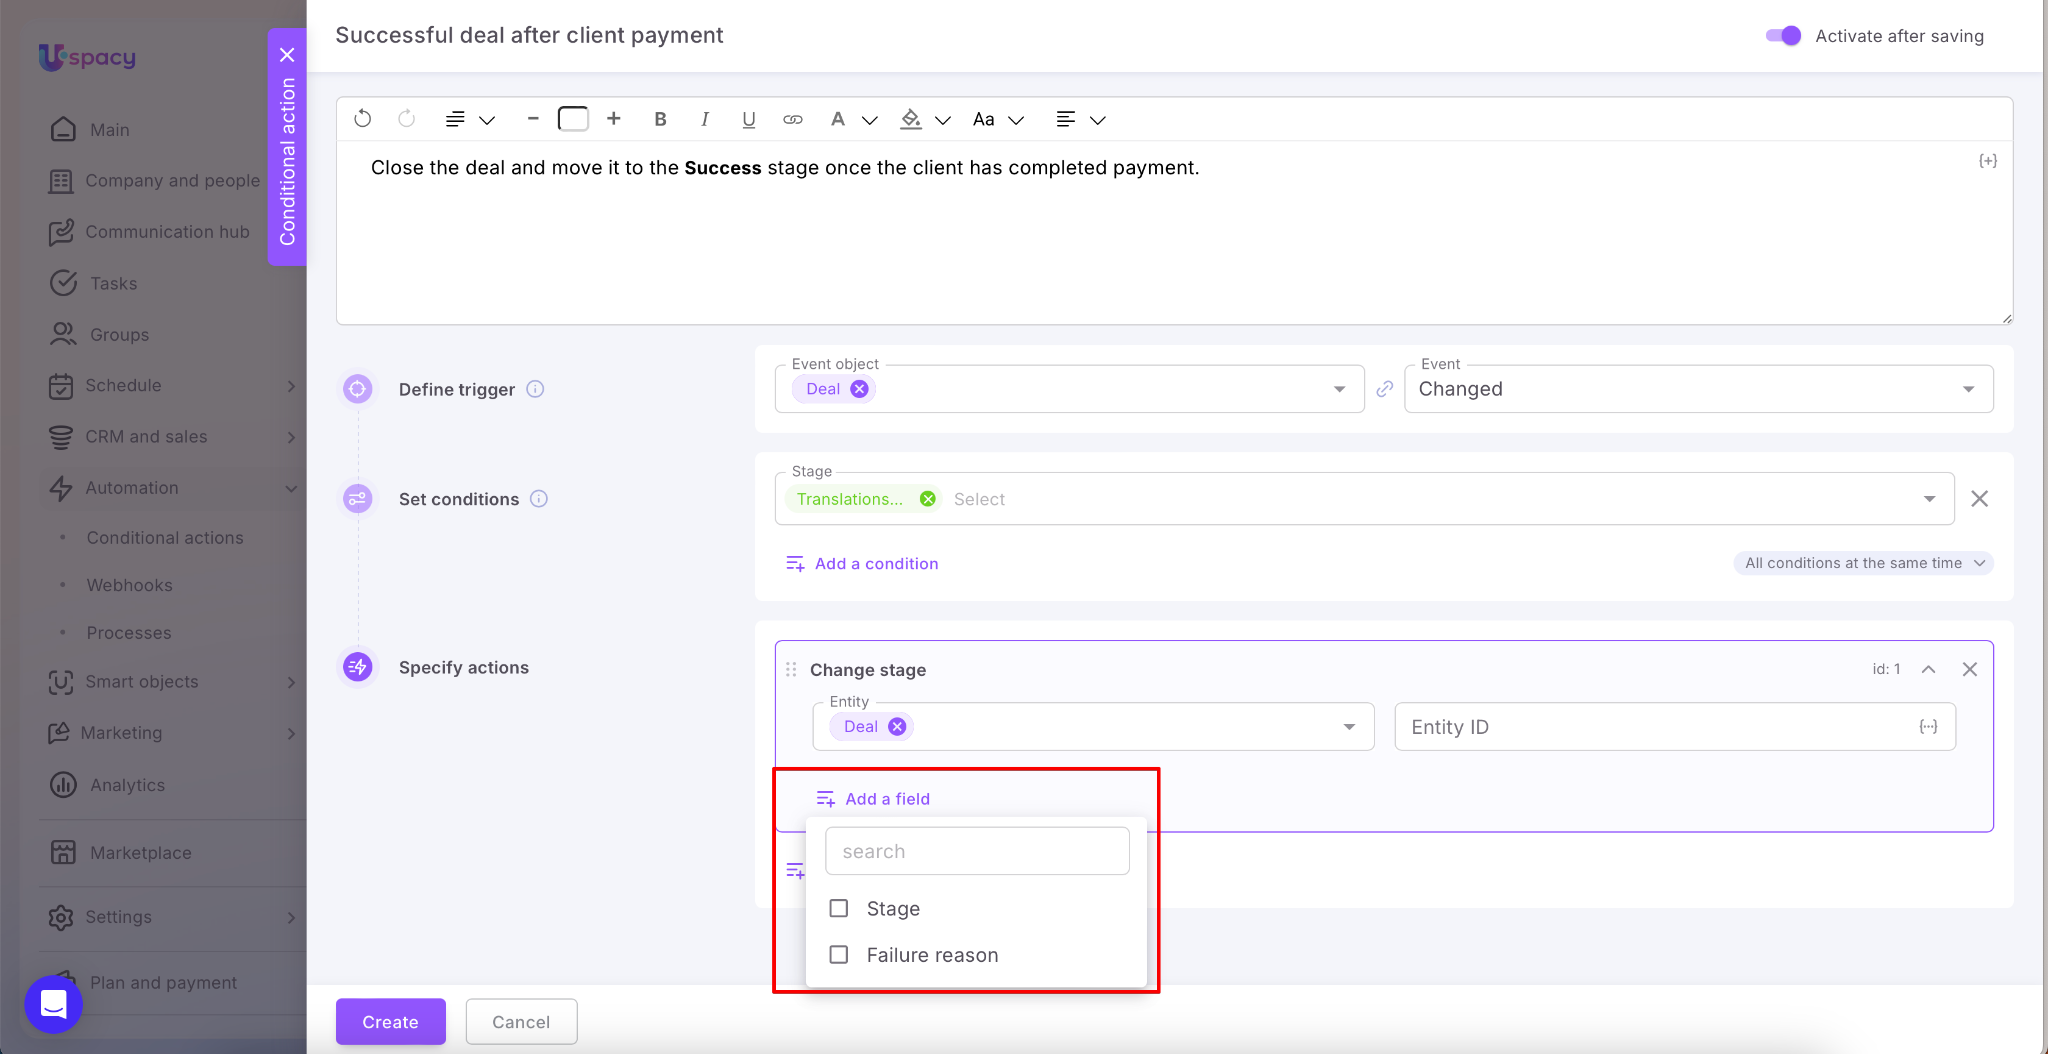
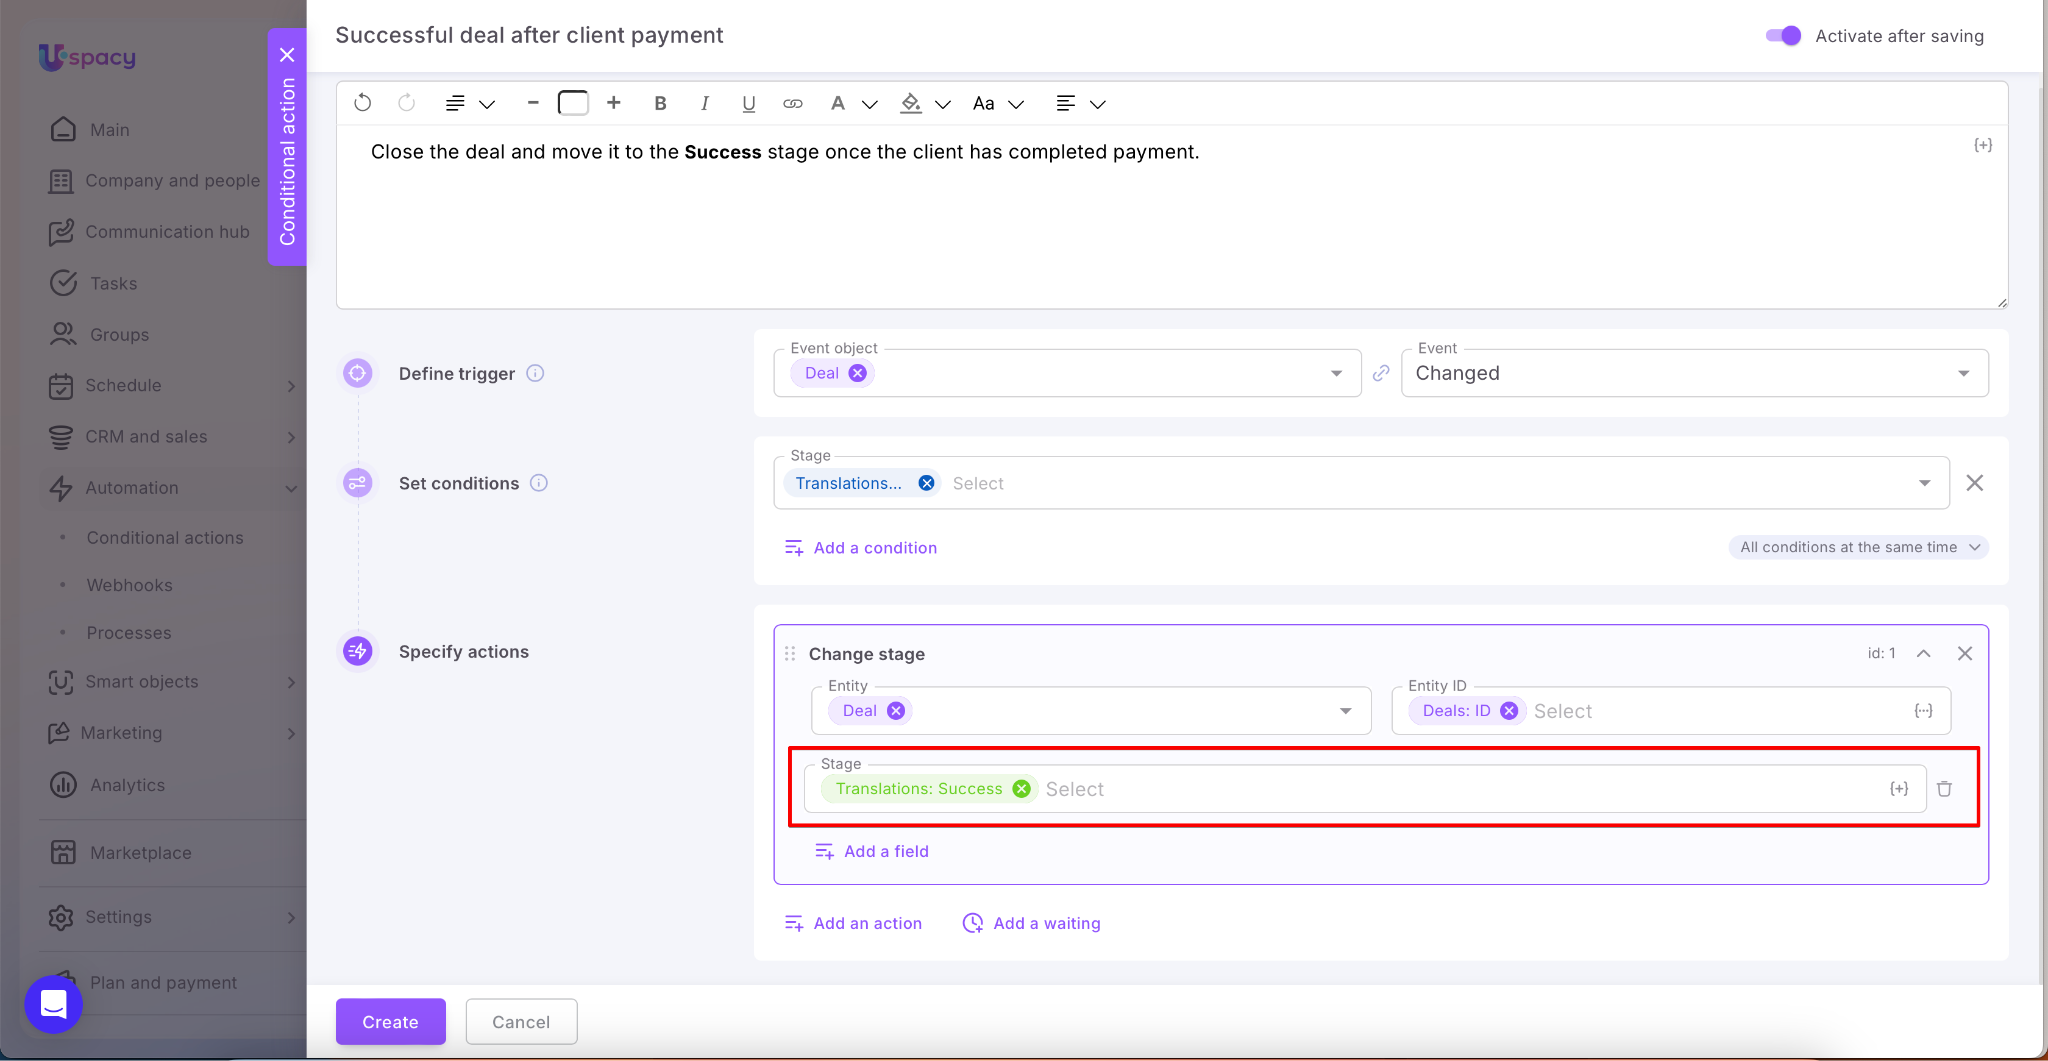
Action: Change stage
The Change stage action works on the same principle as Change fields—the system automatically updates the values in the element’s record. It is separated into its own action because the stage is a key funnel field (determining a lead’s or deal’s position in the funnel) and is the field most frequently used in automations.
Action: Delete
Specify the elements of which entity should be automatically removed from the Space in the event that satisfies the conditions.

How to do it?
First, specify the type of entity the elements of which you want to delete.

Next, specify the identifier (ID) so that the conditional action affects the desired element as a result.
💡If you store the entity element ID in some other field, for example, a custom field, then select it from the list.

Action: Execute a Webhook
That is, to automatically "inform" third-party services of a certain event at Uspacy.

How to do it?
This requires specifying an endpoint outside of Uspacy - the URL to which you want to send the data. There, the developer inserts special code that will process incoming requests (messages).
💡This address must be valid and publicly available.

💡Please note that the same trigger and the same conditions can initiate several automatic actions at once.

Just click Add an action, select an action type, and set it up.

Action: Waiting
This comes in handy when you want to set up two or more actions and need a specific time interval between them. That’s where the waiting action comes in.

The waiting is counted as a separate action.
So, 1 conditional action + 1 waiting + 1 conditional action = 3 actions in total.

🔍 You can read more about this feature in a the following article.
Action: Retrieve
Use this action when you need to retrieve field values from a specific element of a selected entity (for example, a Deal, Lead, Contact, Company, Task, or a Smart Object element).
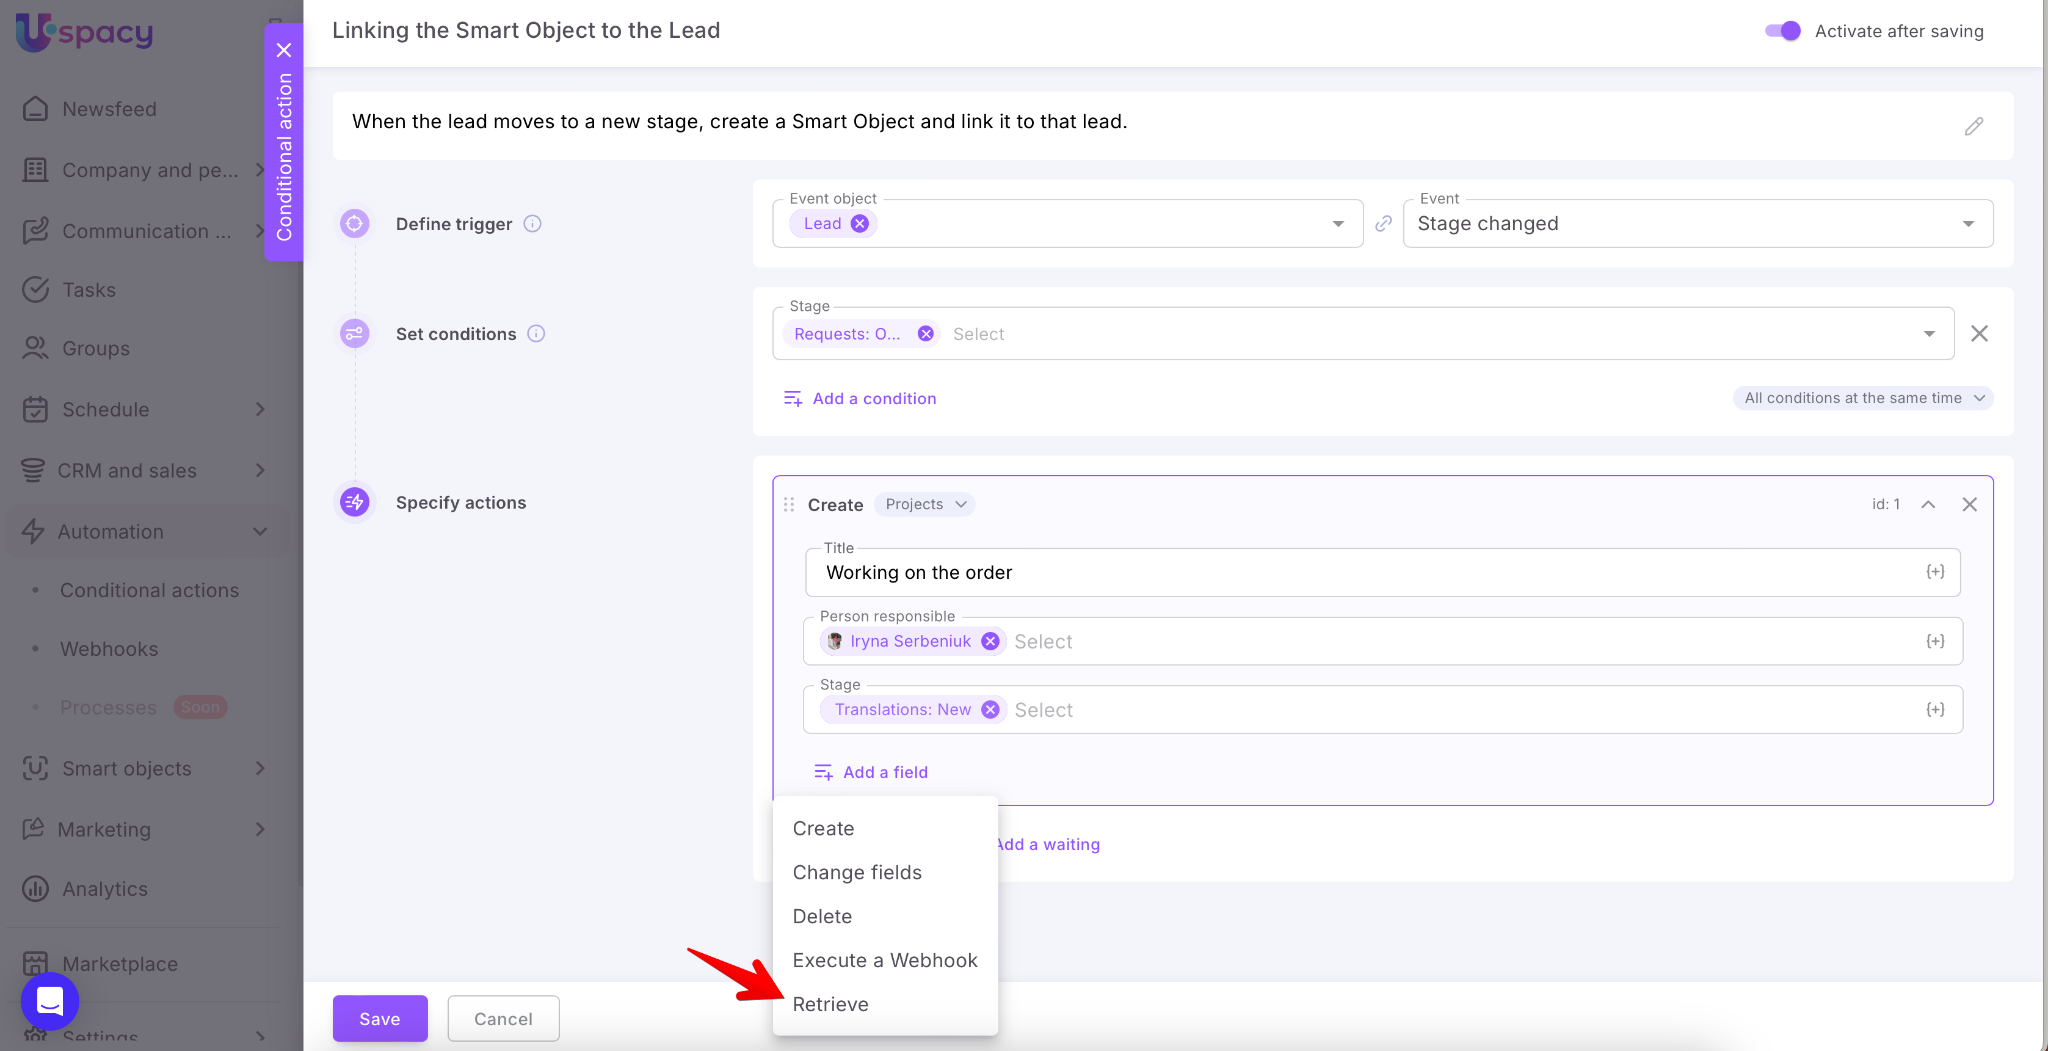
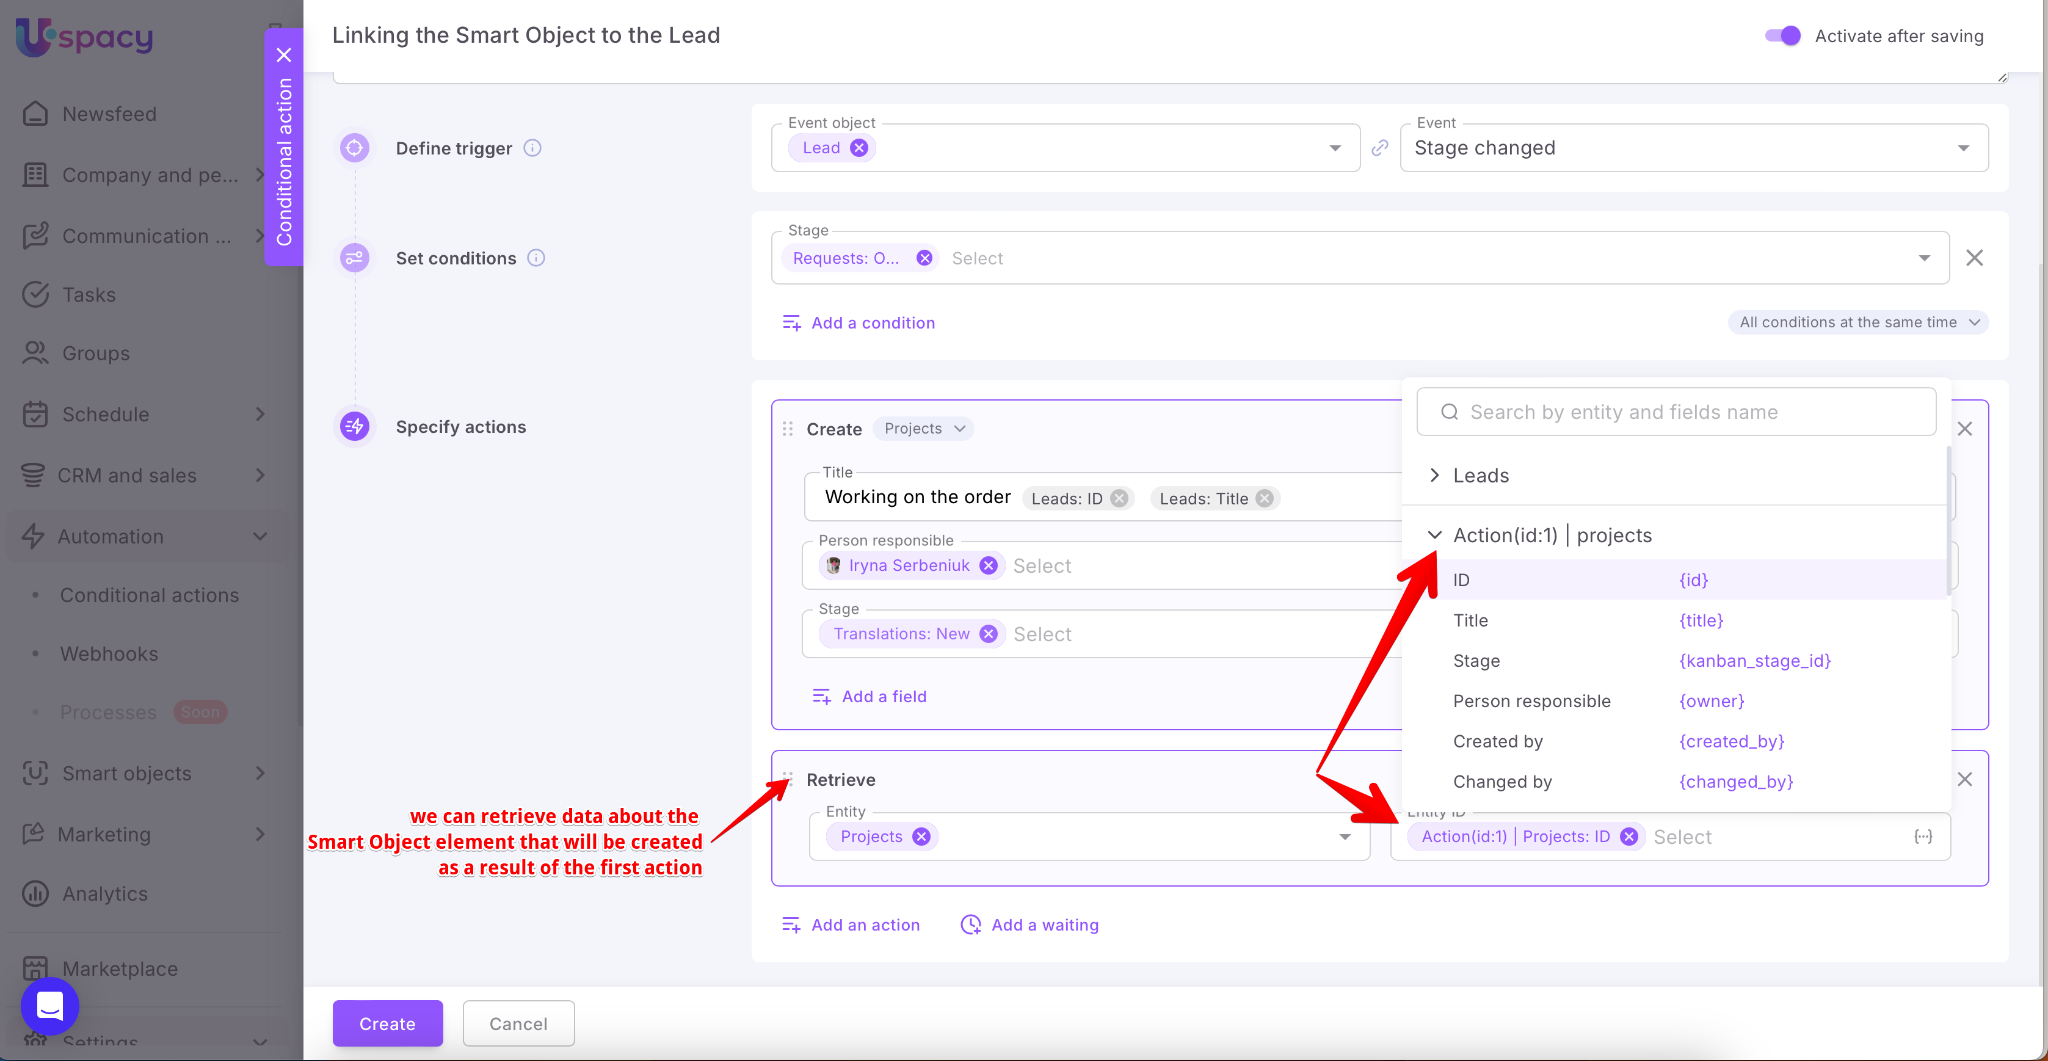
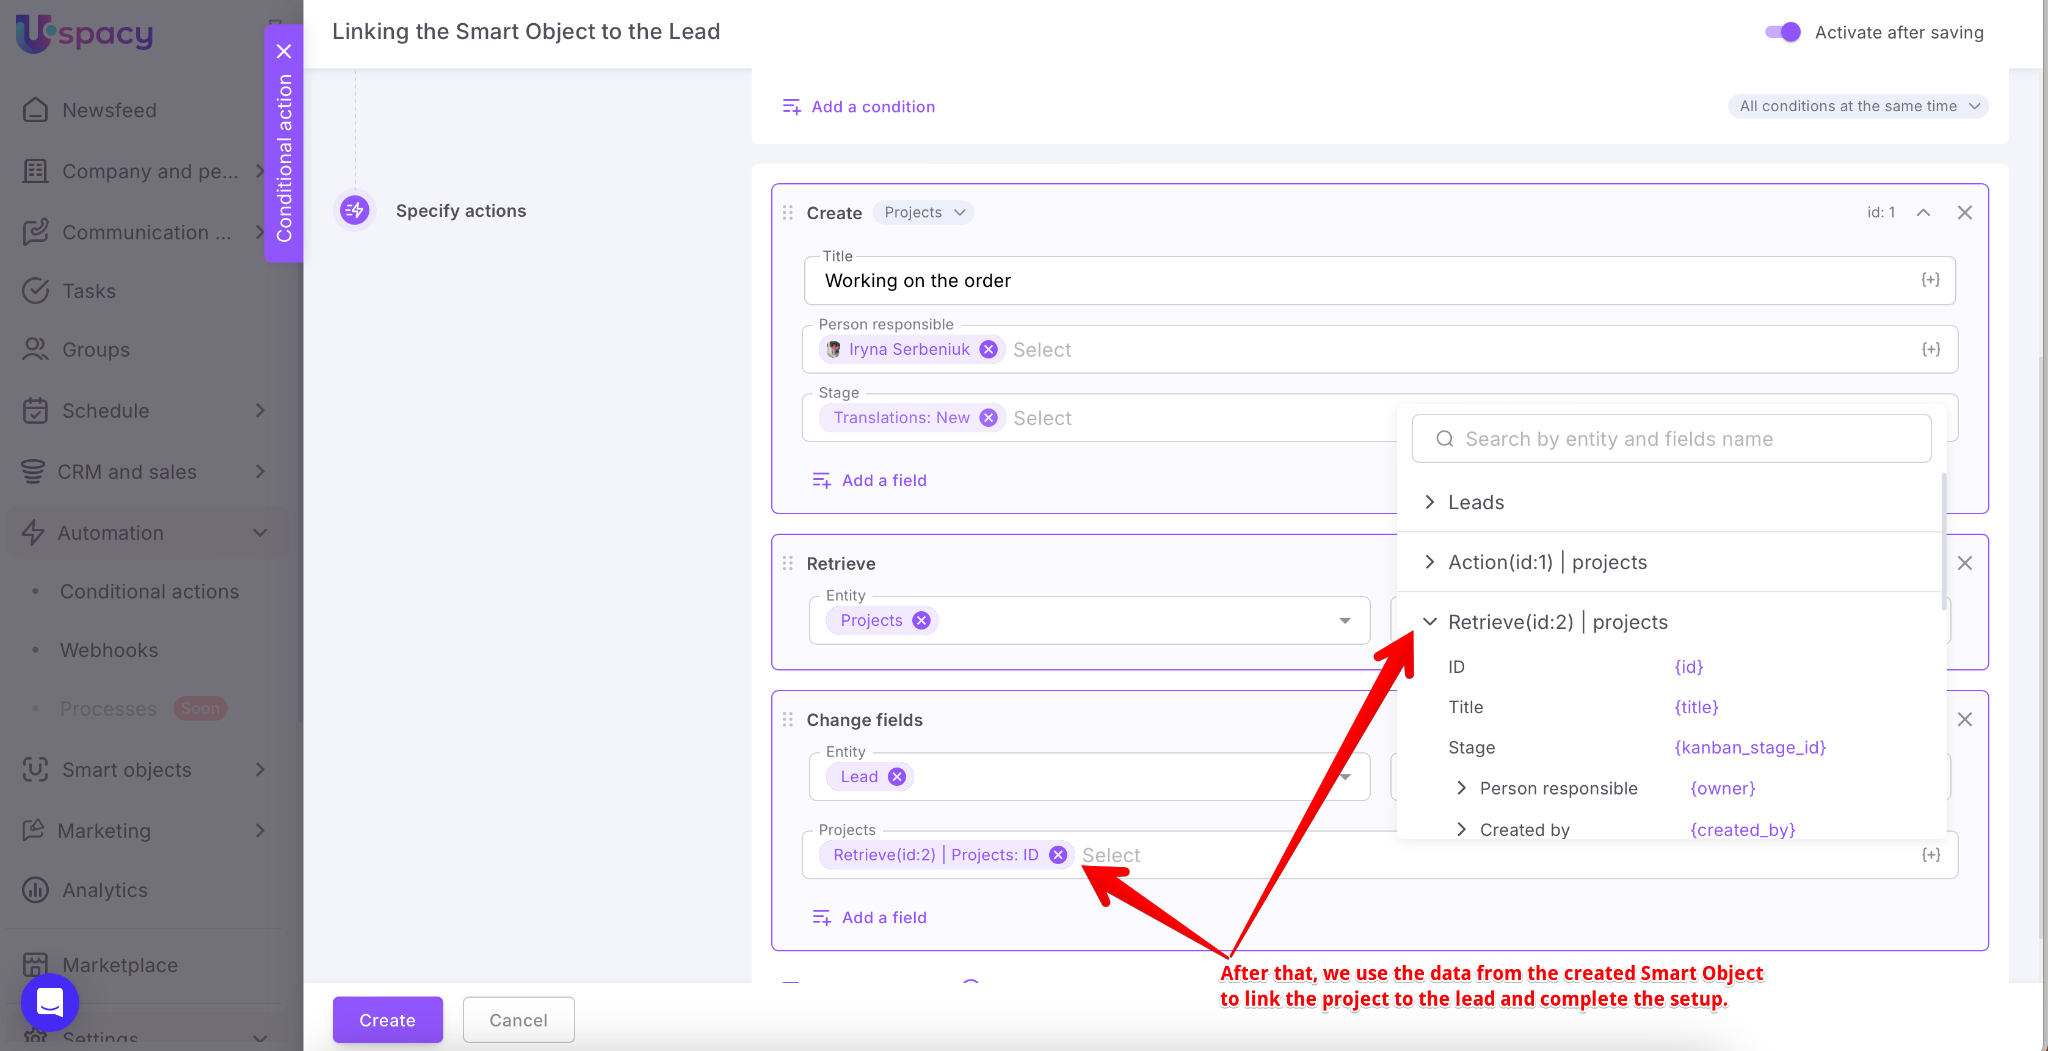
You can then make these values available as variables for the next steps in your conditional action.
🔍 We’ve explained this feature in more detail in this article.
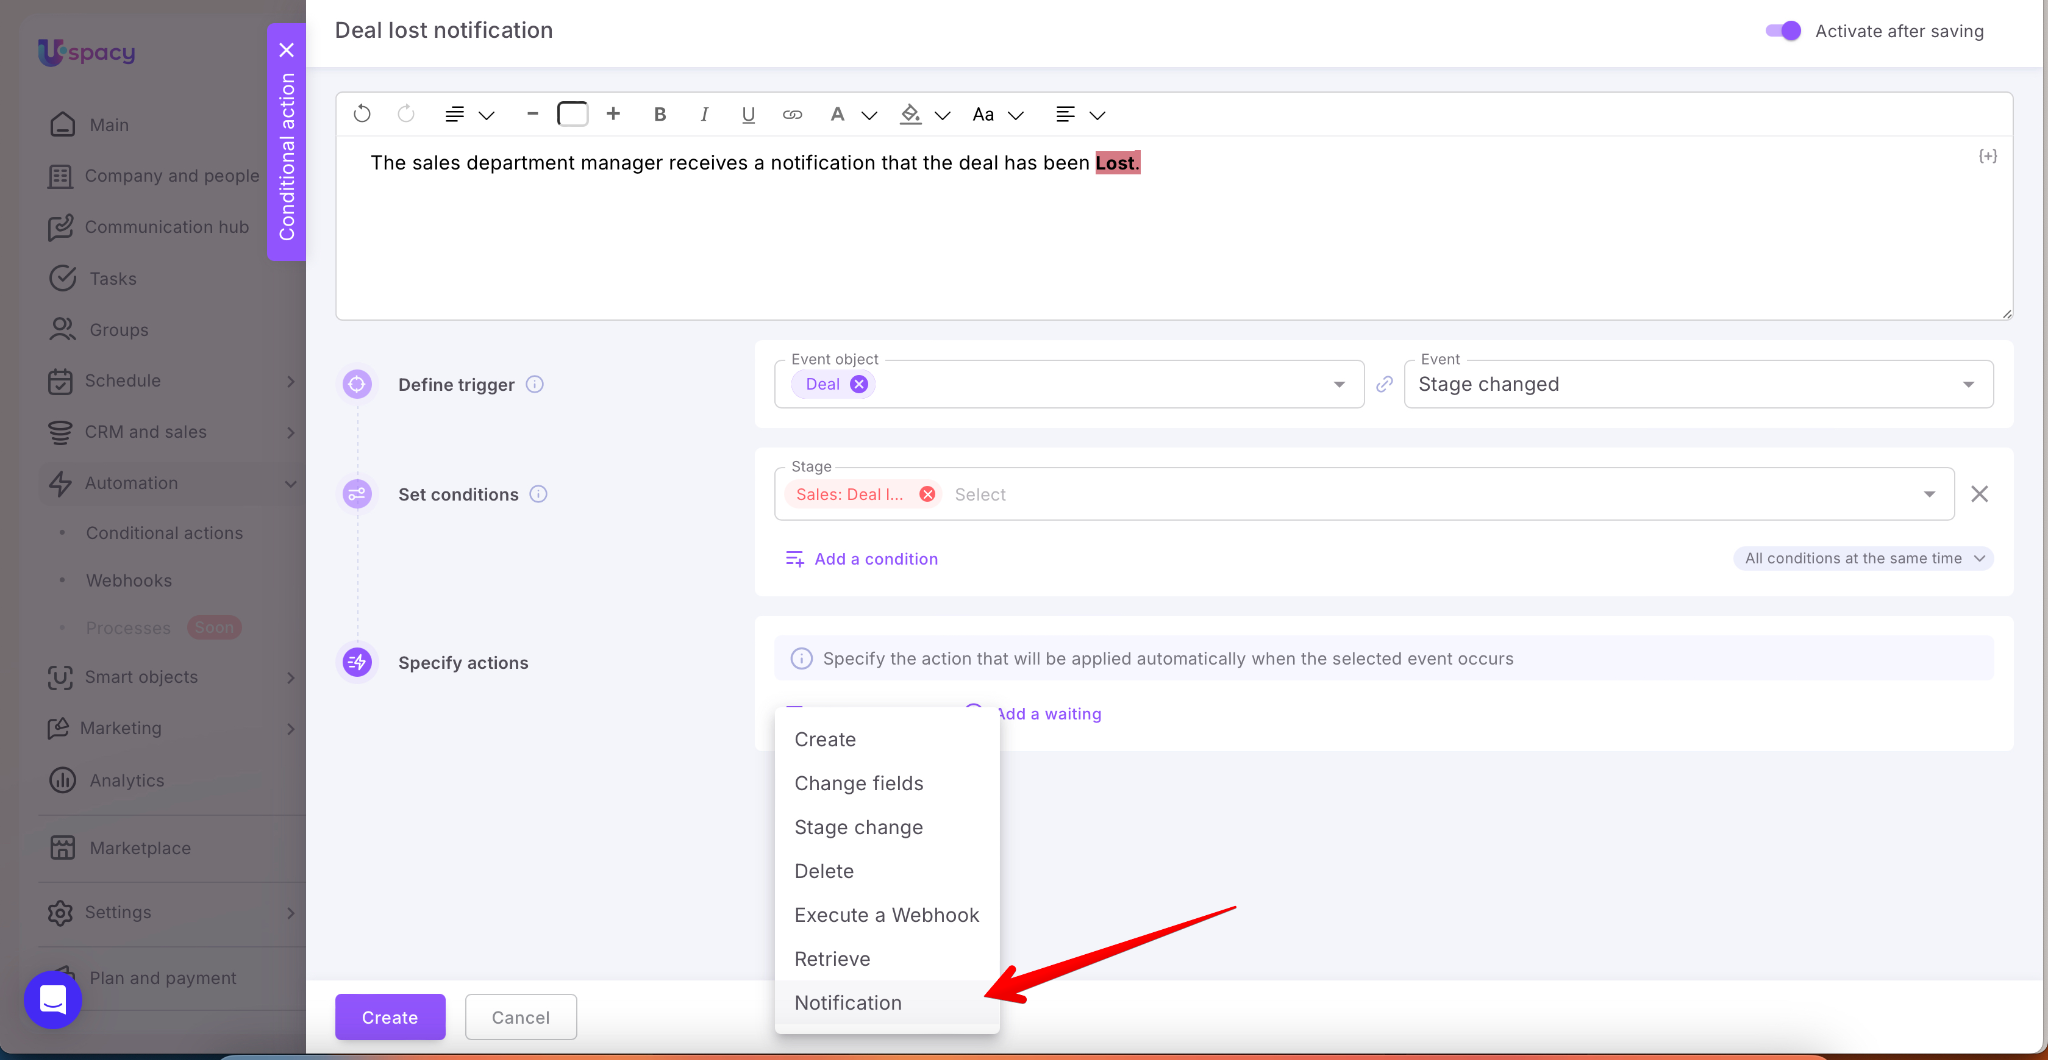
Action: Notification
Use this action to notify a specific user about a particular event in the Workspace. When the conditional action is triggered, Uspacy automatically generates a notification with the specified text for the selected users and delivers it according to their configured notification preferences.
For example, you can alert the sales department manager when a lead or deal is lost.
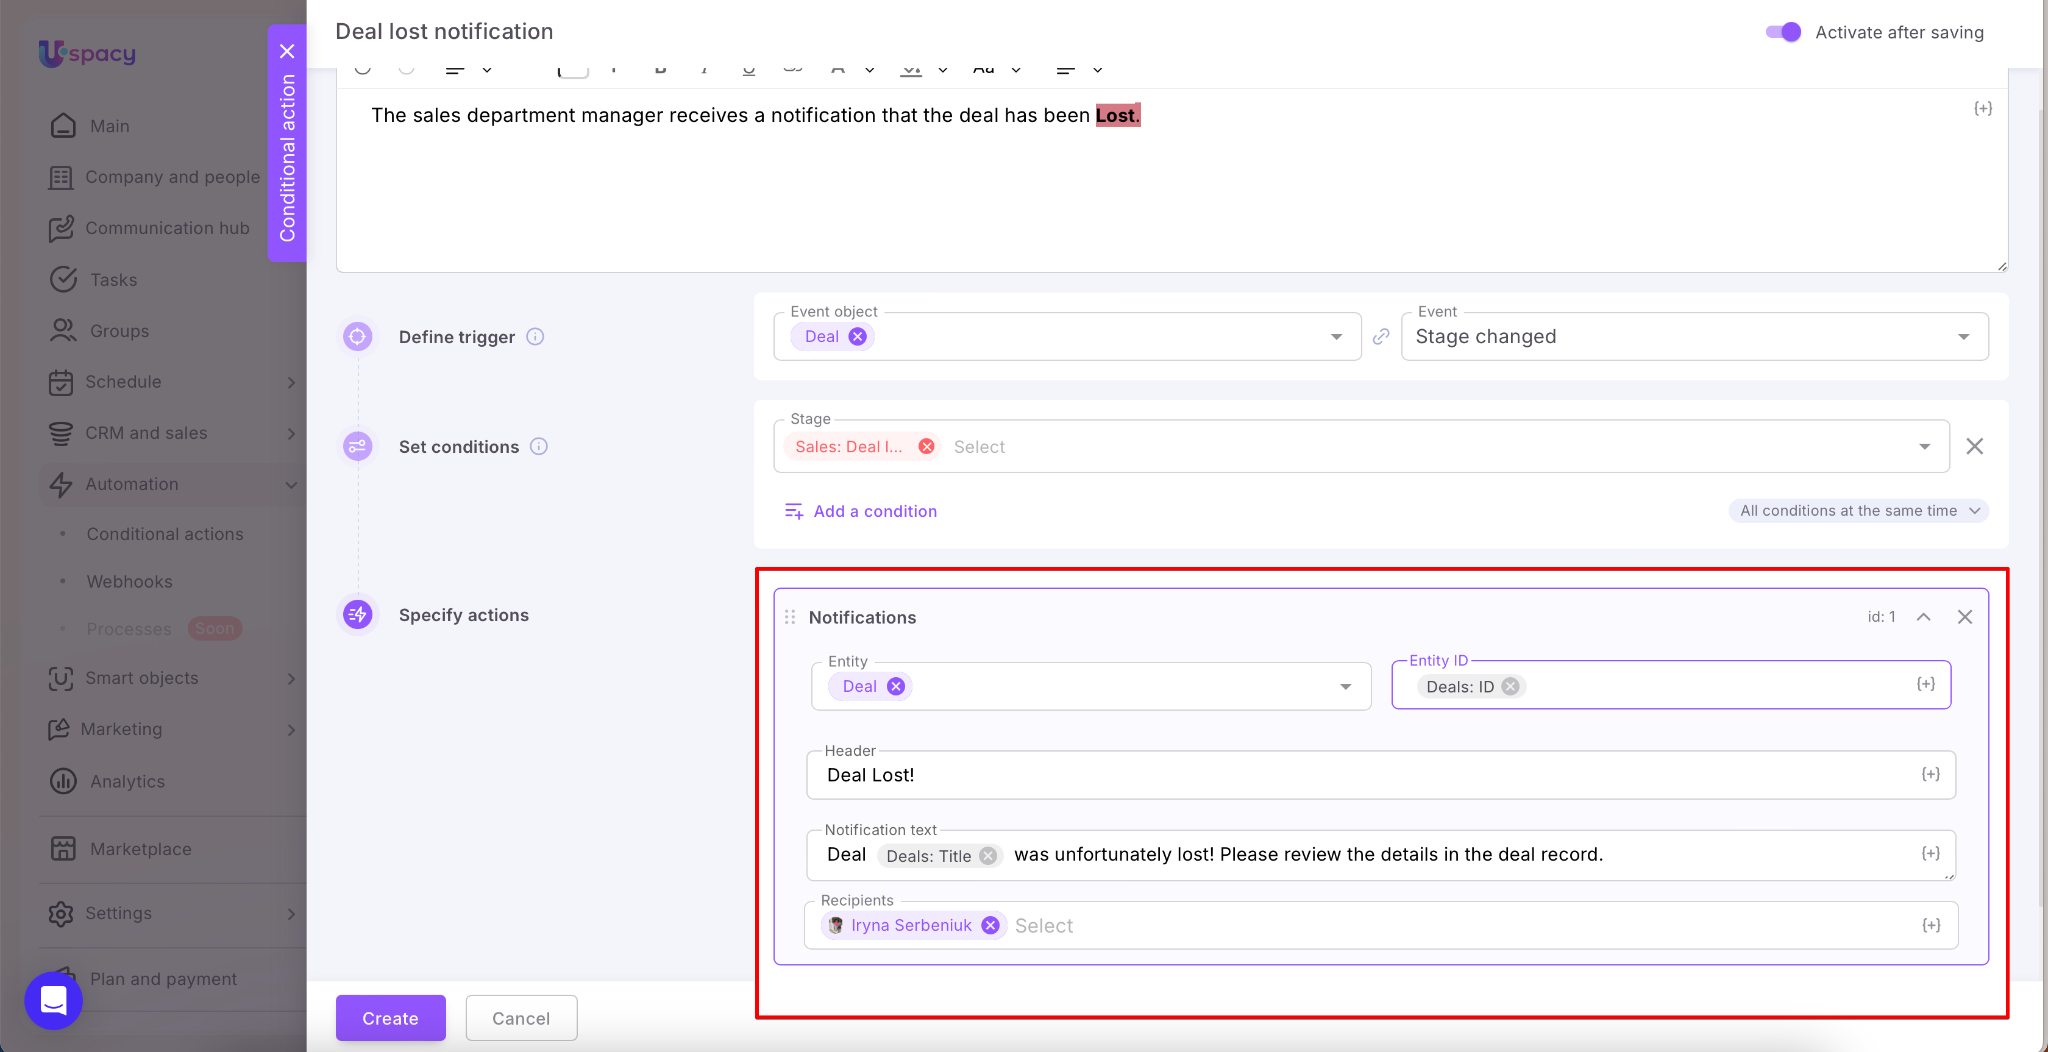
How to set up a Notification action:
- Entity: Select Deal, and in the Entity ID field, use the variable Deal: ID so the notification is linked to the specific deal.
- Header: Enter a short Subject, e.g., Deal Lost!
- Notification text: Describe the event and include relevant variables from the deal card, such as deal name and amount.
- Recipients: Select the users who should receive the notification — in this example, the sales department manager.
Modifiers
When assigning an action, you can use modifiers. These are additional clarifying parameters that alter the execution process of the automation script.
Or you can use modifiers which depend on the field type in the entity or tool.
For example, you can select how to specify the deal amount: either as a number, only as currency, or both.

Or specify what information to include about a contact. You can also decide how to display a checkbox-type field.

💡 Regarding the latter, thanks to the Value modifier, you will be able to see whether the checkbox is checked or use standard logical values such as true or false.
Displaying the value in a user-friendly format will show it as clear, decoded equivalents of Yes and No.


Thus, by using modifiers, you can specify exactly which values should be passed as a result of a conditional action.


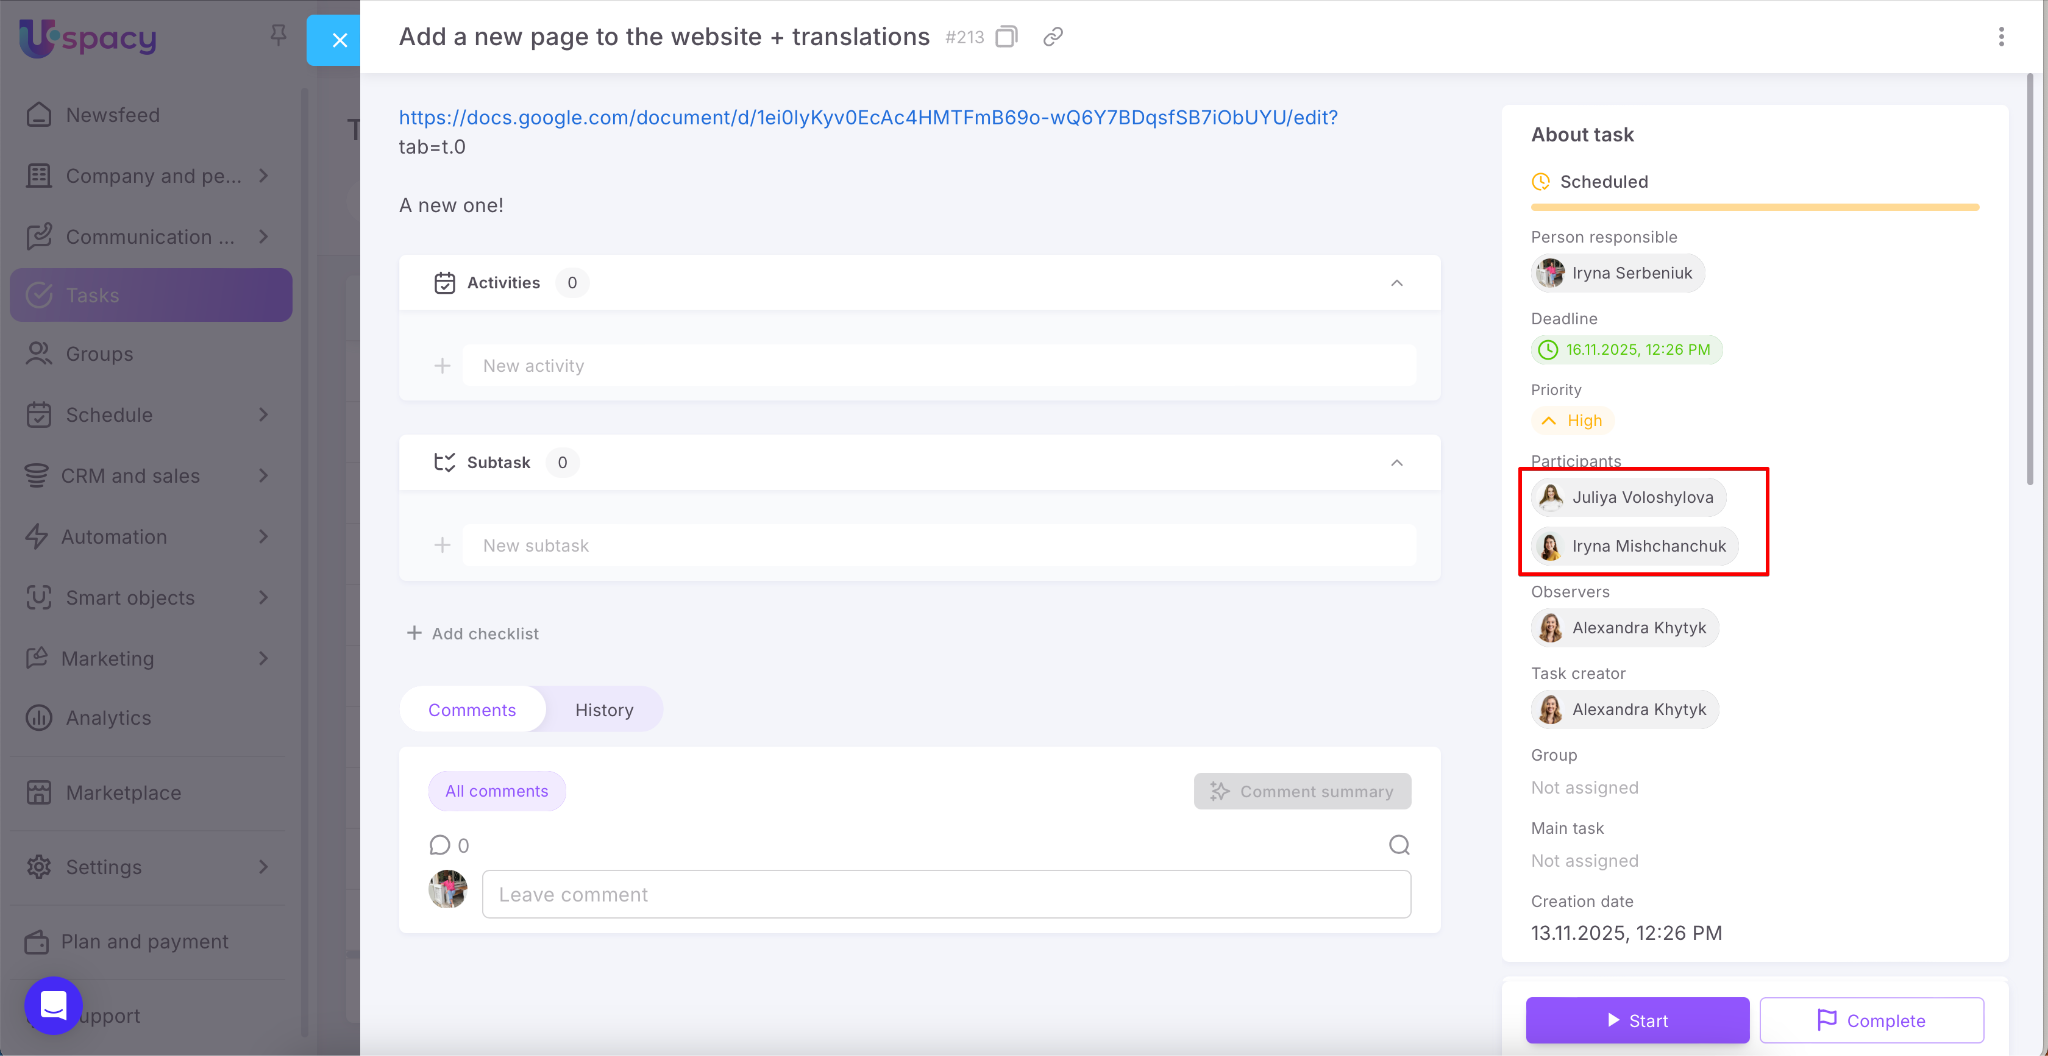
If, while executing a conditional action, you need to pass data from a User field (for example, Person responsible, Participants, or Observers) — such as inserting it into an email message — it’s important to select the correct substitution format.
Previously, only separate options for First name and Last name were available. Now, a combined format — “Last name and First name” — has been added.
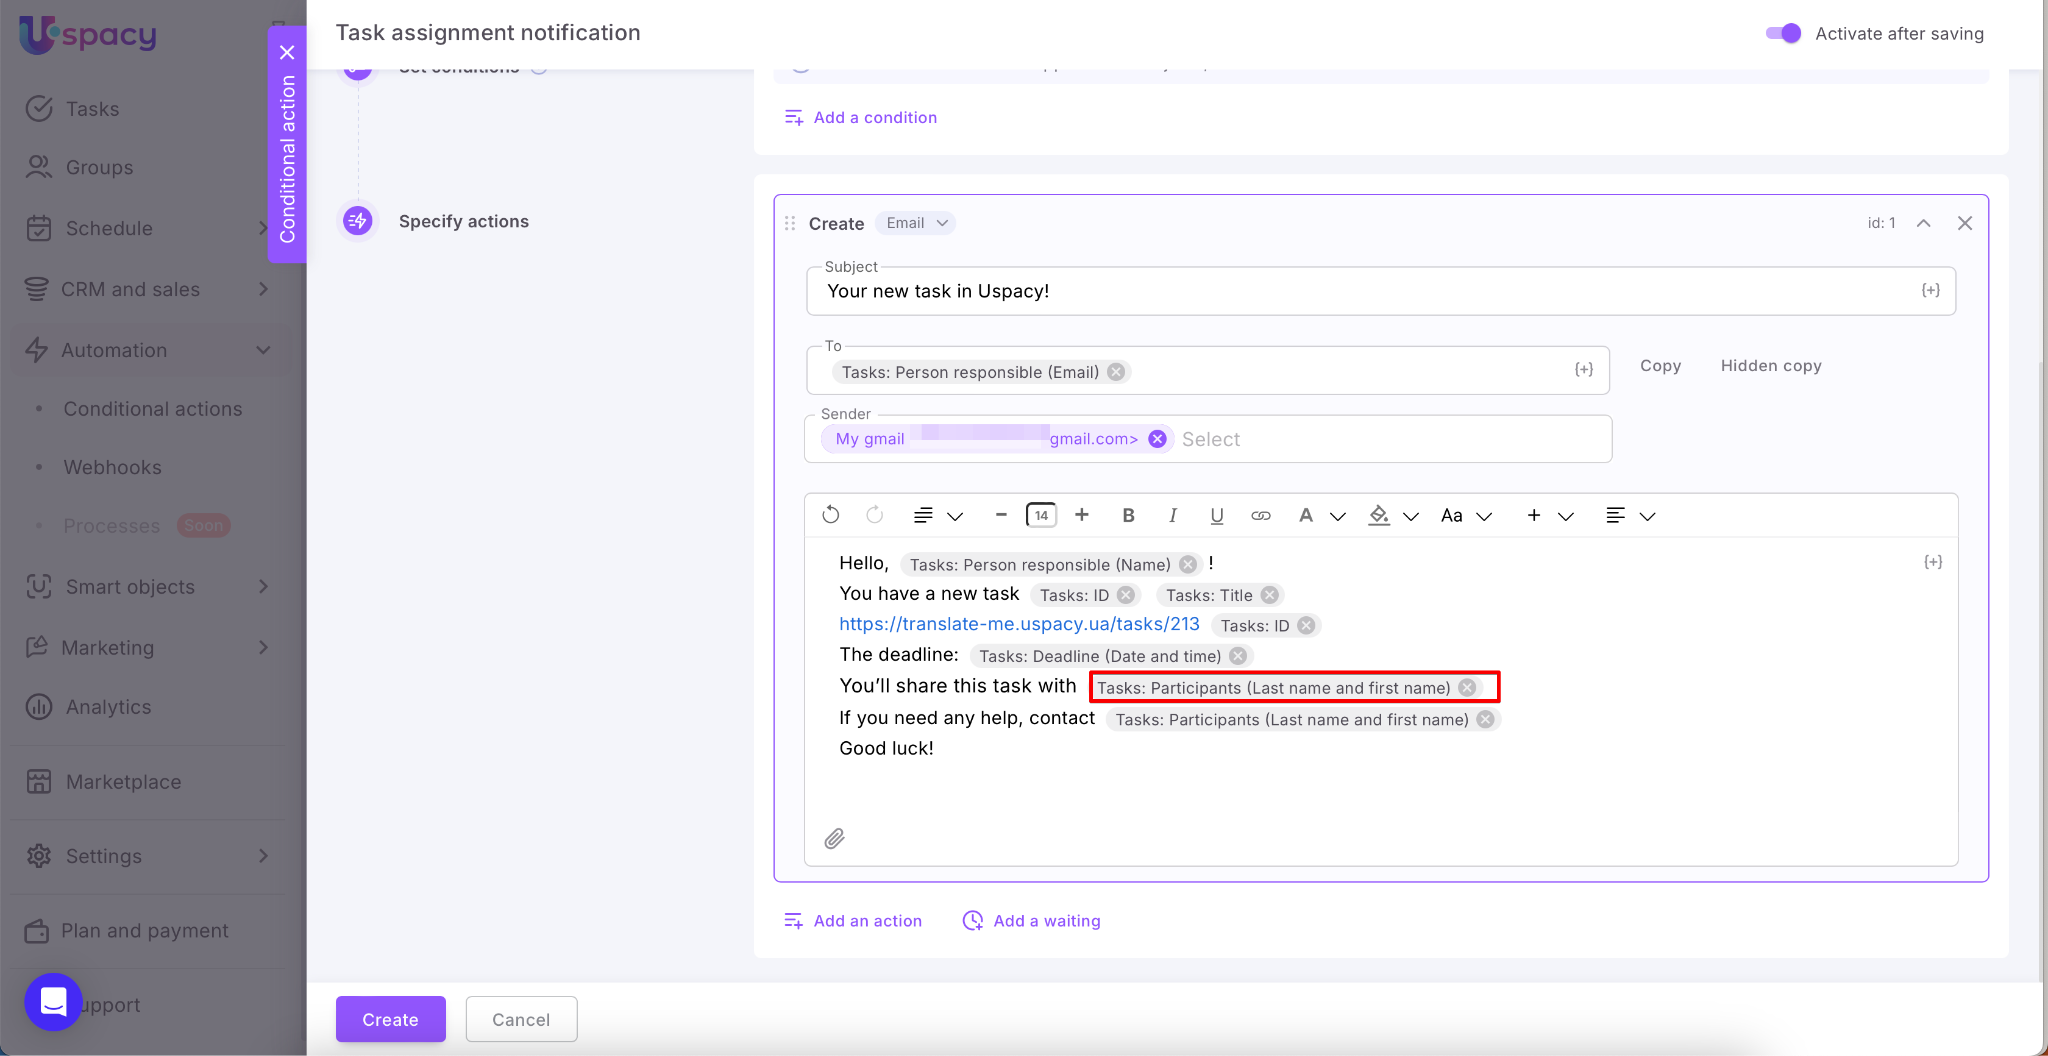
This format correctly combines the data for each user and generates a readable list.
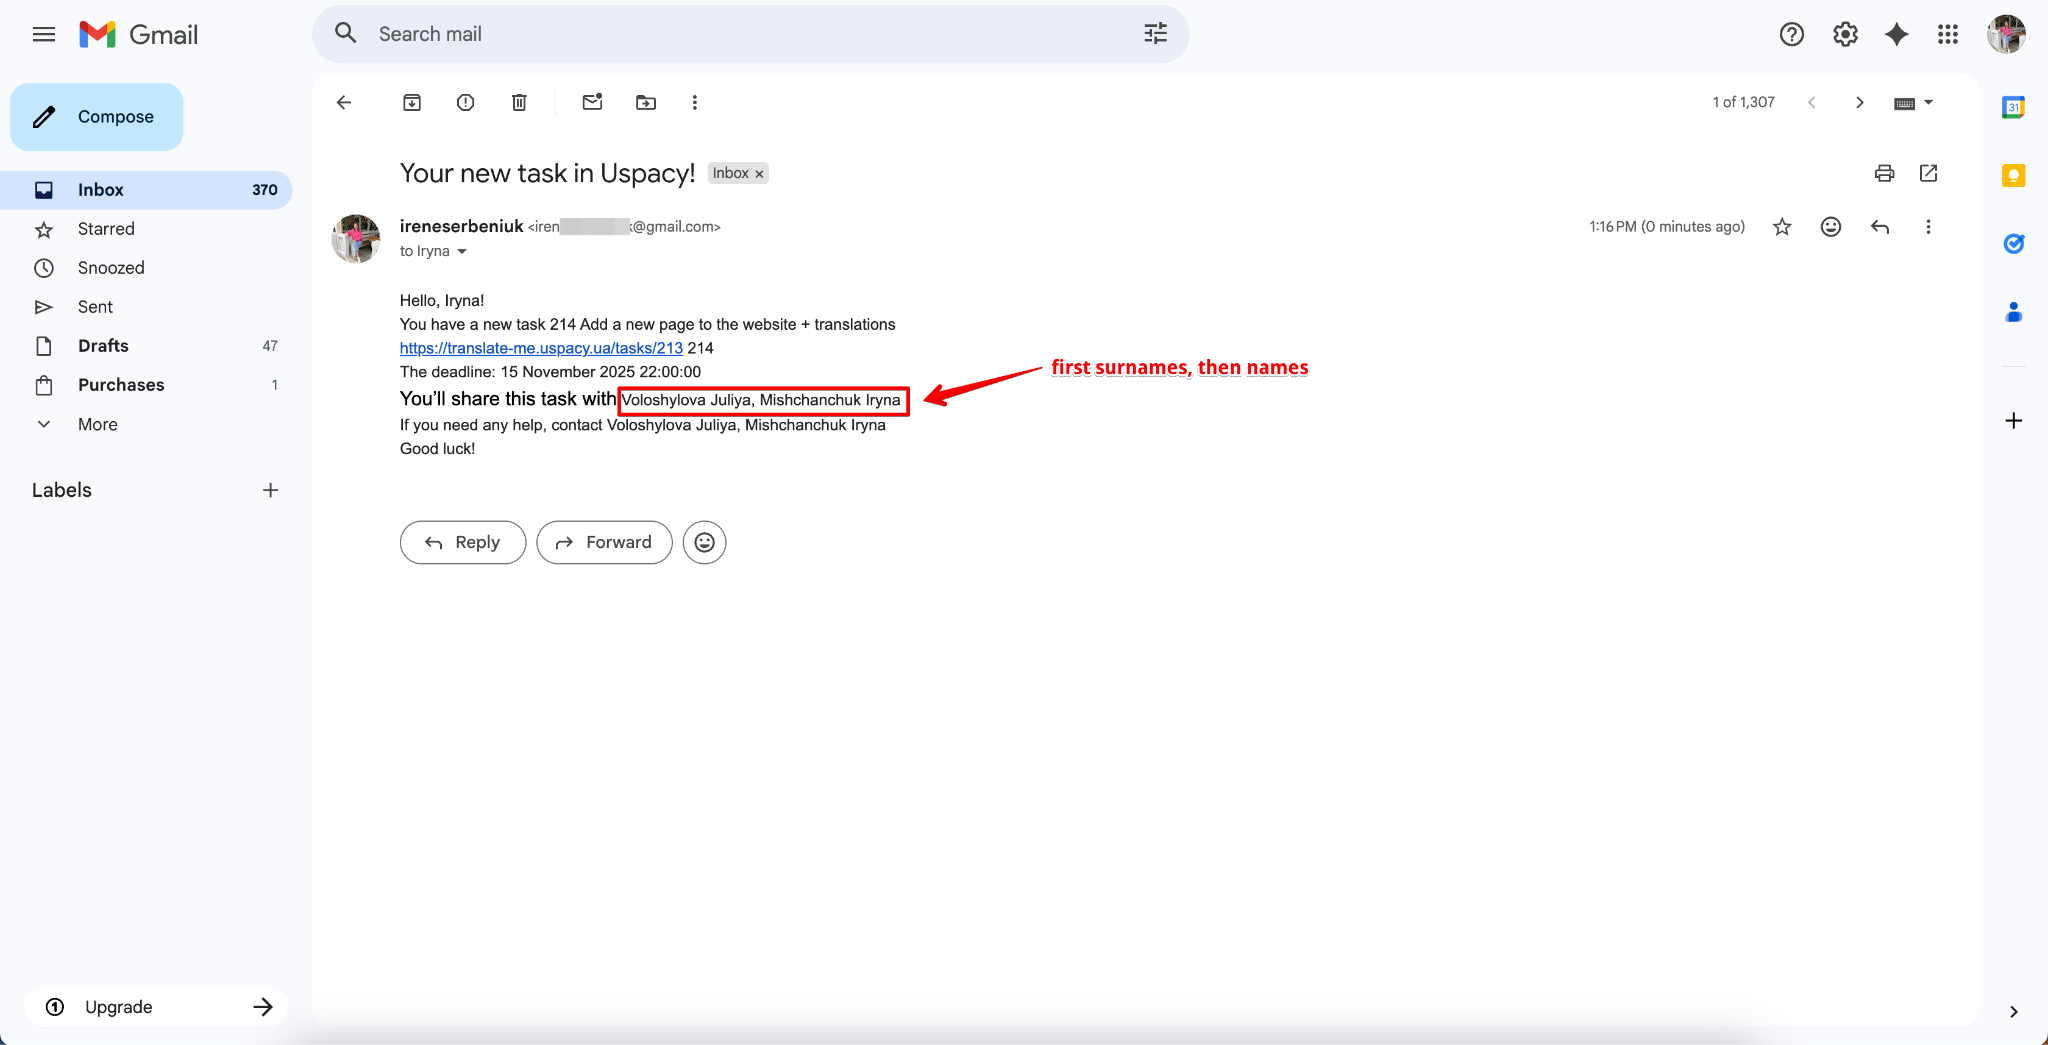
If you insert First name and Last name separately for a multi-value field, the system will apply the modifiers sequentially to the entire list: first all the names, then all the surnames (and then other attributes, if you add them, such as email addresses). Because of this, the elements won’t be grouped by individual users, resulting in a jumbled output.
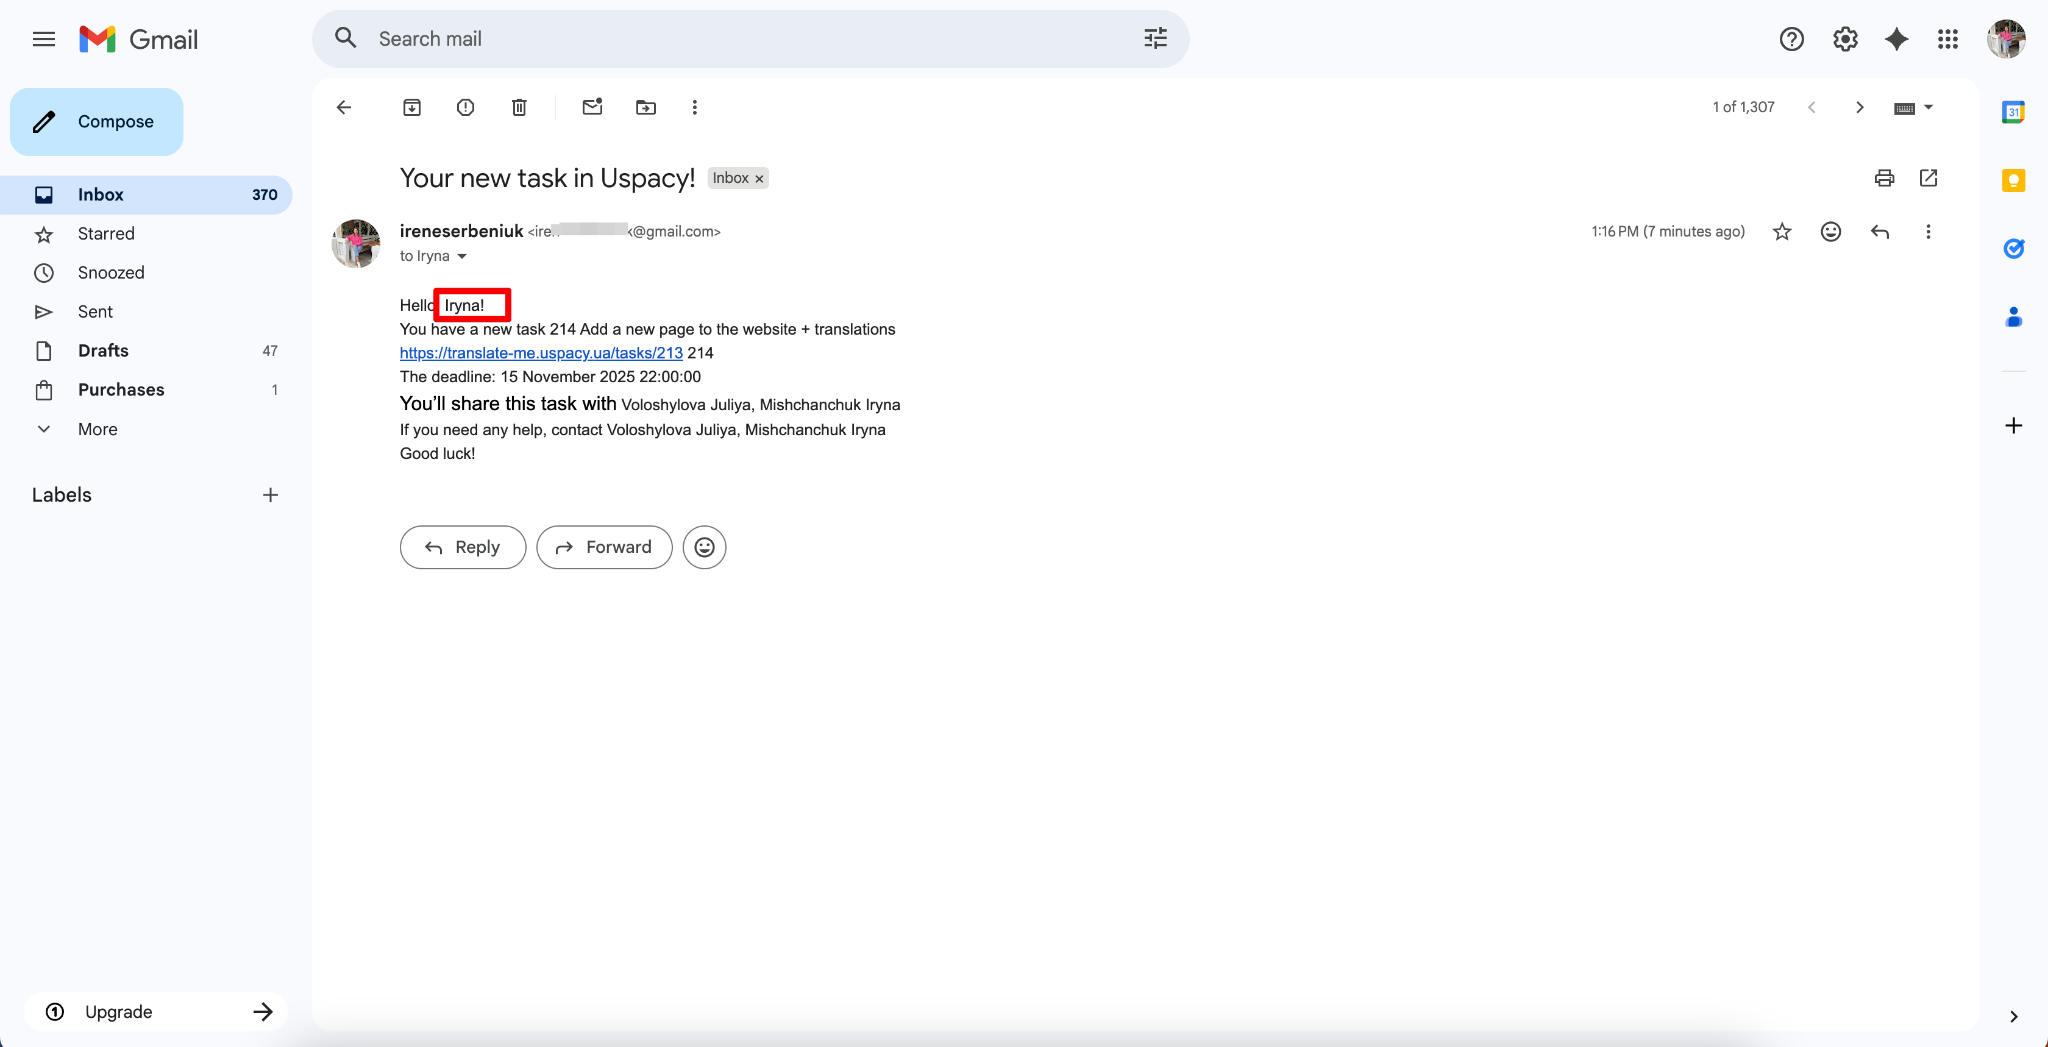
In other words, using separate modifiers for names and surnames only makes sense when you need to mention each attribute individually — depending on the context of the message. For example:
- To address the person informally by first name: “Hi, Task:Person responsible (First name)!”
- To keep a formal tone using the last name: “Dear Mr./Ms. Task:Task creator (Last name),”
- To place the first name and last name in different parts of the message (e.g., subject vs. message body).
How to save and activate a conditional action?
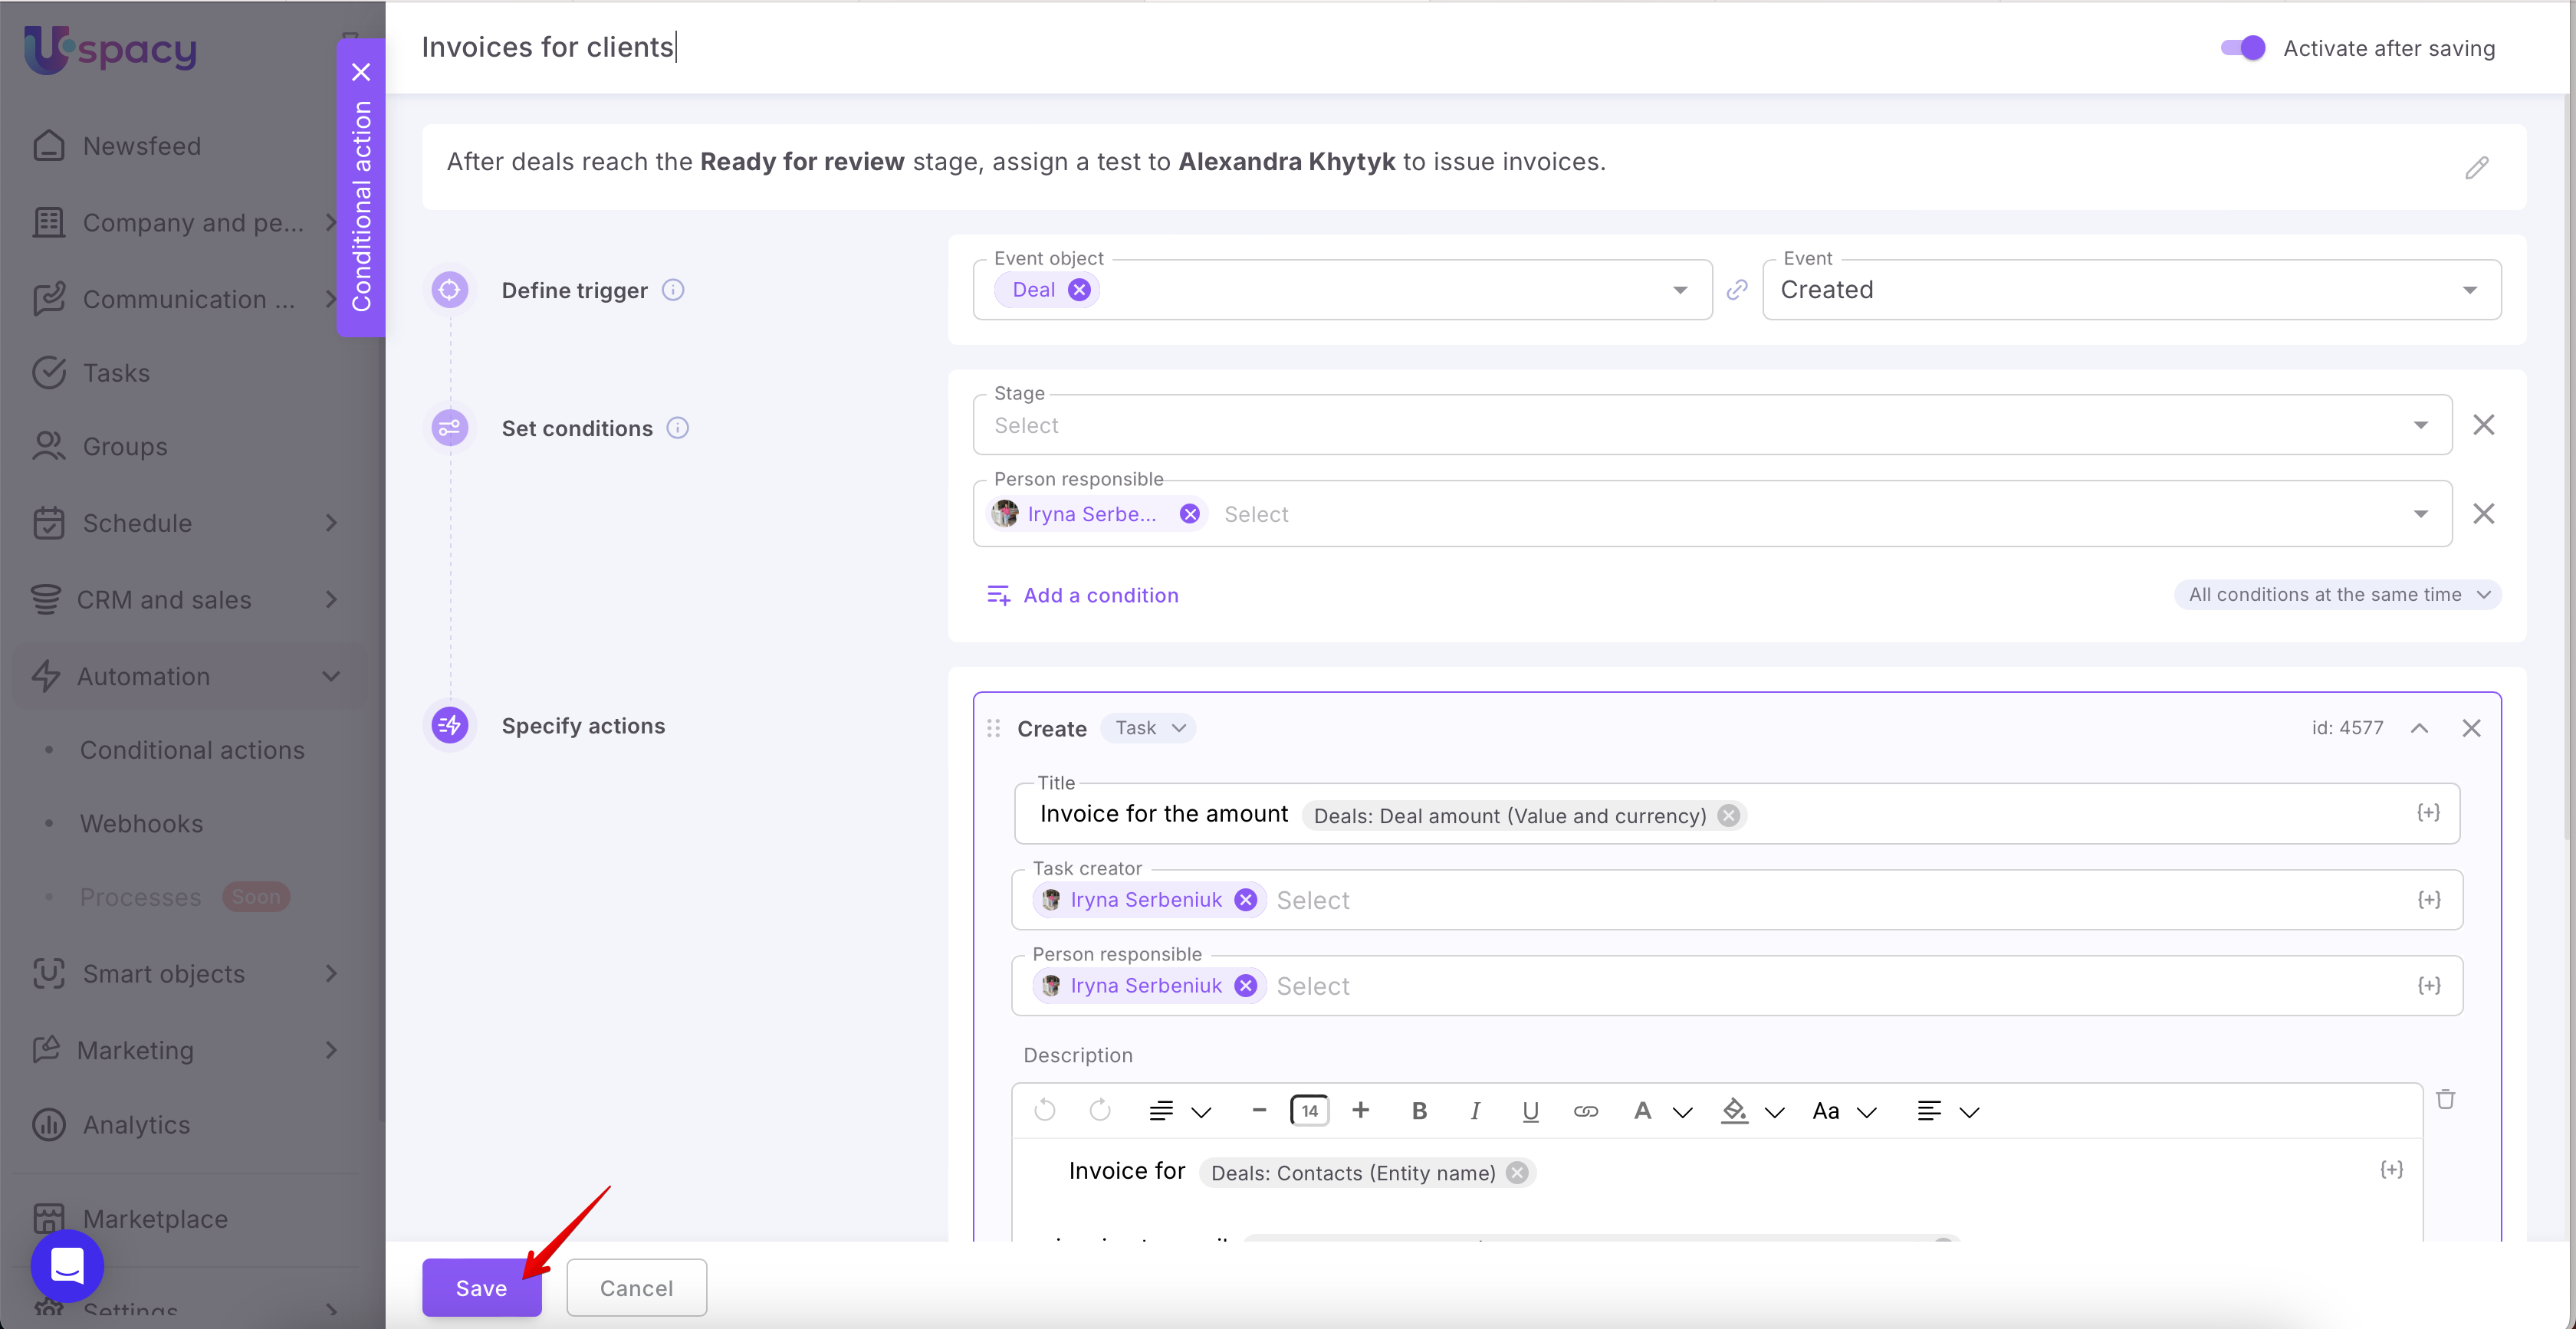
When all the settings (the trigger, conditions and actions) are set, it remains only to save and create a conditional action.
In order for it to start working immediately, you need to use the Activate after saving toggle button.

Then click Create.

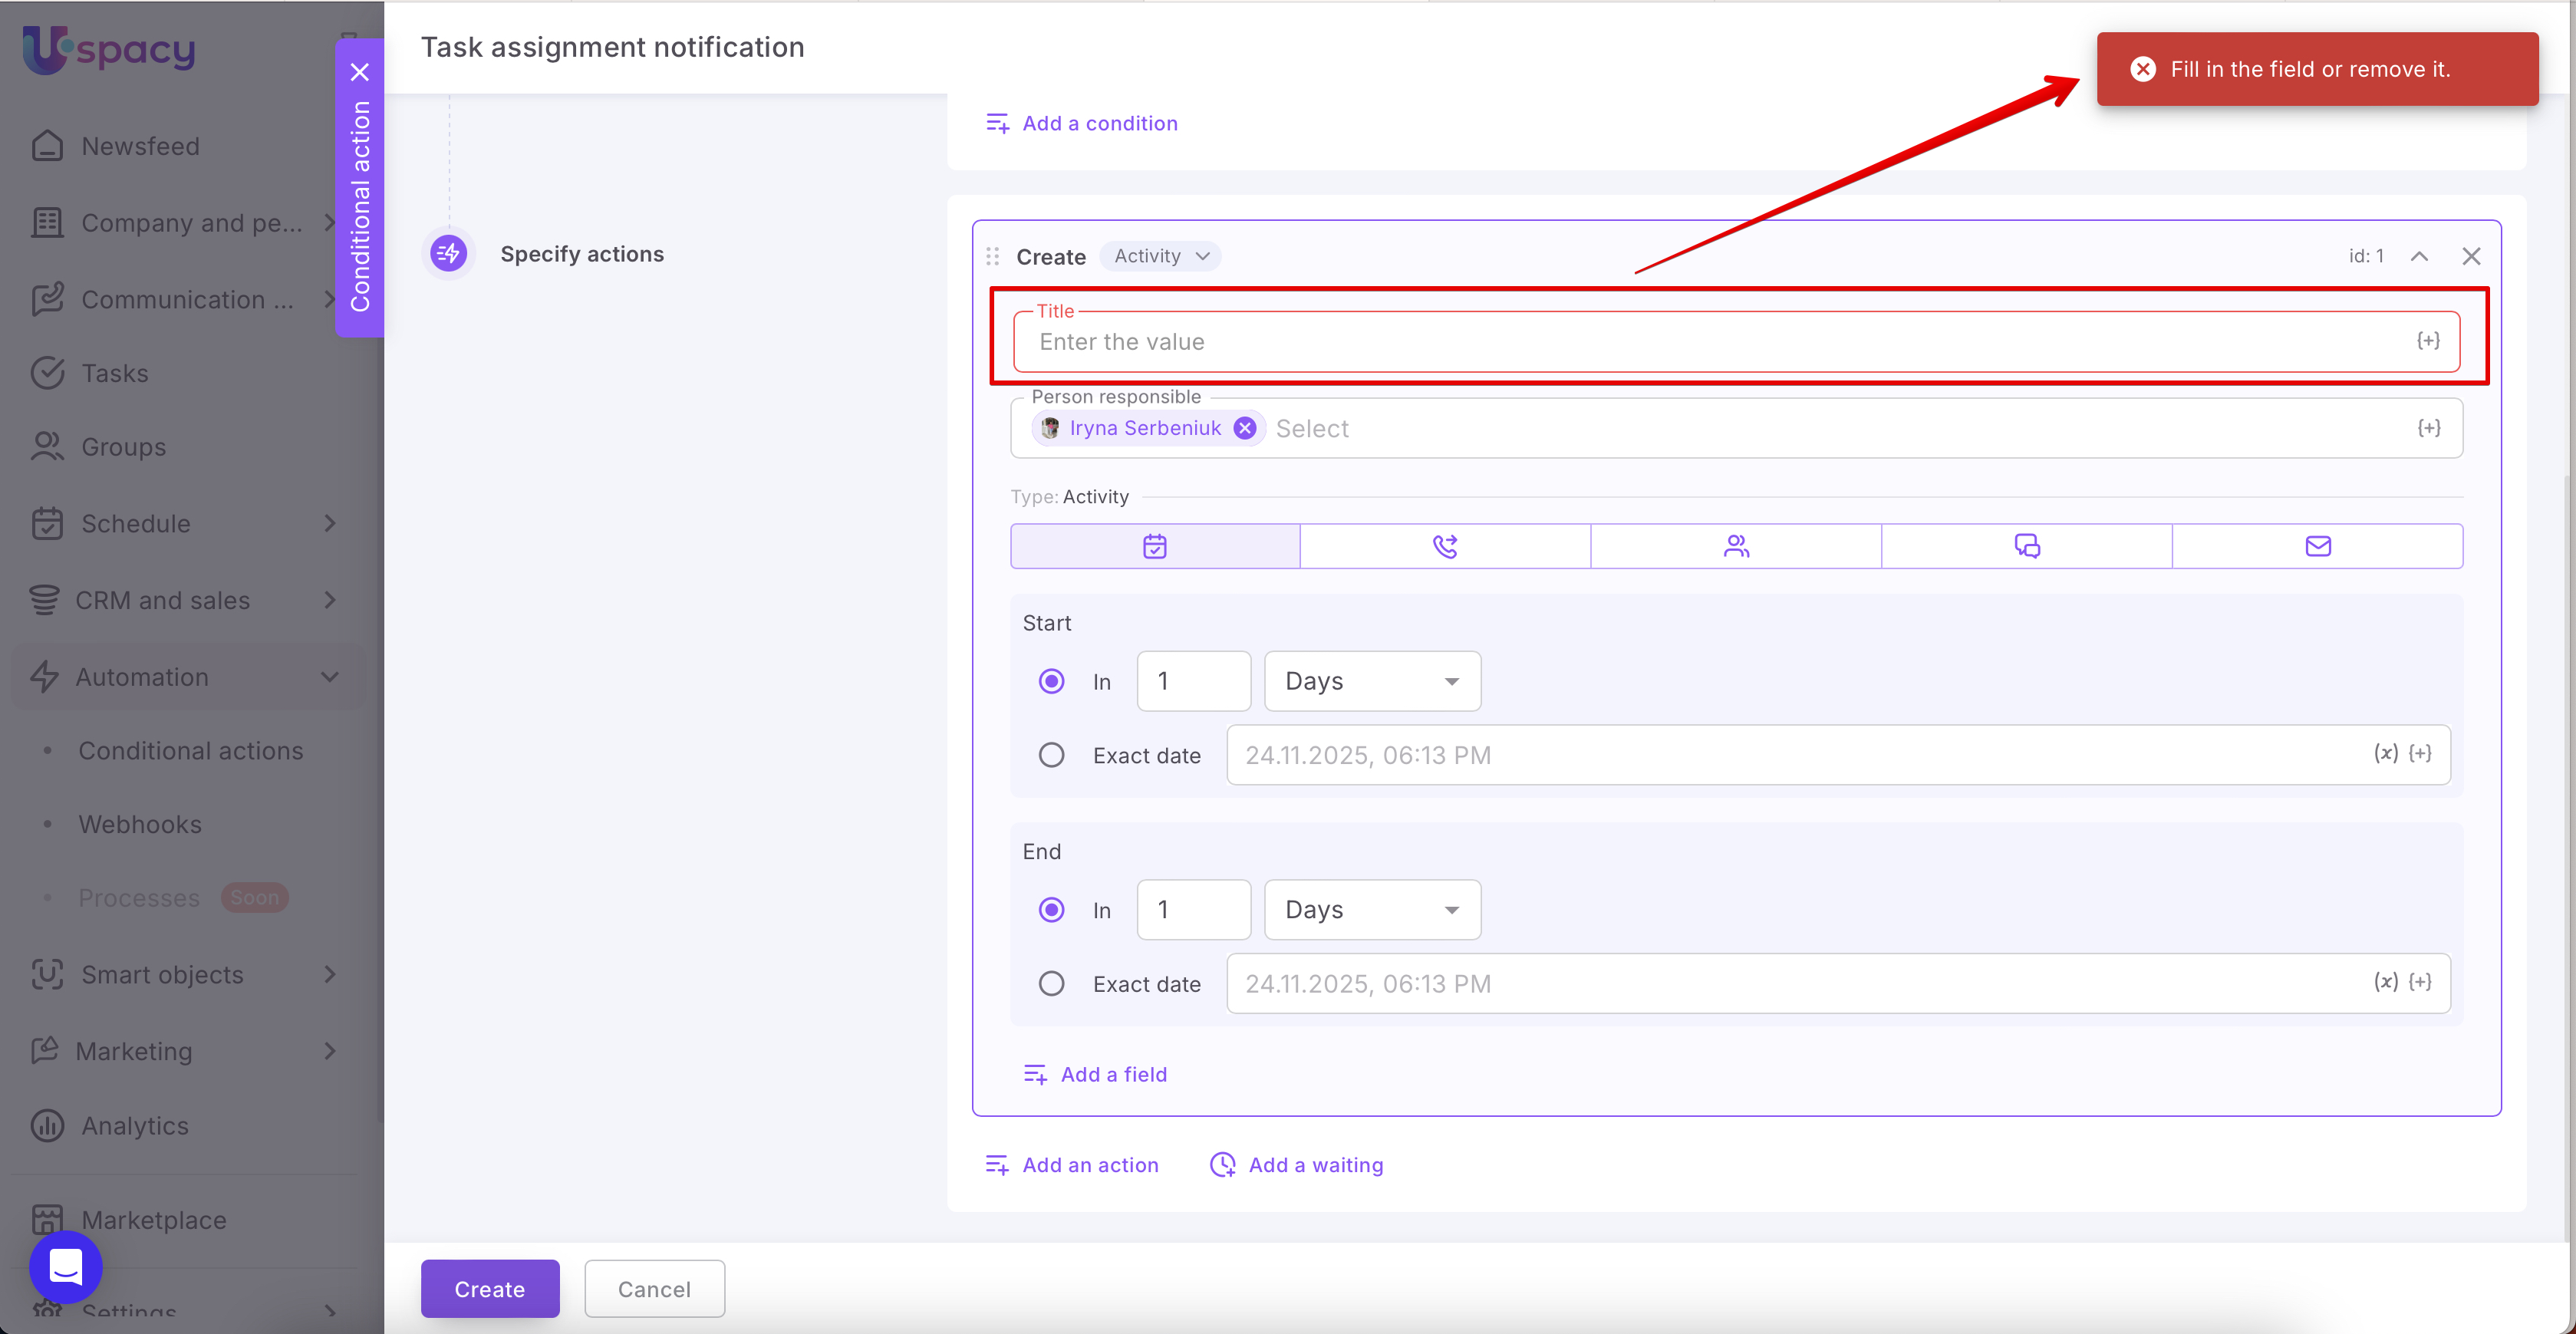
💡 Please note that before saving, all fields for the assigned actions must be filled out.
Done!

You can find the created conditional action in the list on the page. If you activated it already at the stage of creation, then it will have the corresponding status and will work.

How to deactivate a conditional action?
For this, use the interaction menu and select Deactivate.

Or, in the settings form, move the Activate after saving toggle button.

As a result, the conditional action will receive the Suspended status and will not work until it is activated again.

How to change conditional action settings?
Open the conditional action settings by clicking on its name in the list.

Then make changes to any fields and Save.
💡For example, you can change the trigger, conditions or actions for your automation. It is also possible to change the name, description and, as it was already mentioned above, deactivate or activate the conditional action.
💡 Please note that before saving, all fields for the assigned actions must be filled out.

How to delete a conditional action?
To do this, use the interaction menu and select the section of the same name.

💡 Since the removal of a conditional action is an irreversible process, that is, it will not be possible to restore it, the system will notify about this and ask for additional consent.

As a result, the conditional action will be removed and no longer available for work.
If you have additional questions or you need to contact the support, send a request to this email [email protected]
Created: July 29, 2024 / Updated: February 27, 2026