At Uspacy, you can connect a mailbox from the service you use to your Workspace.
🟣 Outlook
🟣 corporate Outlook (Microsoft 365)
That is, no need to constantly switch between tabs. You will be able to receive and reply to incoming emails directly in Space.
The email at Uspacy works using the IMAP and SMTP protocols. IMAP provides access to emails stored on the server, and allows for managing and processing them remotely. SMTP, on the other hand, is used for securely sending emails and ensures that messages are delivered to the recipient's server and processed according to email delivery standards.

🌟Please note that the number of mailboxes available for connection per Space user depends on the plan. That is:
You can read more about plans and their possibilities on this page of our website.
How to connect Gmail?
To do this, you need to follow these five main steps:
Step 1. Enable IMAP support
According to the changes implemented by Google starting from January 2025, the "Enable IMAP" and "Disable IMAP" options are no longer available. Now, the IMAP access feature is always enabled in Gmail. This change does not affect your current connections with other email clients. You don’t need to do anything.
🔍 For more details, visit the Google Help Center.
So, IMAP support is now automatically enabled.
Step 2. Enable two-step verification
Go to your Google Account management.

Next, open the Security tab and enable two-step verification.

A settings page will open where you need to click the corresponding button.

Done! Two-step verification is enabled.

To verify this, return to the page managing your account.

💡 If you haven’t added your phone number in the Google security settings yet, please do so first.

In the window that opens, enter your current phone number and click Next.

Then, you will receive an SMS on your phone. Enter the one-time code you receive into the provided field.

Done! Two-step verification is enabled.

🔍 You can read more information on two-factor verification from Google at this link.
Step 3. Create a password to connect to Uspacy
Go to the settings of the two-step verification of the account. Open the App passwords block.

Here you need to create a new password that will be used at Uspacy. It will be generated automatically after clicking the button.

As a result, you will see a window with a password. Copy and use it to connect the mailbox to the Uspacy Space.

🔍 You can read more about app passwords here.
Step 4. Authorize and connect the mailbox to Space
First, you need to go to the Communication center - Email item and click Connect.

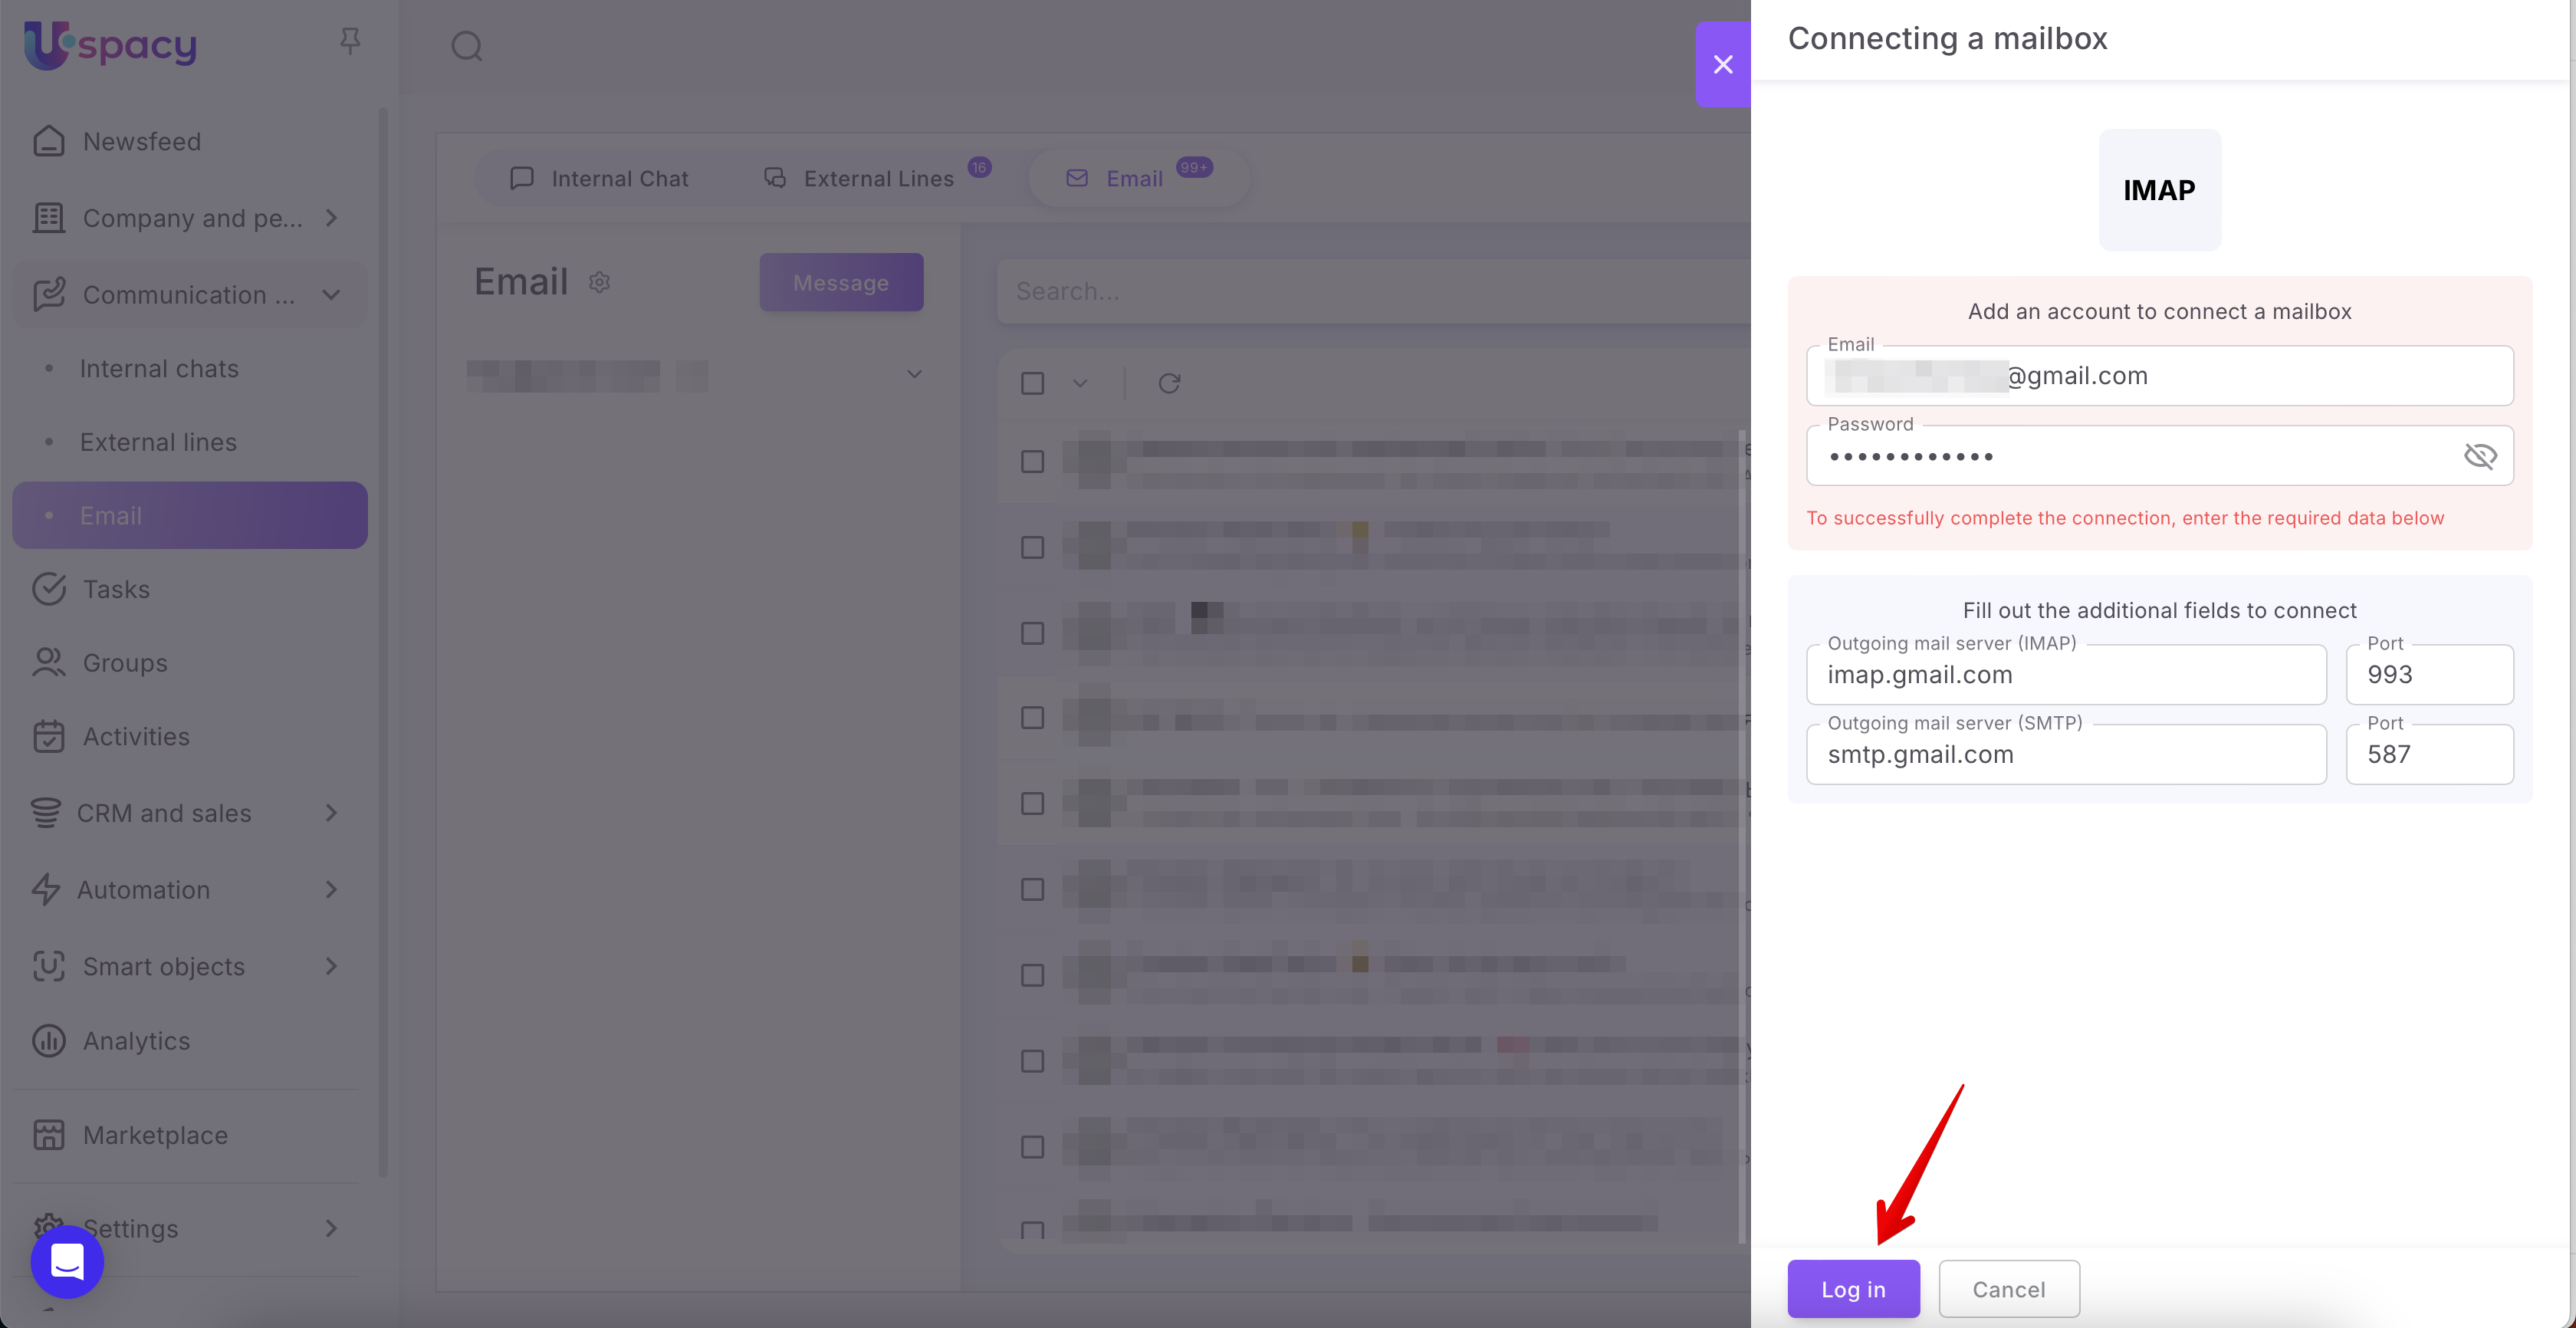
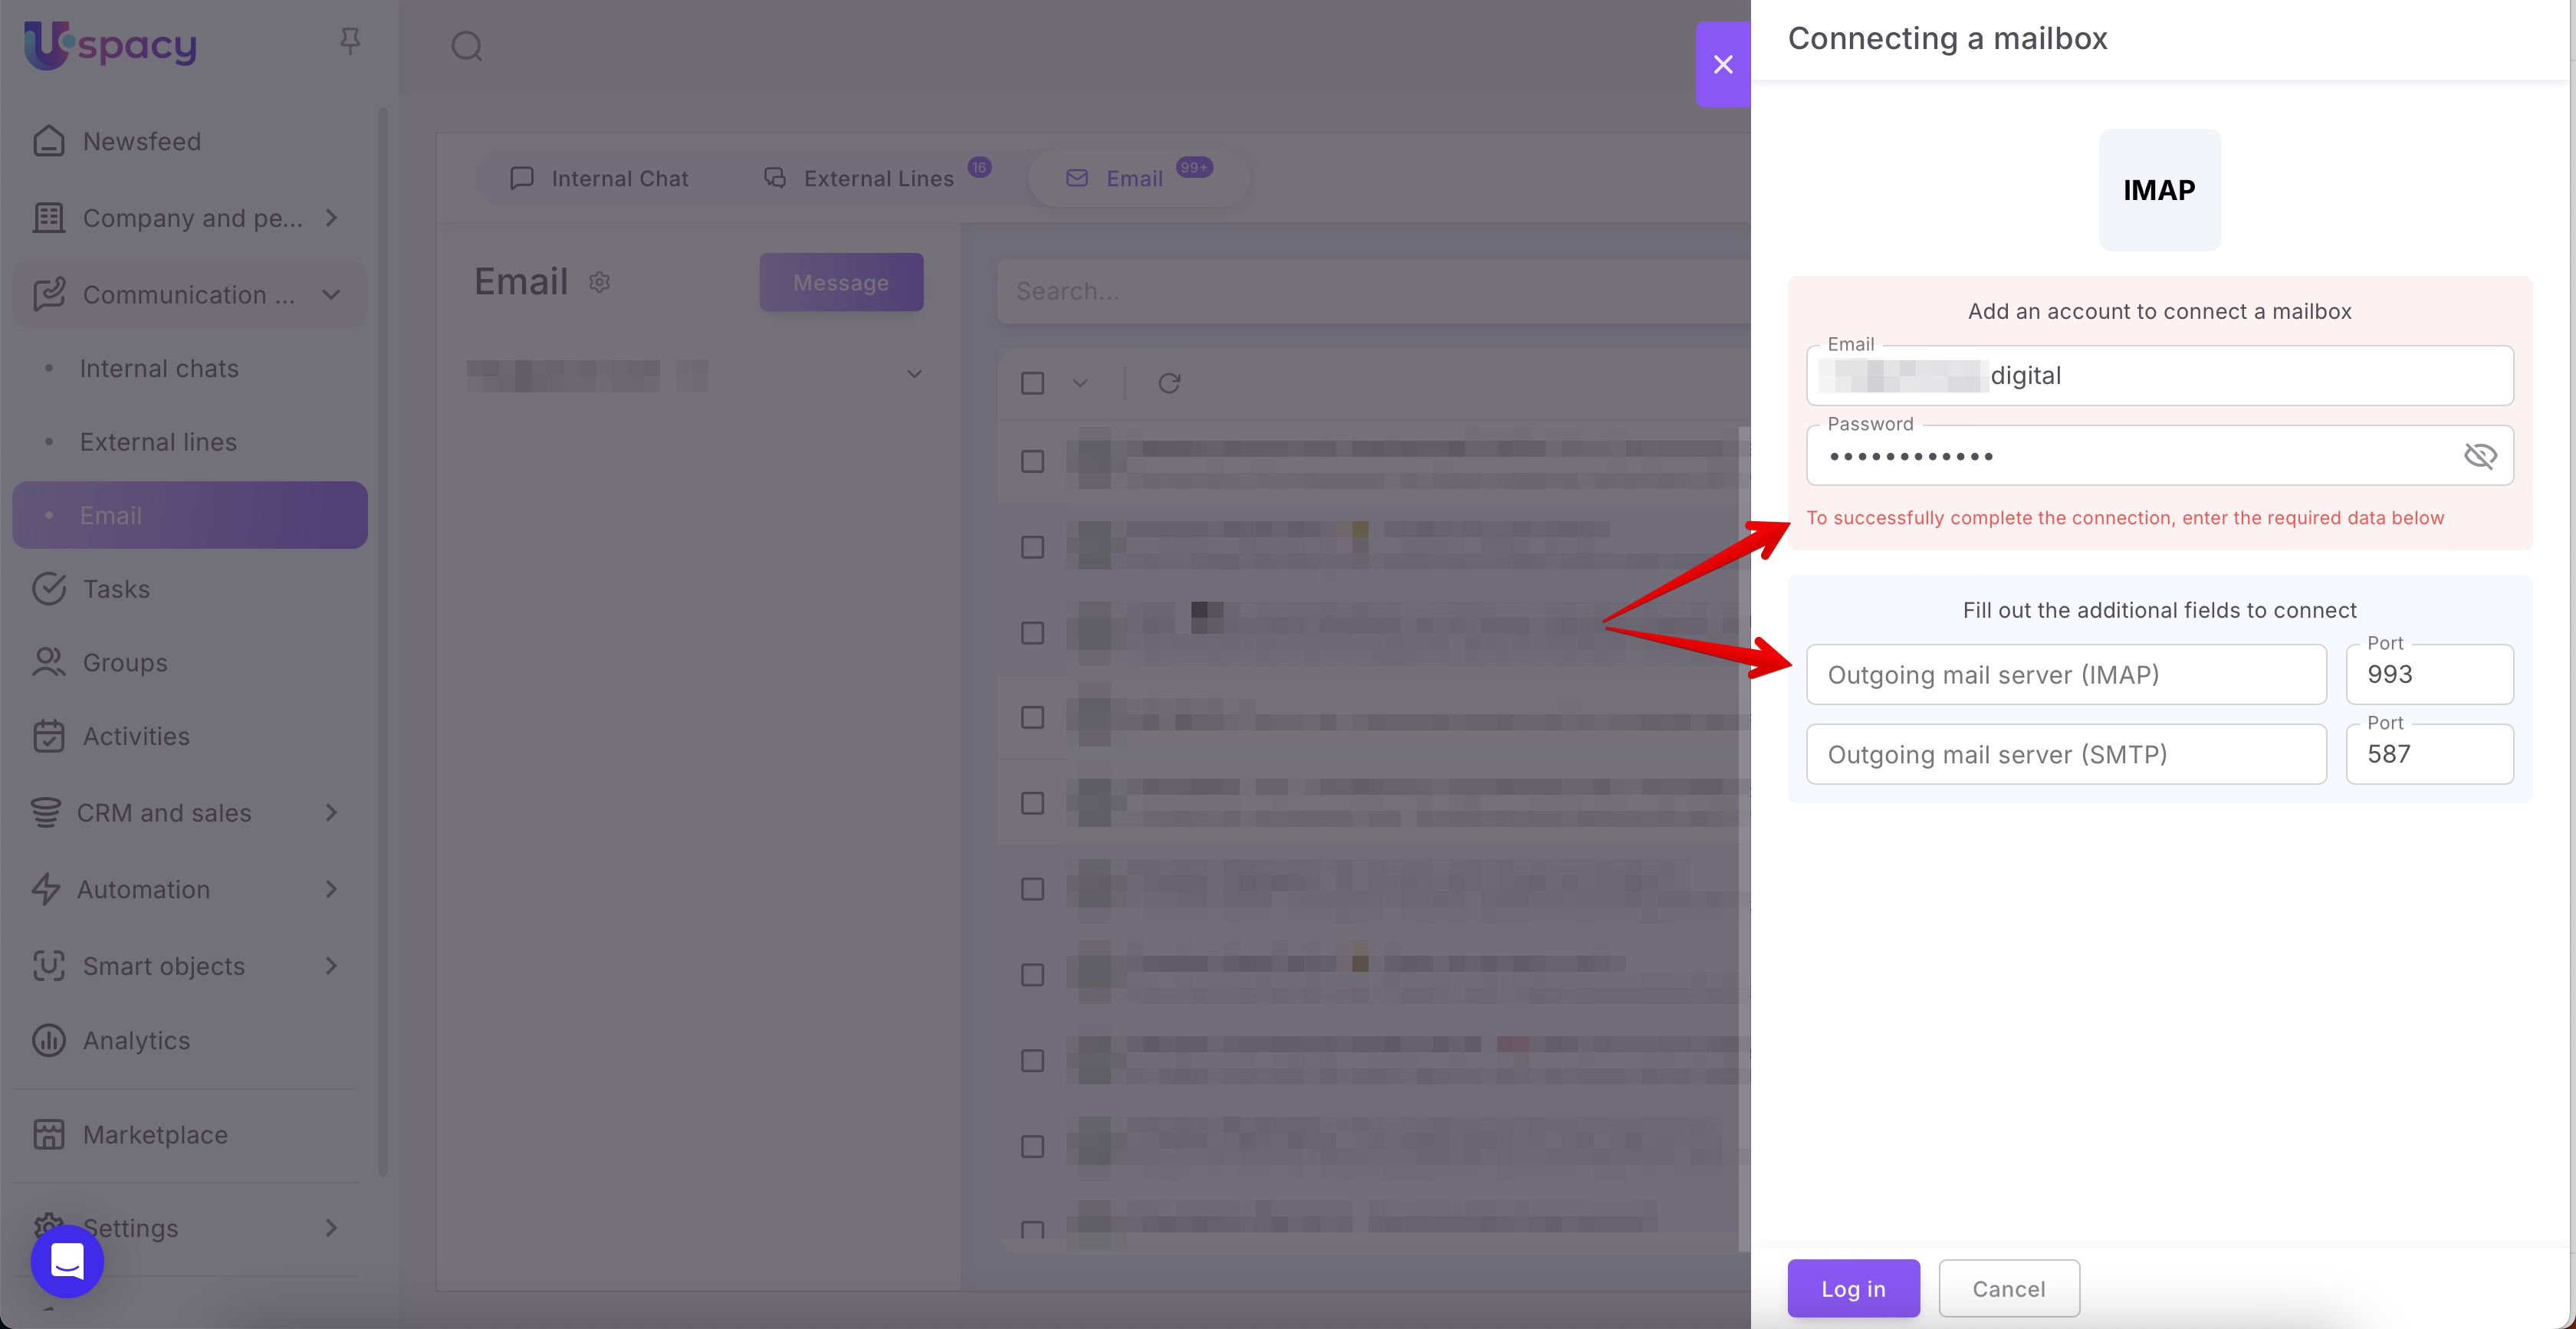
Next, enter the address of the mailbox you plan to connect, as well as the password that was generated in the Google account settings. Then, click Log in.

In order to successfully complete the process and connect the mailbox, enter the required data.

Such as:
🟣 Outgoing mail server (IMAP). In this field you need to enter the value imap.gmail.com
Port. You can leave this field blank or enter the standard value 993.
🟣 Outgoing mail server (SMTP). In this field enter the value smtp.gmail.com
Port. Here, you should use the standard value 587.
After that, click Log in again.
Almost done!
Step 5. Configure synchronization settings

Namely:
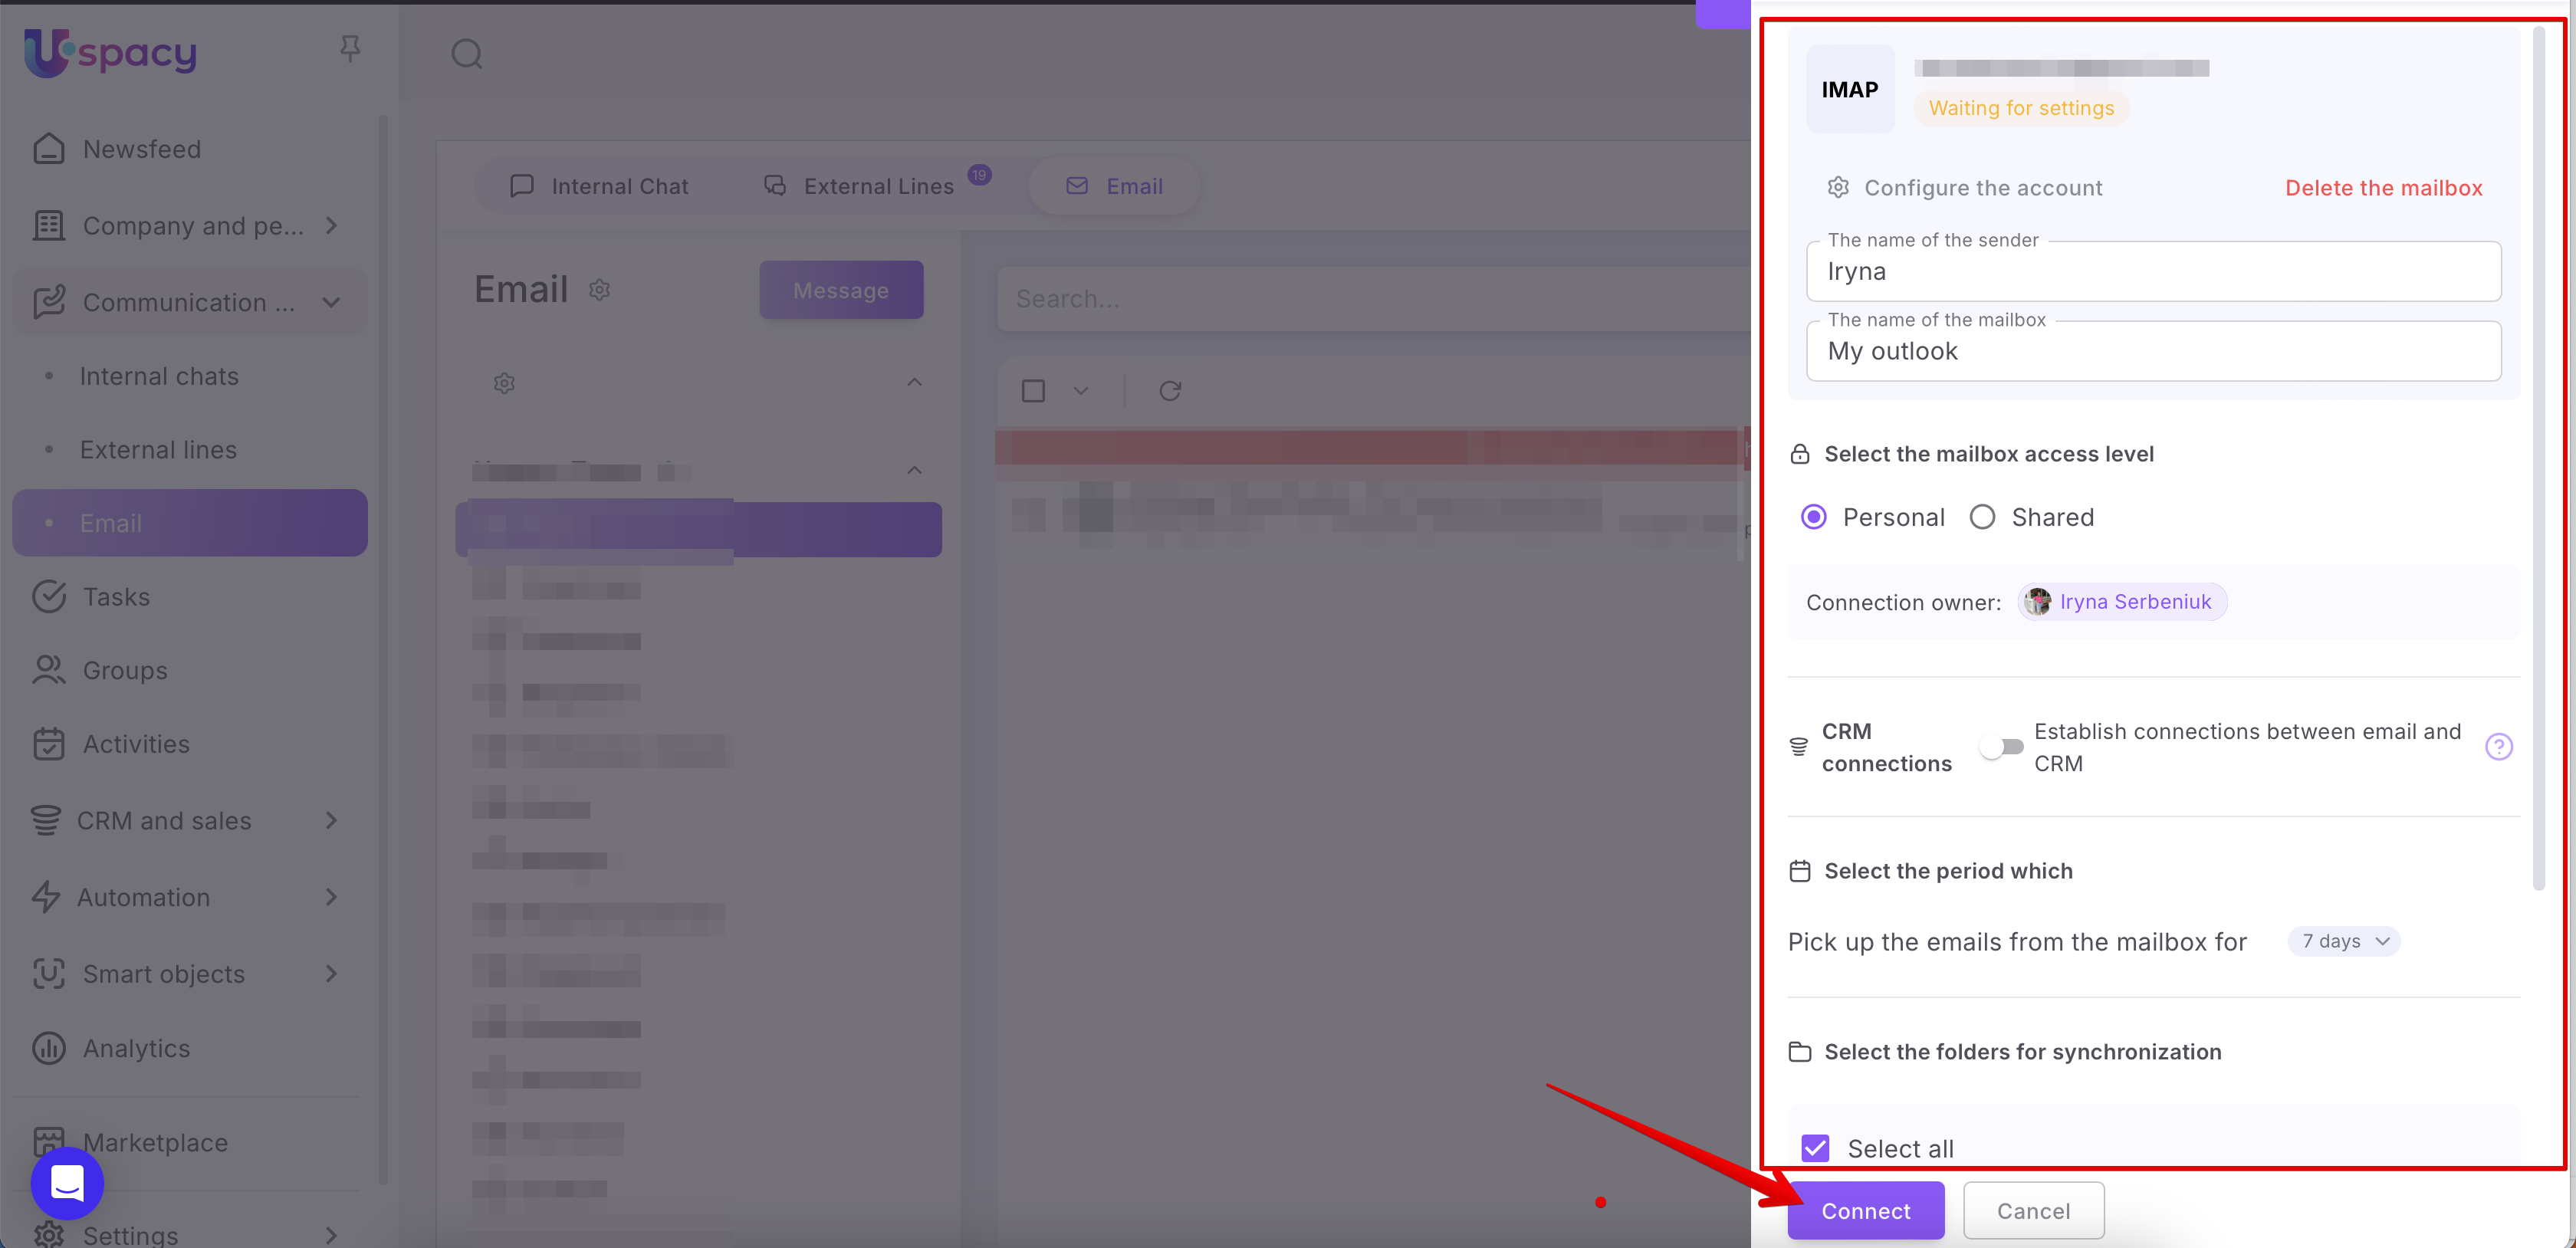
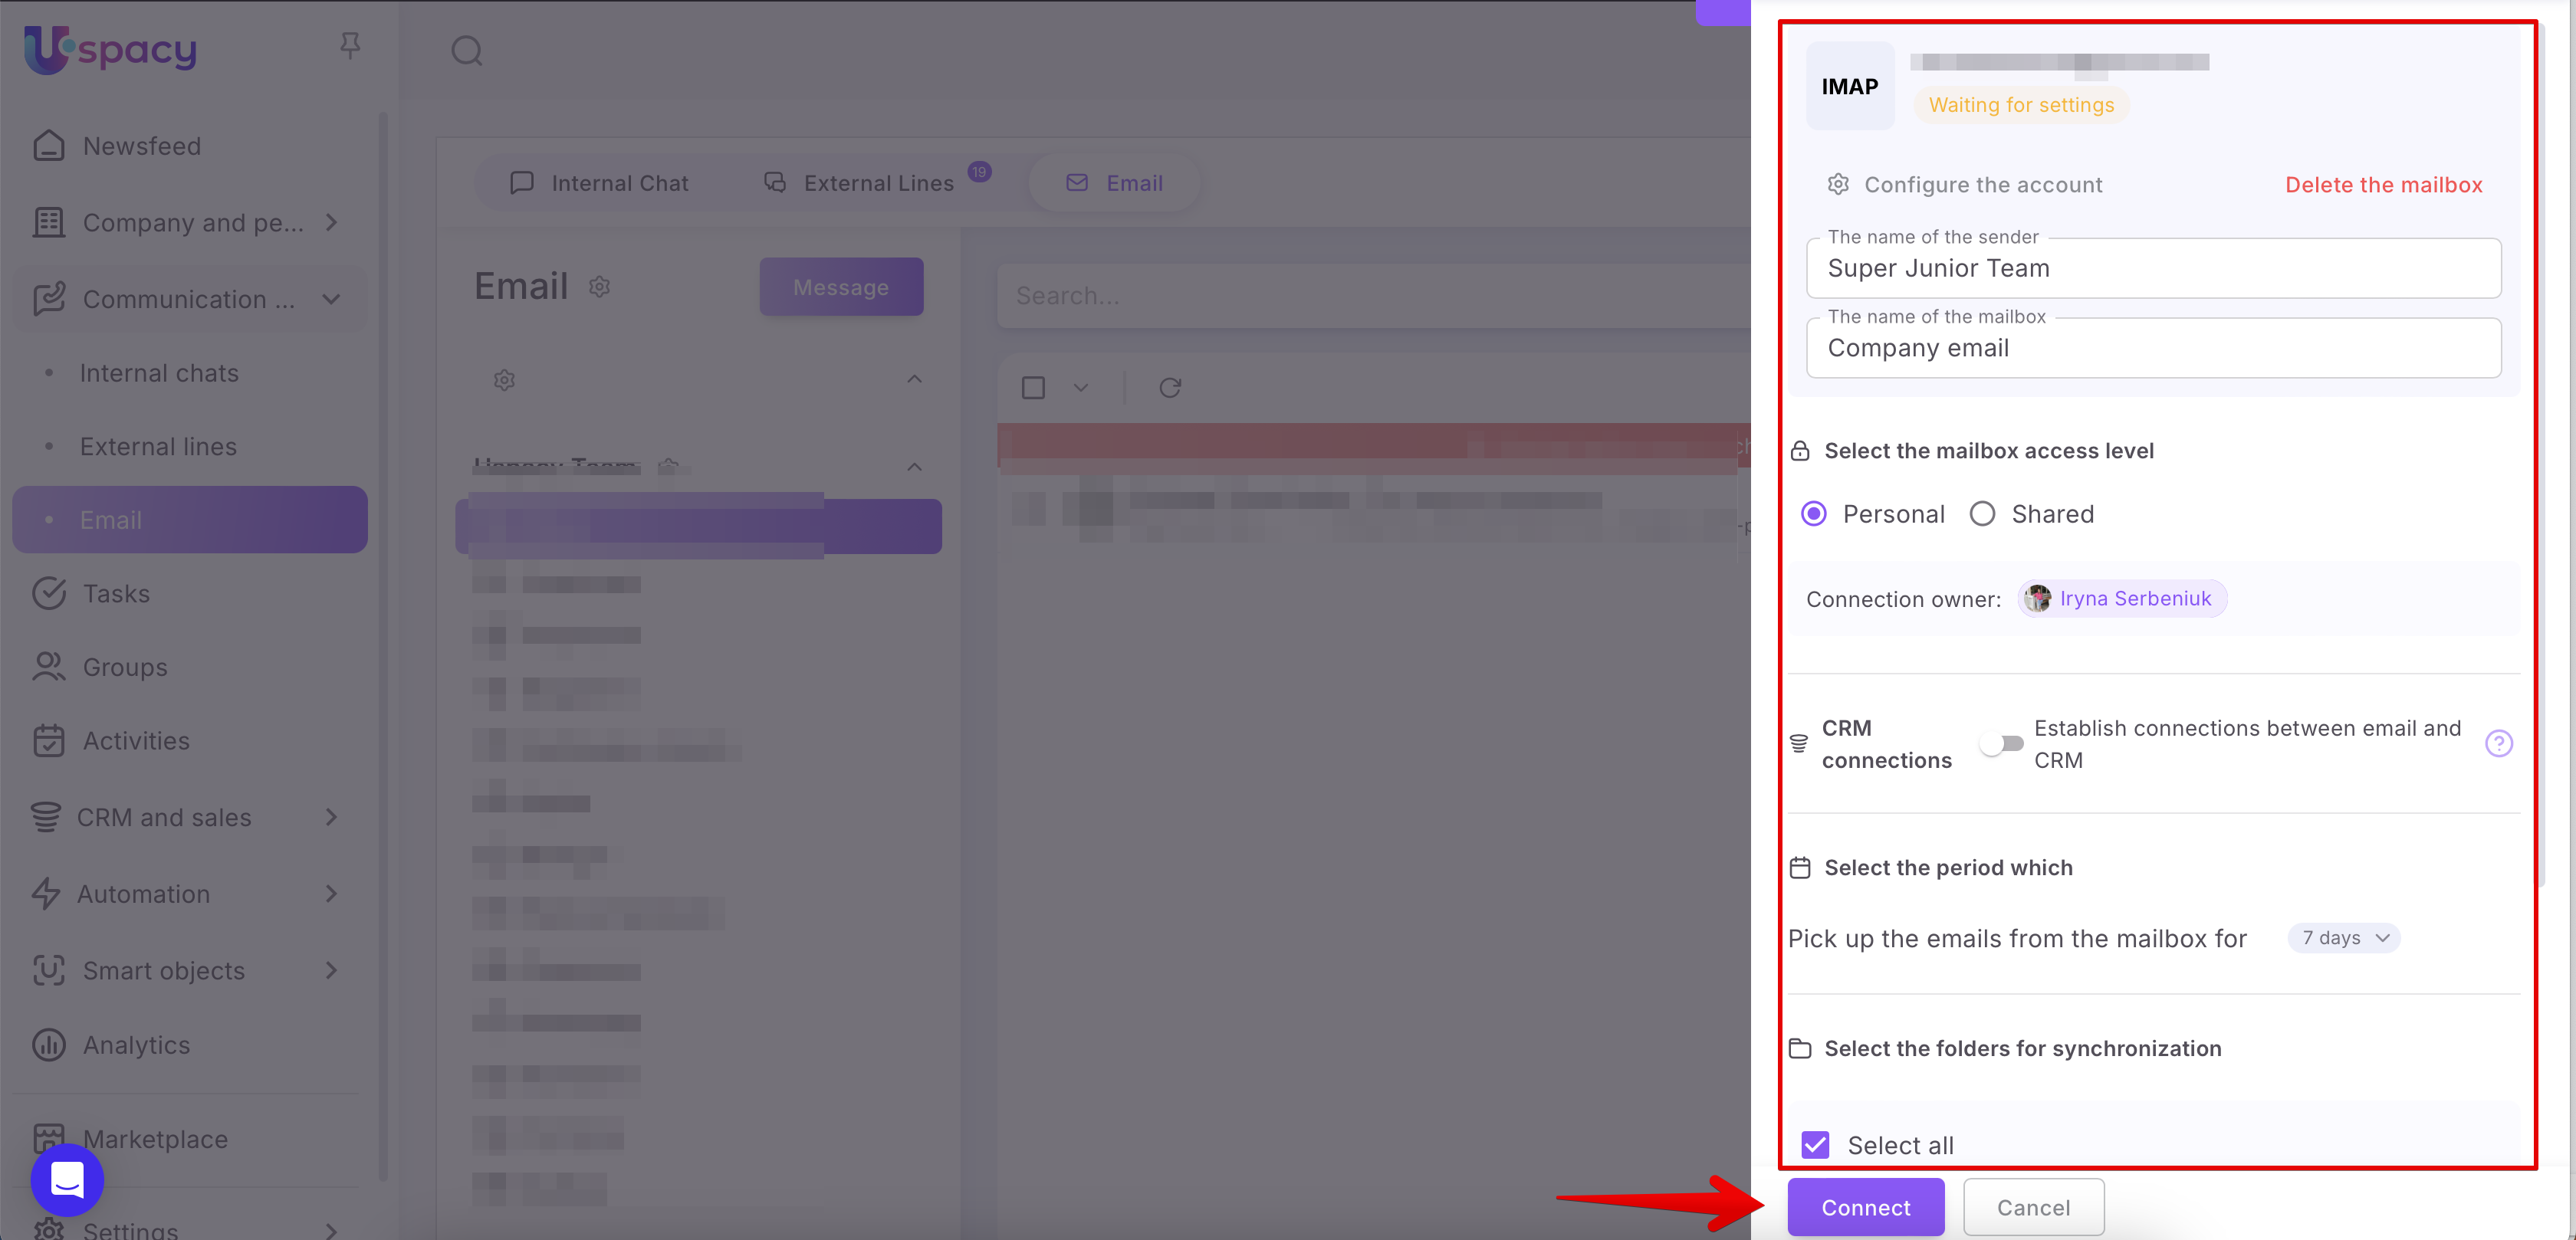
🟣 Add the name of the sender (1) and the name of the mailbox (2).

💡They will be displayed after the connection is complete.

🟣 Select the level of access to the mailbox.
Now this parameter has advanced settings and a visual interface 😉
There are two options:
- Personal – only the user who connected the email will be able to work with it.
- Shared – only those users who are specified in the corresponding field will have access to work with the email.
🌟 Note: The shared access level can only be used on commercial plans.


💡Please note that regardless of the access level, only the user who directly added it to the Space can make changes to the settings of the already connected mail.
🟣 Establish email and CRM connections.
🔍 You can read more on how to configure this parameter in the following article.

🟣 Select the period to pick up emails from the mailbox. It can be 7 days, 1 month, 3 months and 1 year.

🟣 Select folders for syncronization. That is, which categories of emails from the service need to be pulled into Space.

🟣 Set up signatures for this mailbox that can be used by the owner of the connection when sending emails.
🔍 You can read more on how to configure this setting in the following article.

💡 All users who gain access to the mailbox will also be able to configure their signatures. However, it’s possible to do after the connection setup is completed.

🔍 For more details on this topic, go to this article.
When all parameters are set, check everything again and click Connect.

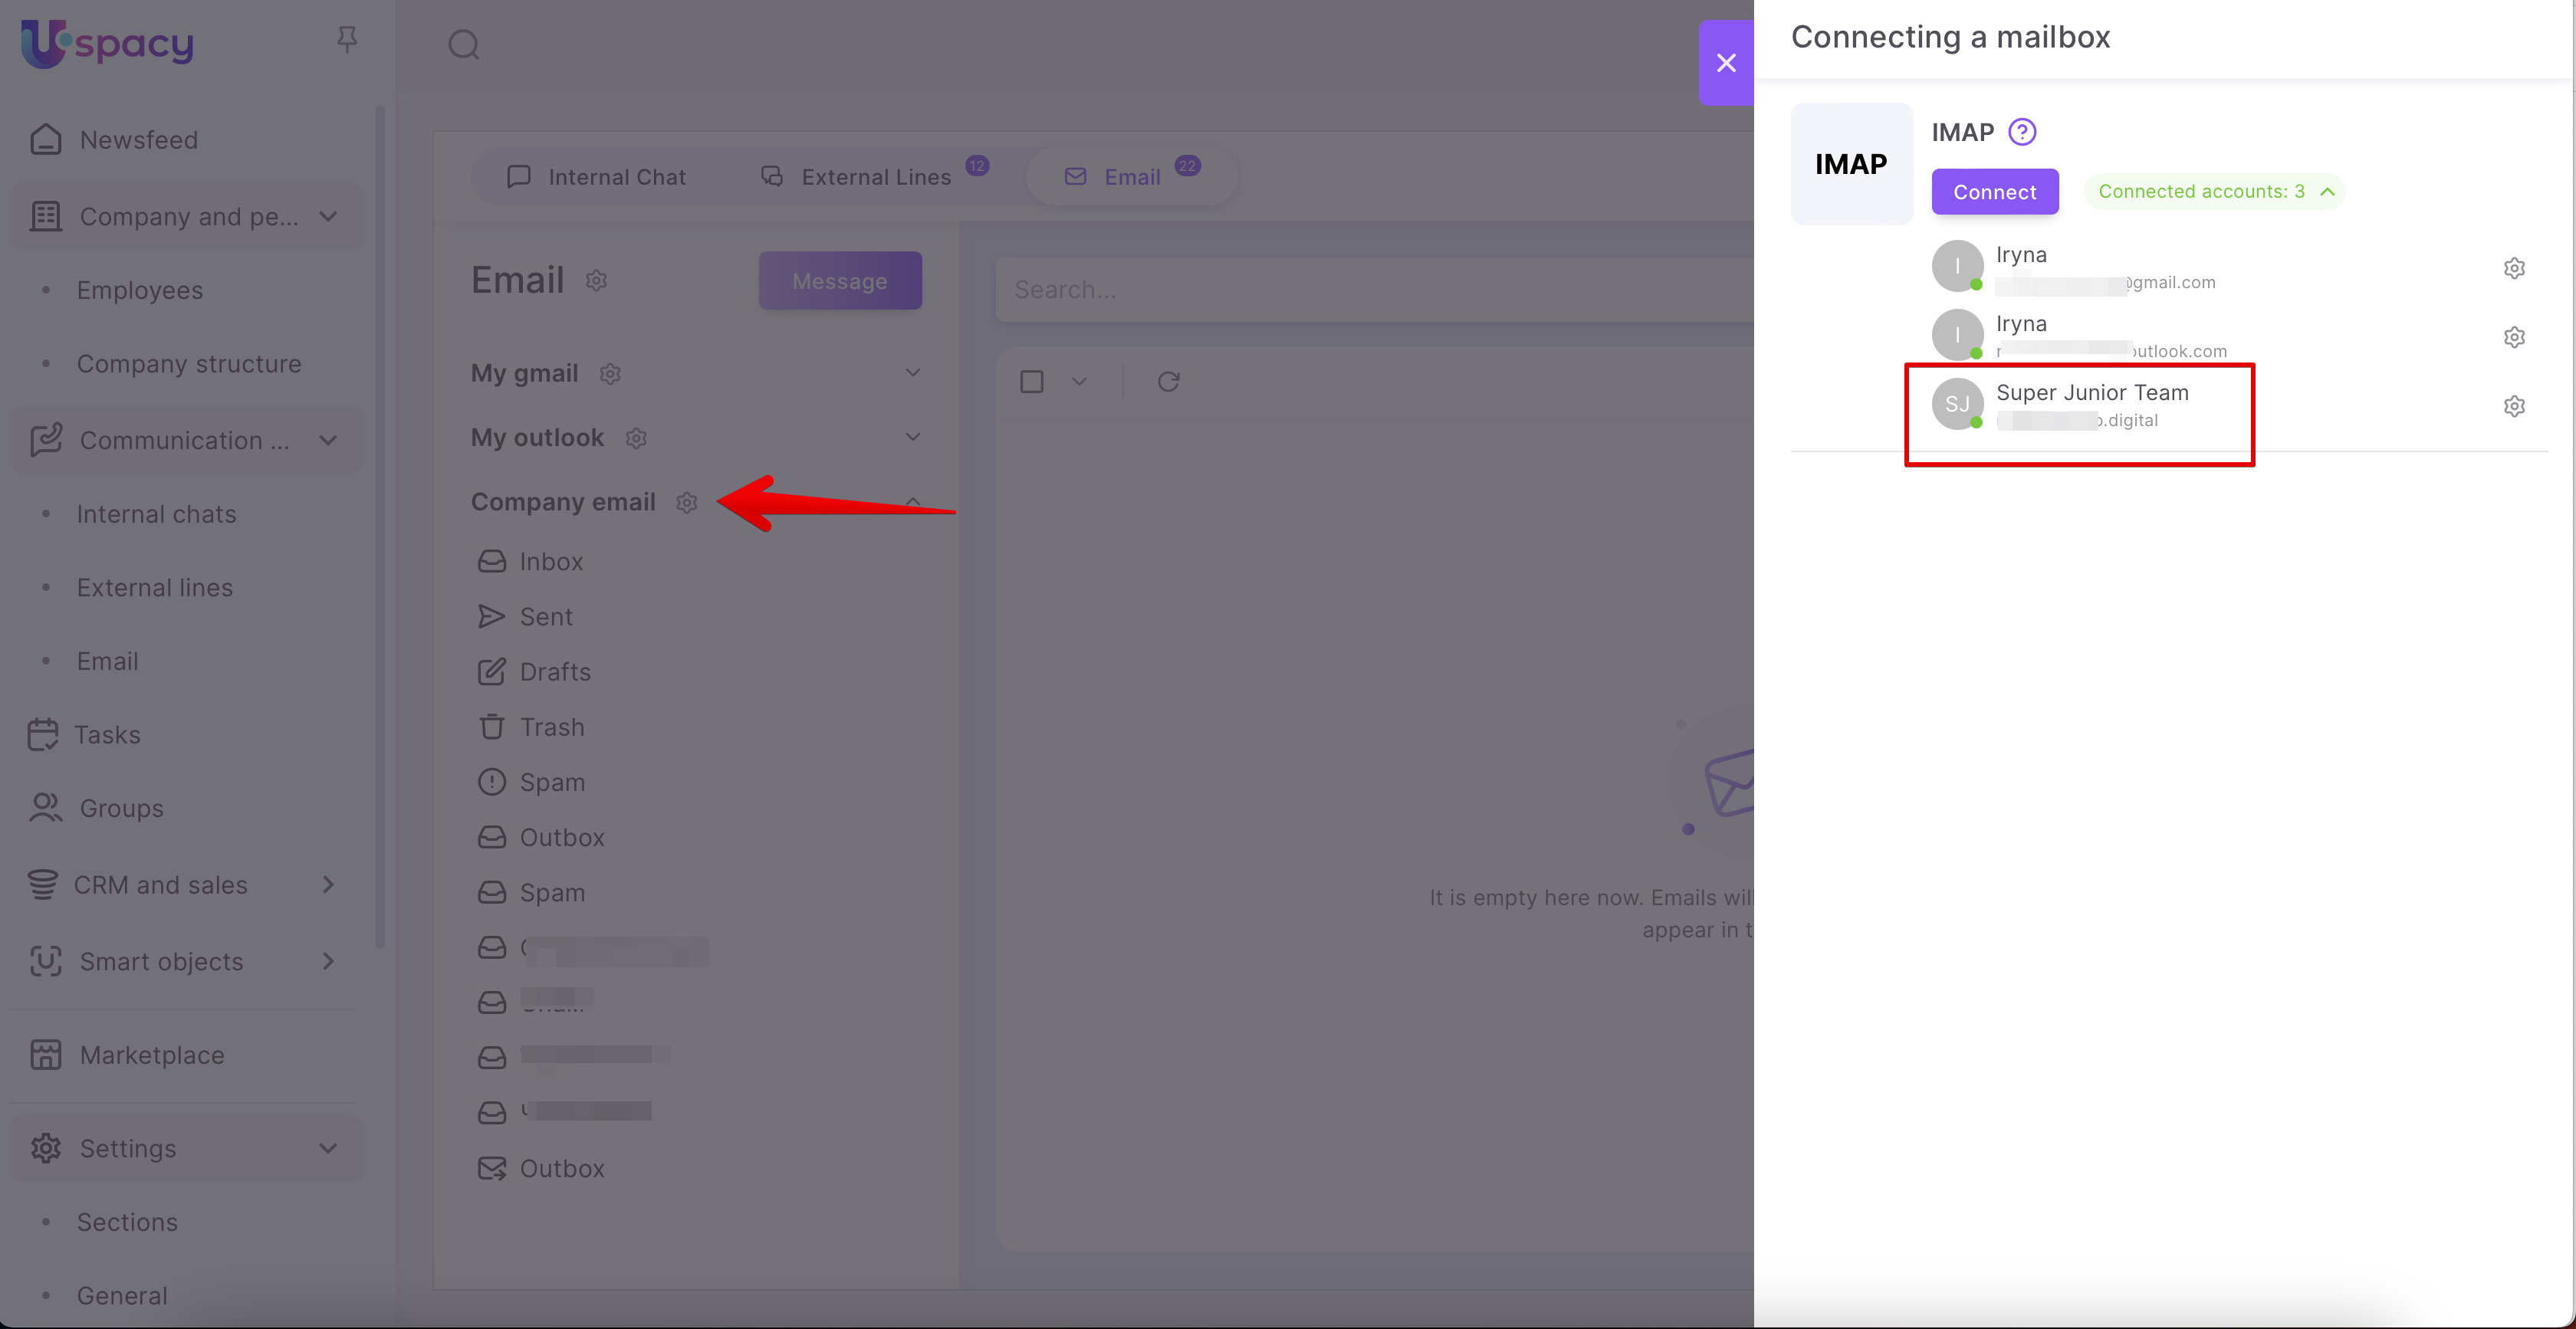
After that, the mailbox will appear in the list of connected accounts.

After the synchronization is completed (it takes some time), you will be able to work with your Gmail directly in Space.
🌟Please note that the synchronization frequency depends on the plan:

How to connect Microsoft Outlook mail?
To do this, follow these five main steps:
Step 1. Enable POP/IMAP support
Go to your Outlook account settings and open the Email Synchronization tab. You can do it at this link.

Check that permission to use the POP protocol is active.

Step 2. Turn on two-factor authentication.
Go to the Security tab (2) in your Microsoft account settings (1).

Here, click on Two-Step Verification – Turn on.

Before connecting two-step verification, you need to select a way to verify your identity. This can be either a backup email or a phone number.
Enter the required data and click Next.
Enter the received code in the field and click Next.
After that, Microsoft will require pre-authorization using an additional security tool. Then, you'll proceed to connecting two-step verification. To do this, click Turn on in the corresponding block.

Read the quick note and go Next to settings.

Select a method to verify your identity again. It can be a phone number or backup email address. A special authenticator program is also included.
💡If you previously selected a phone number as a confirmation method, then use email, for example, here. Or vice versa. If you previously selected email, enter your phone number here. Or use the authenticator program.
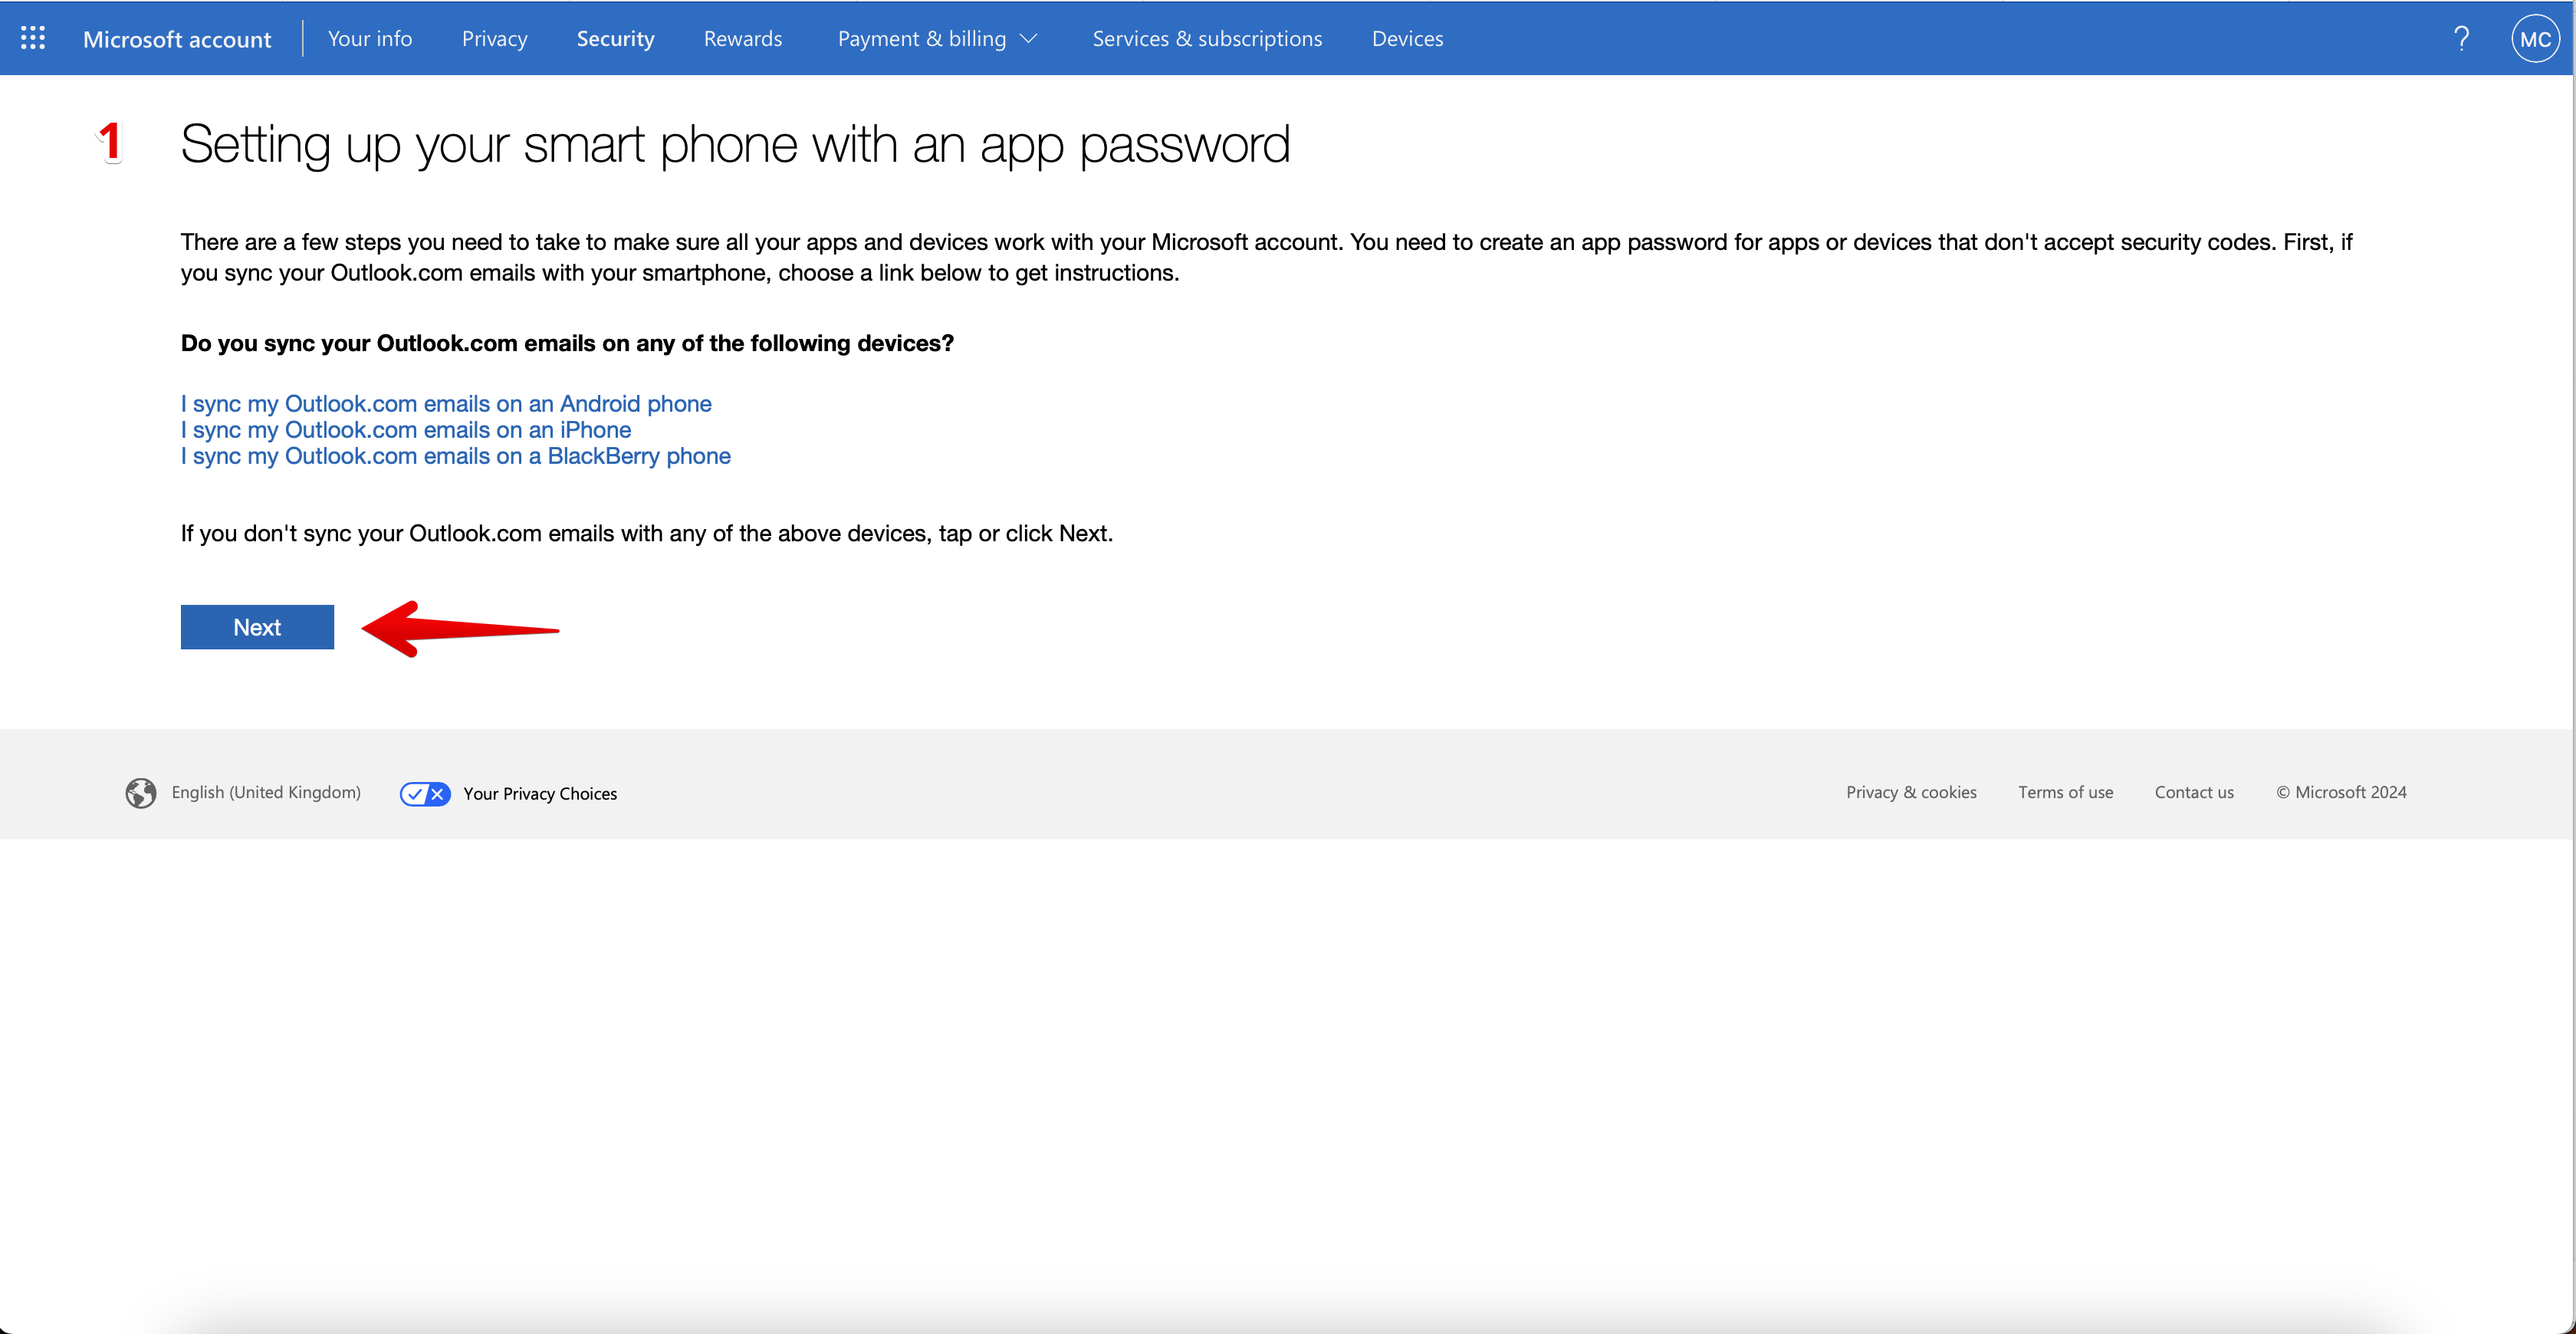
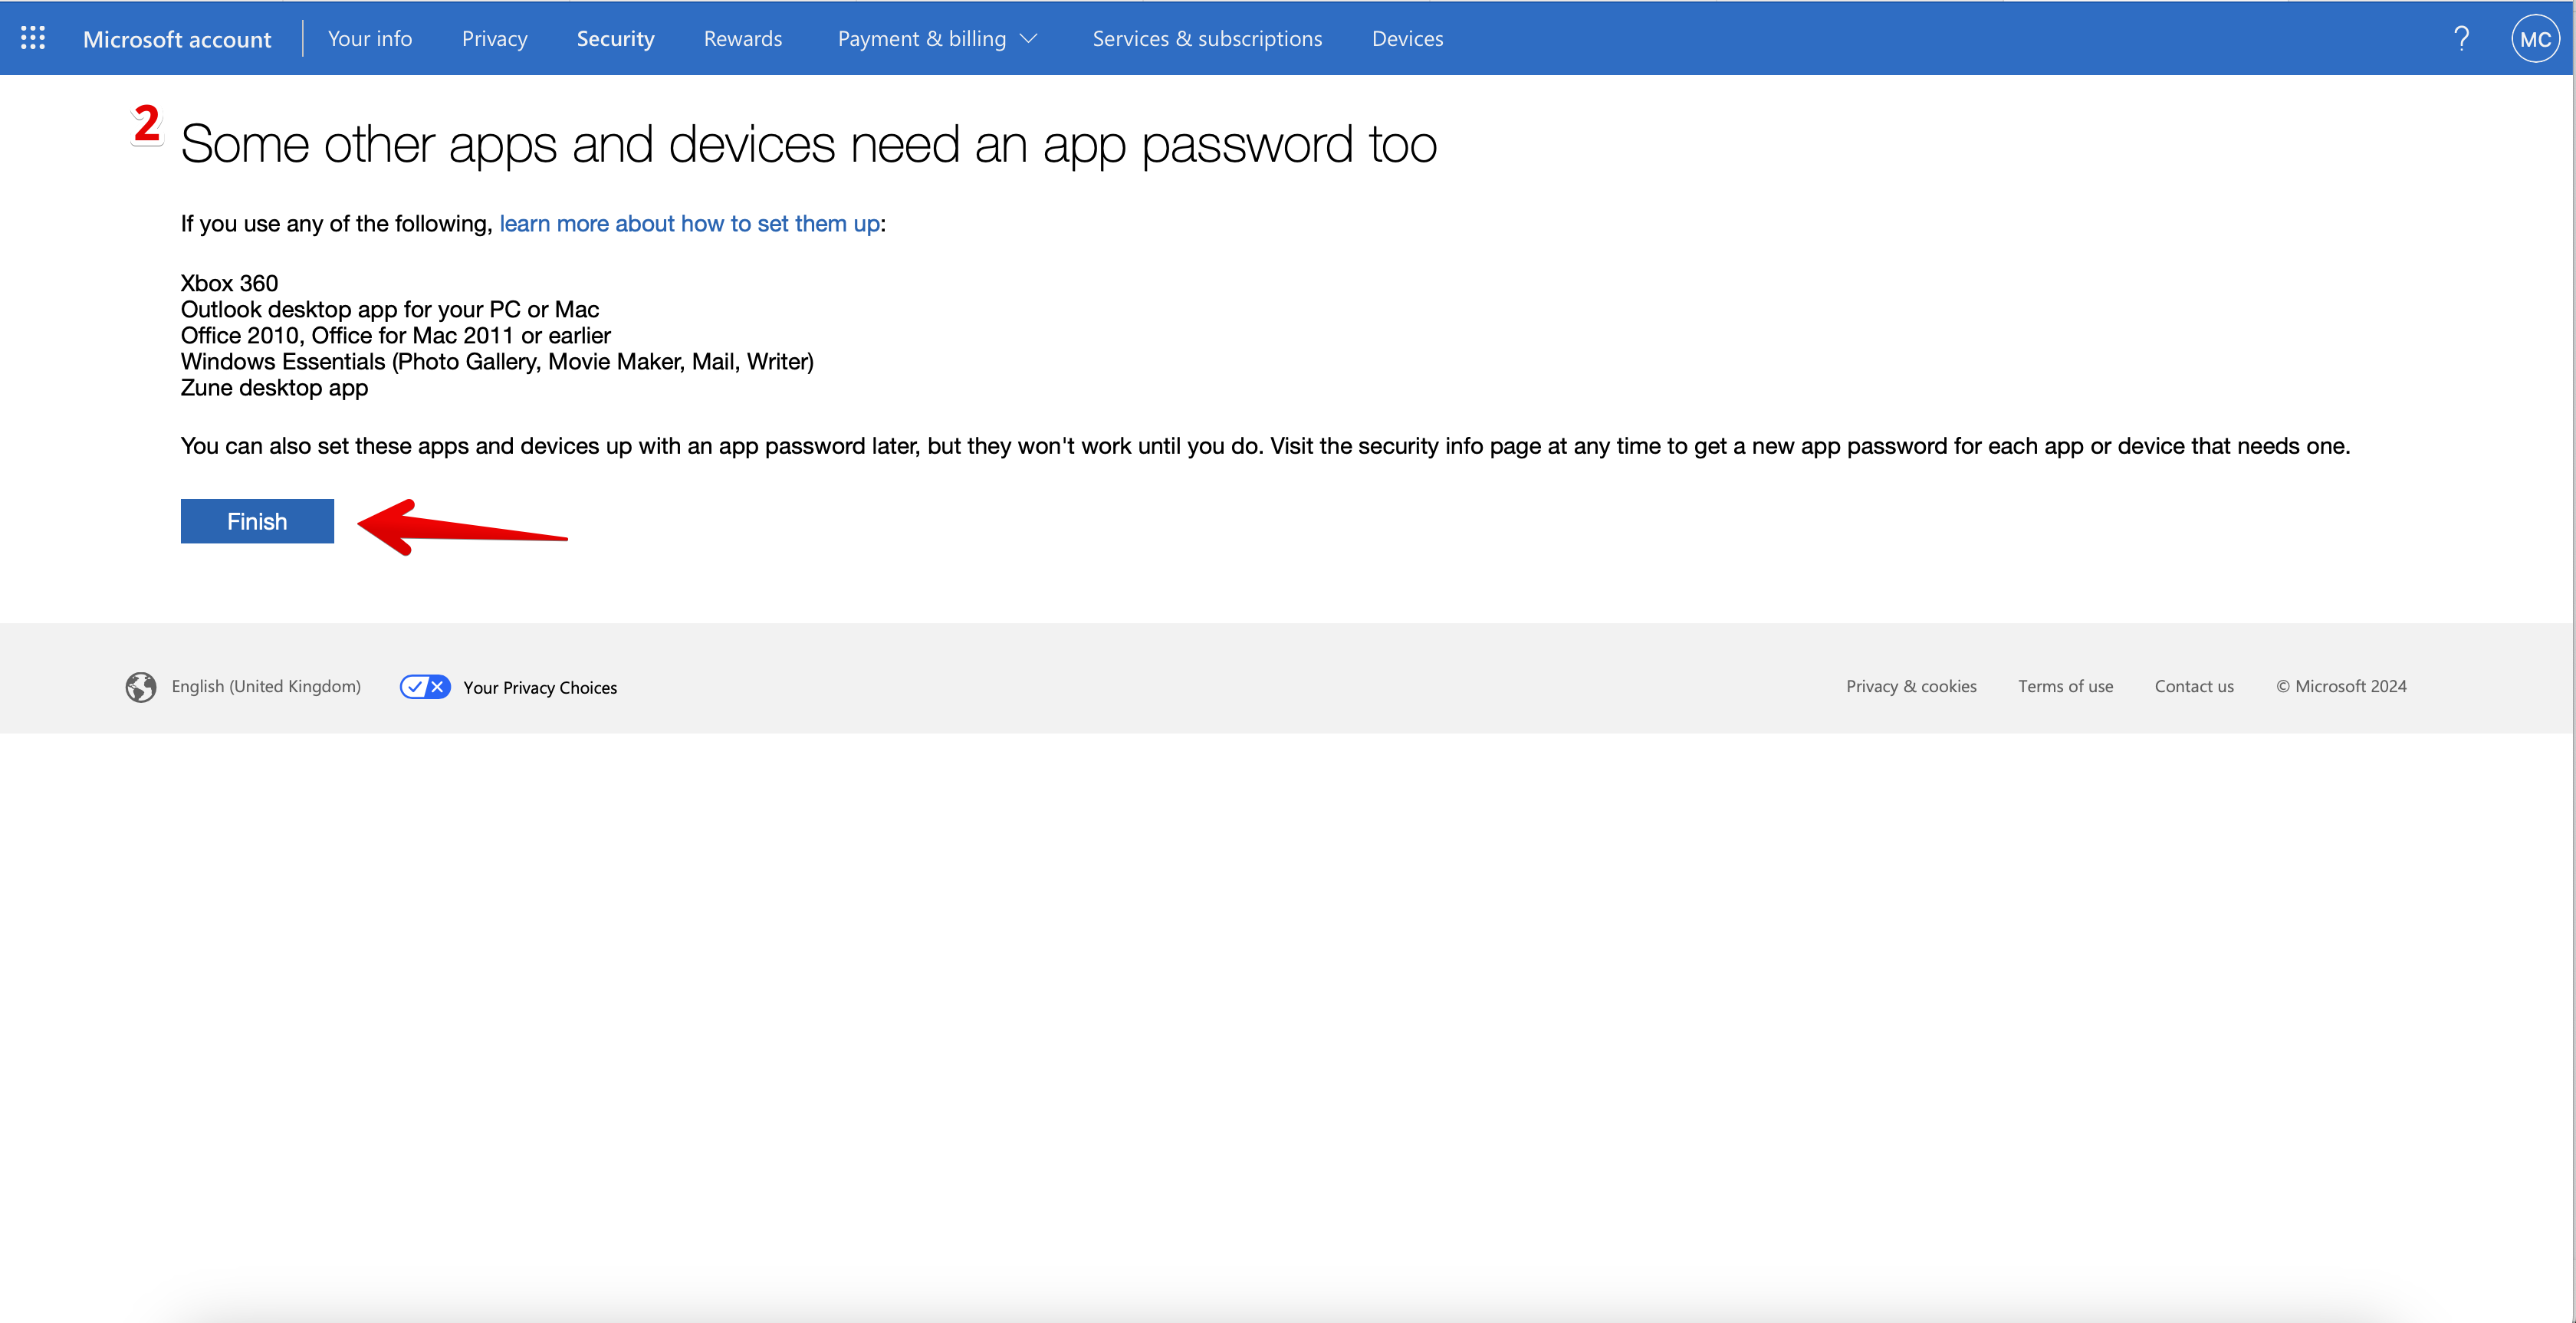
Fill out the fields with the required data or take further necessary actions. They depend on the additional verification method you select. You will then receive a code to enter. After that, you will be redirected to pages that contain information about setting the password for smartphone apps (1) and for some other devices or services (2).
So, everything is ready. In your account security settings, you can see that two-step verification is turned on.
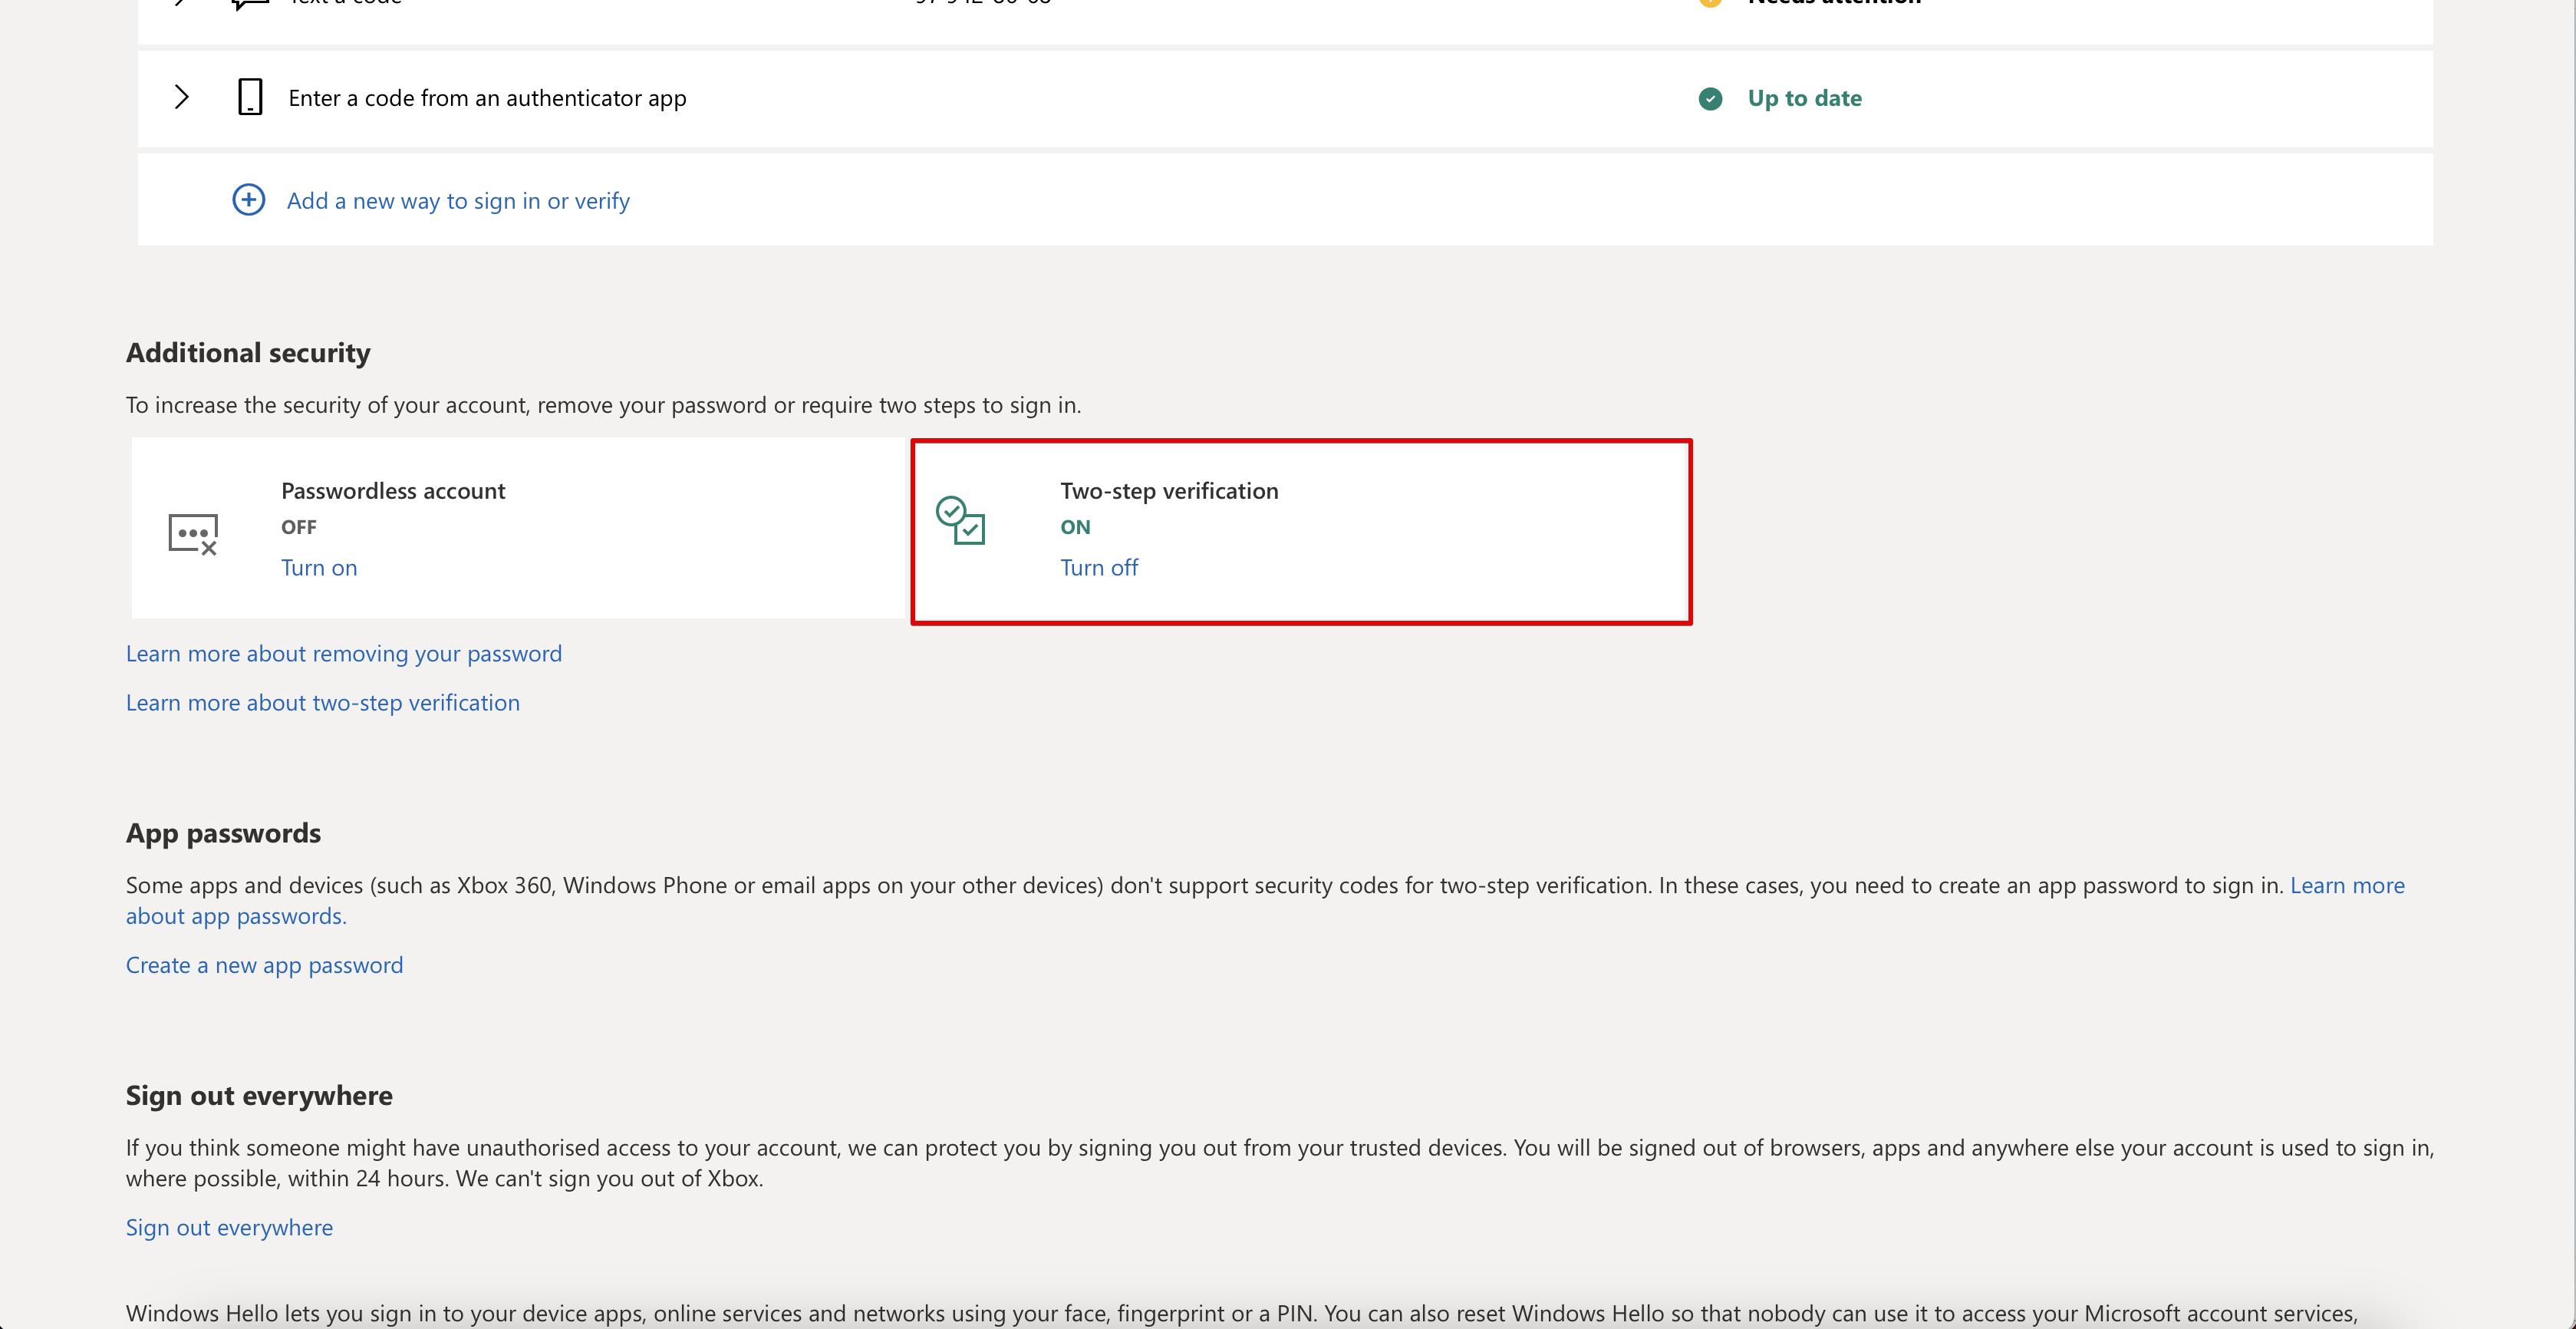
Step 3. Create a password to connect to Uspacy.
You need to click Create a new app password on the account security settings page in the App Passwords block.
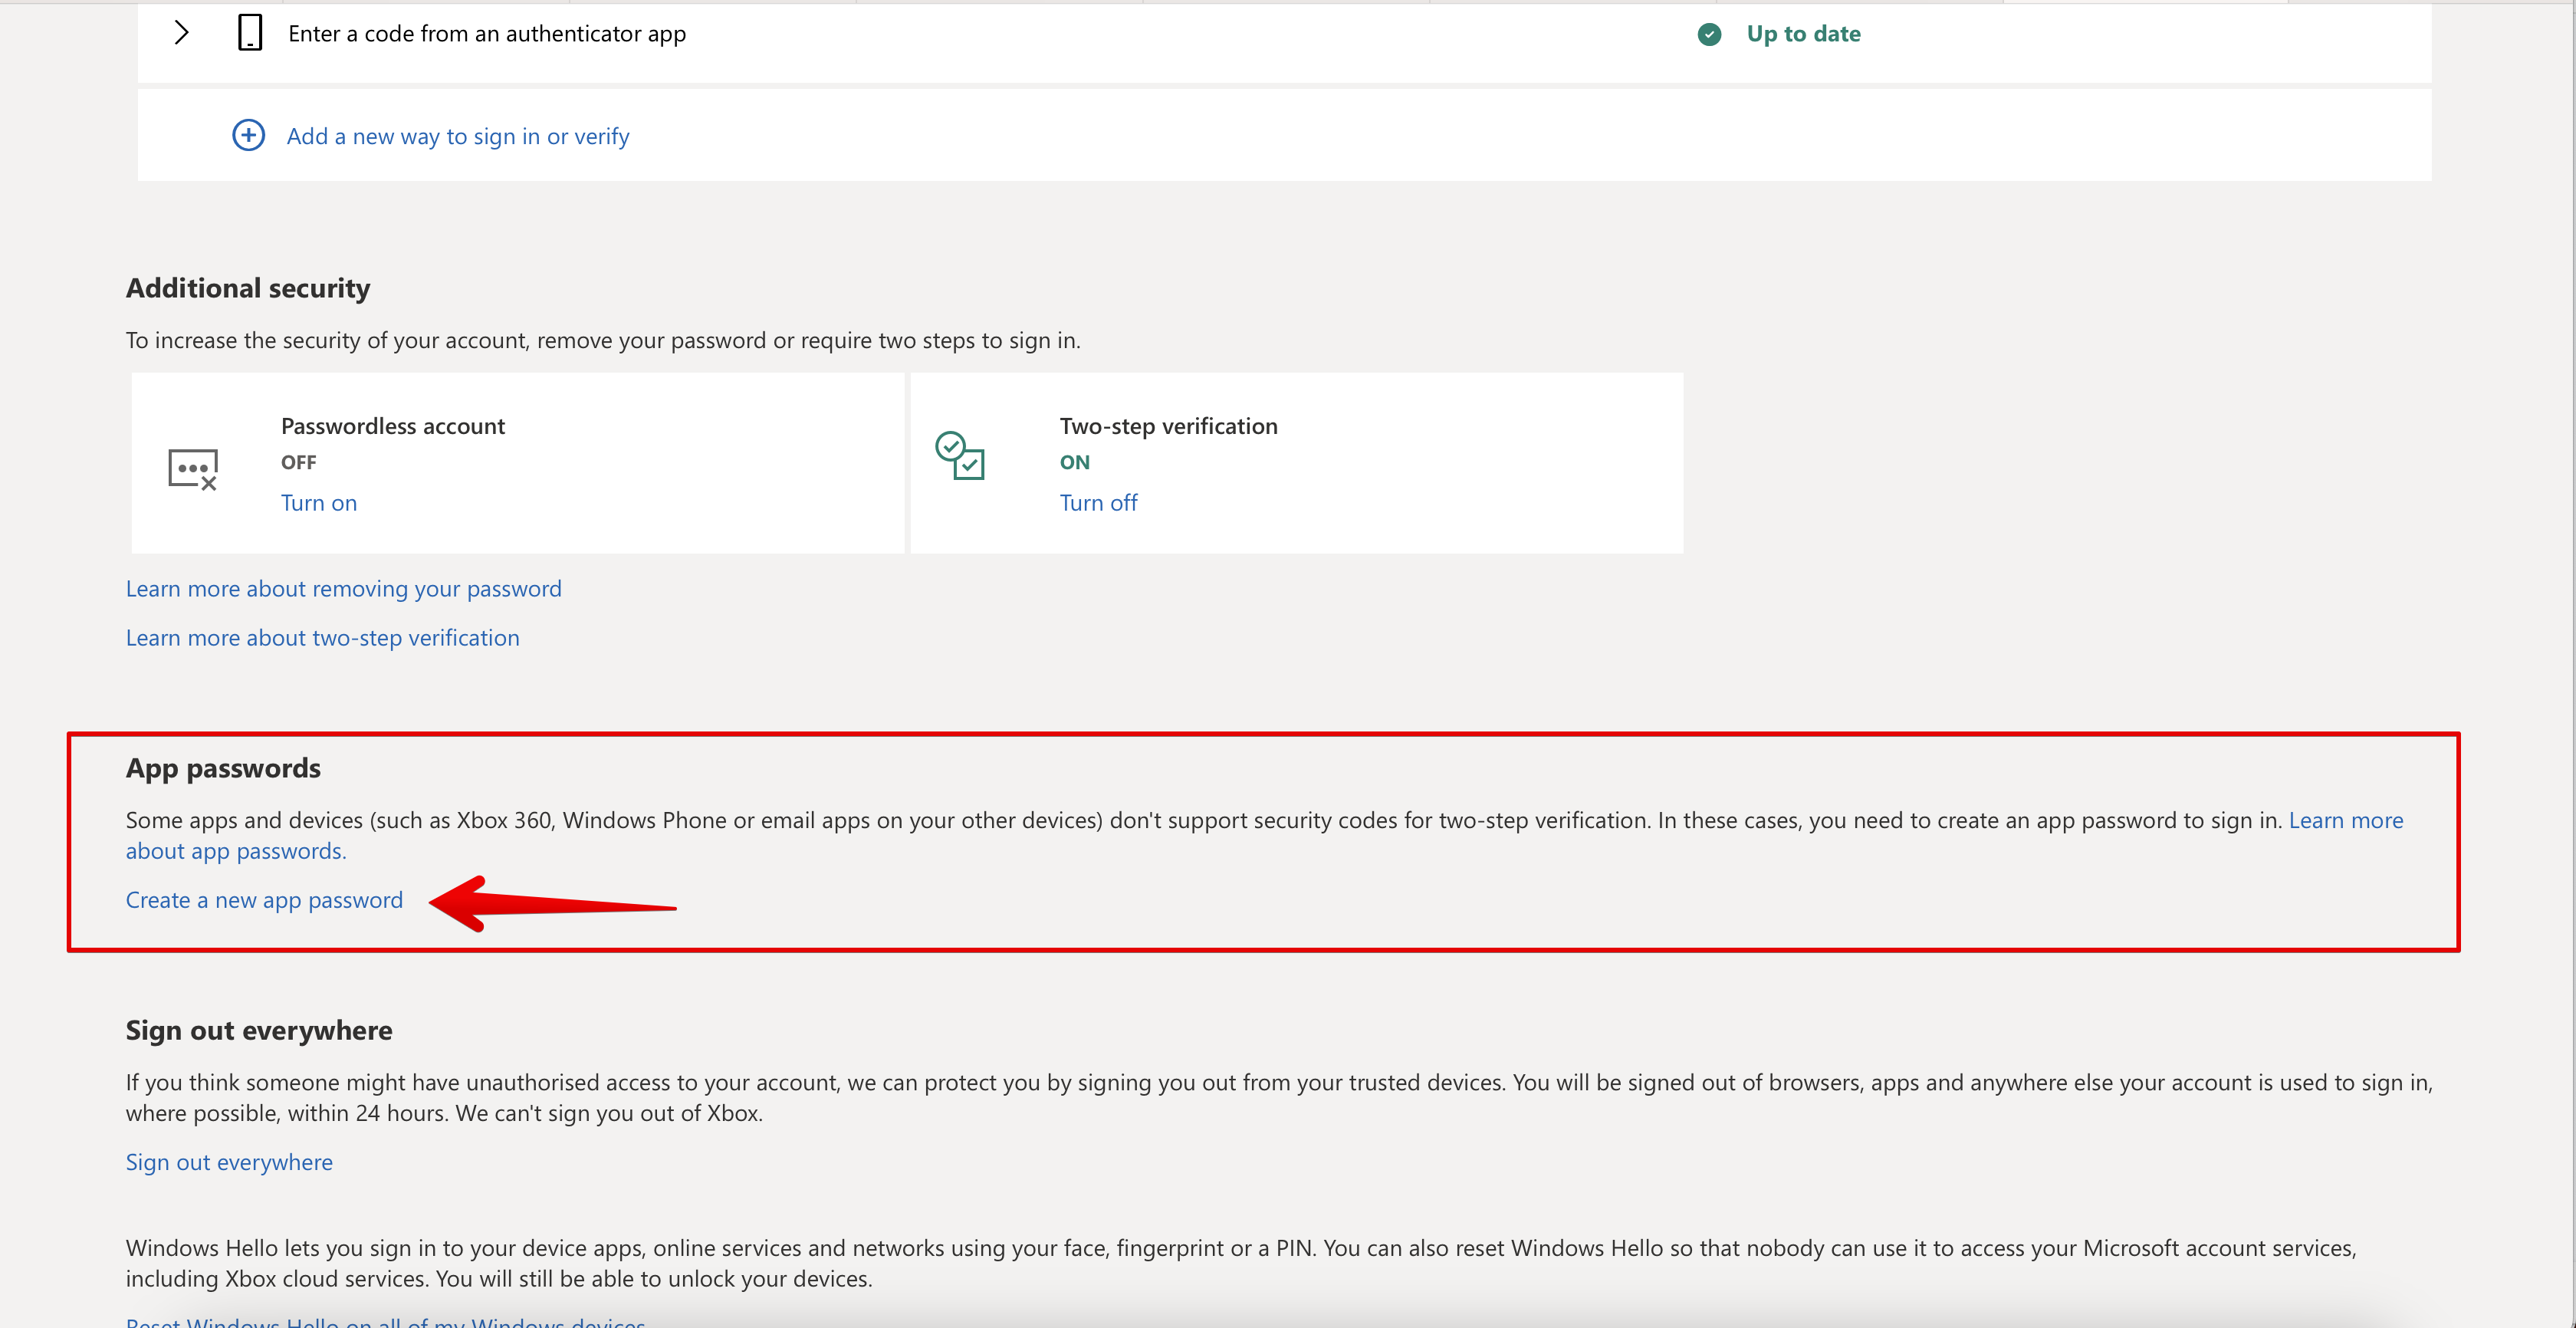
Next, there will be an automatically generated password needed to use at Uspacy. Copy it.

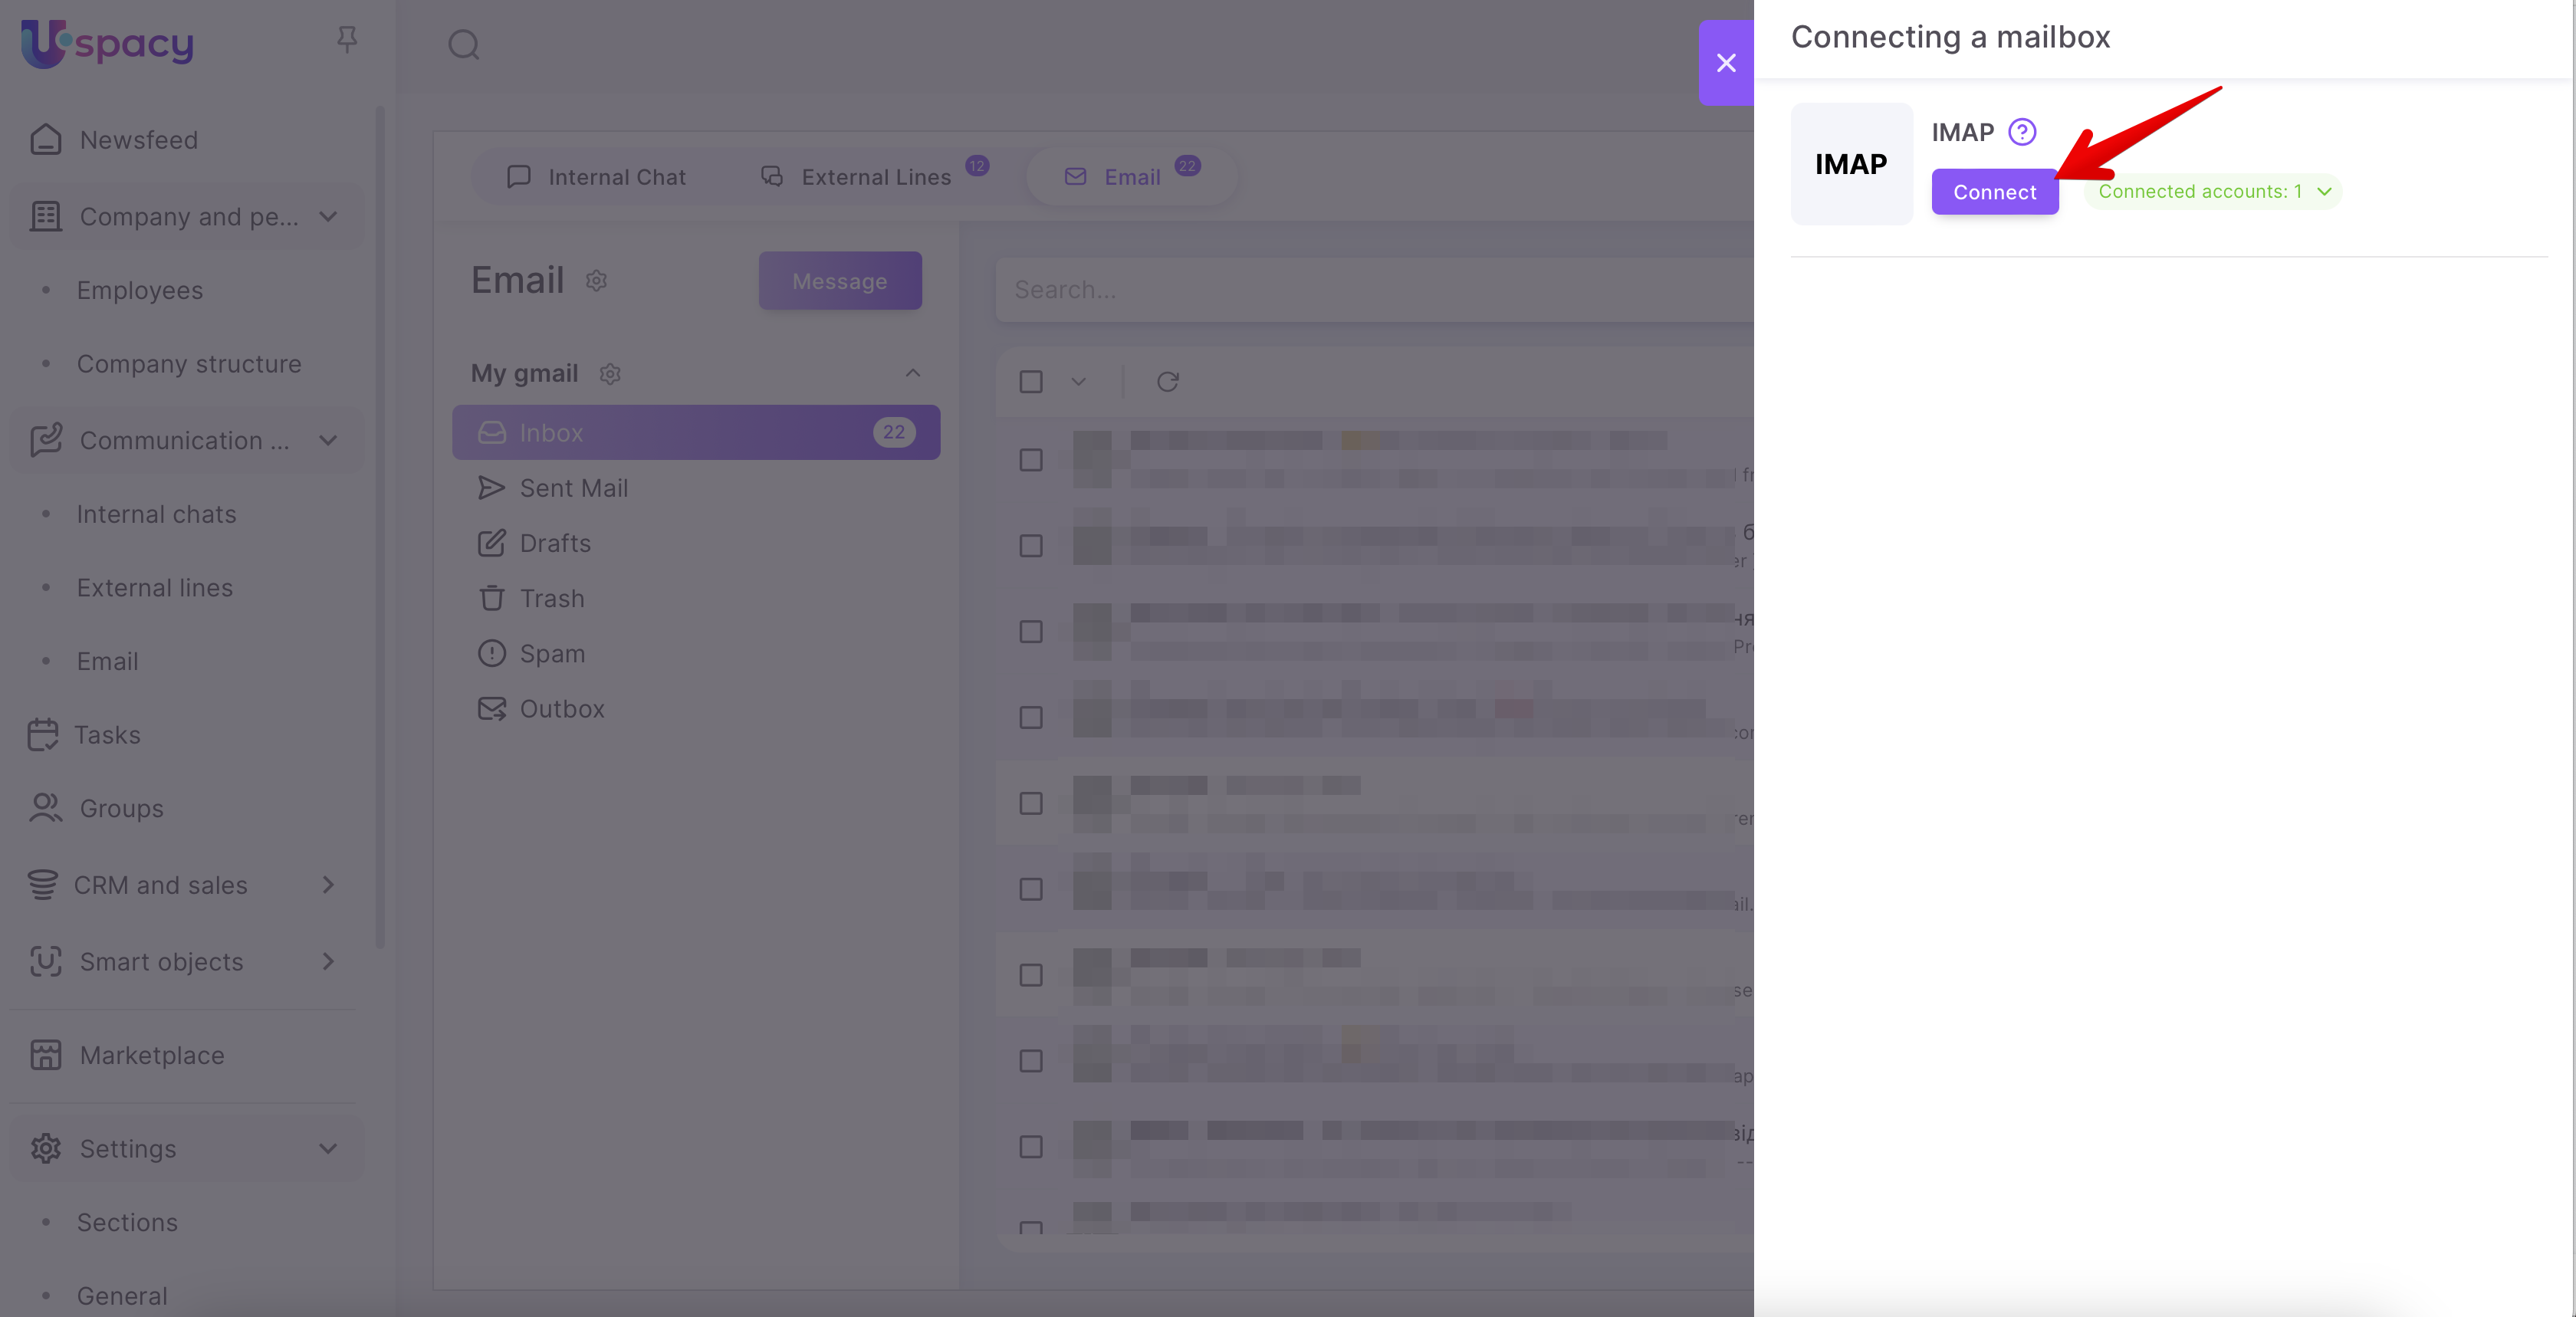
Step 4. Authorize and connect the mailbox to Space
First, you need to go to the Communication center - Email item and click Connect.
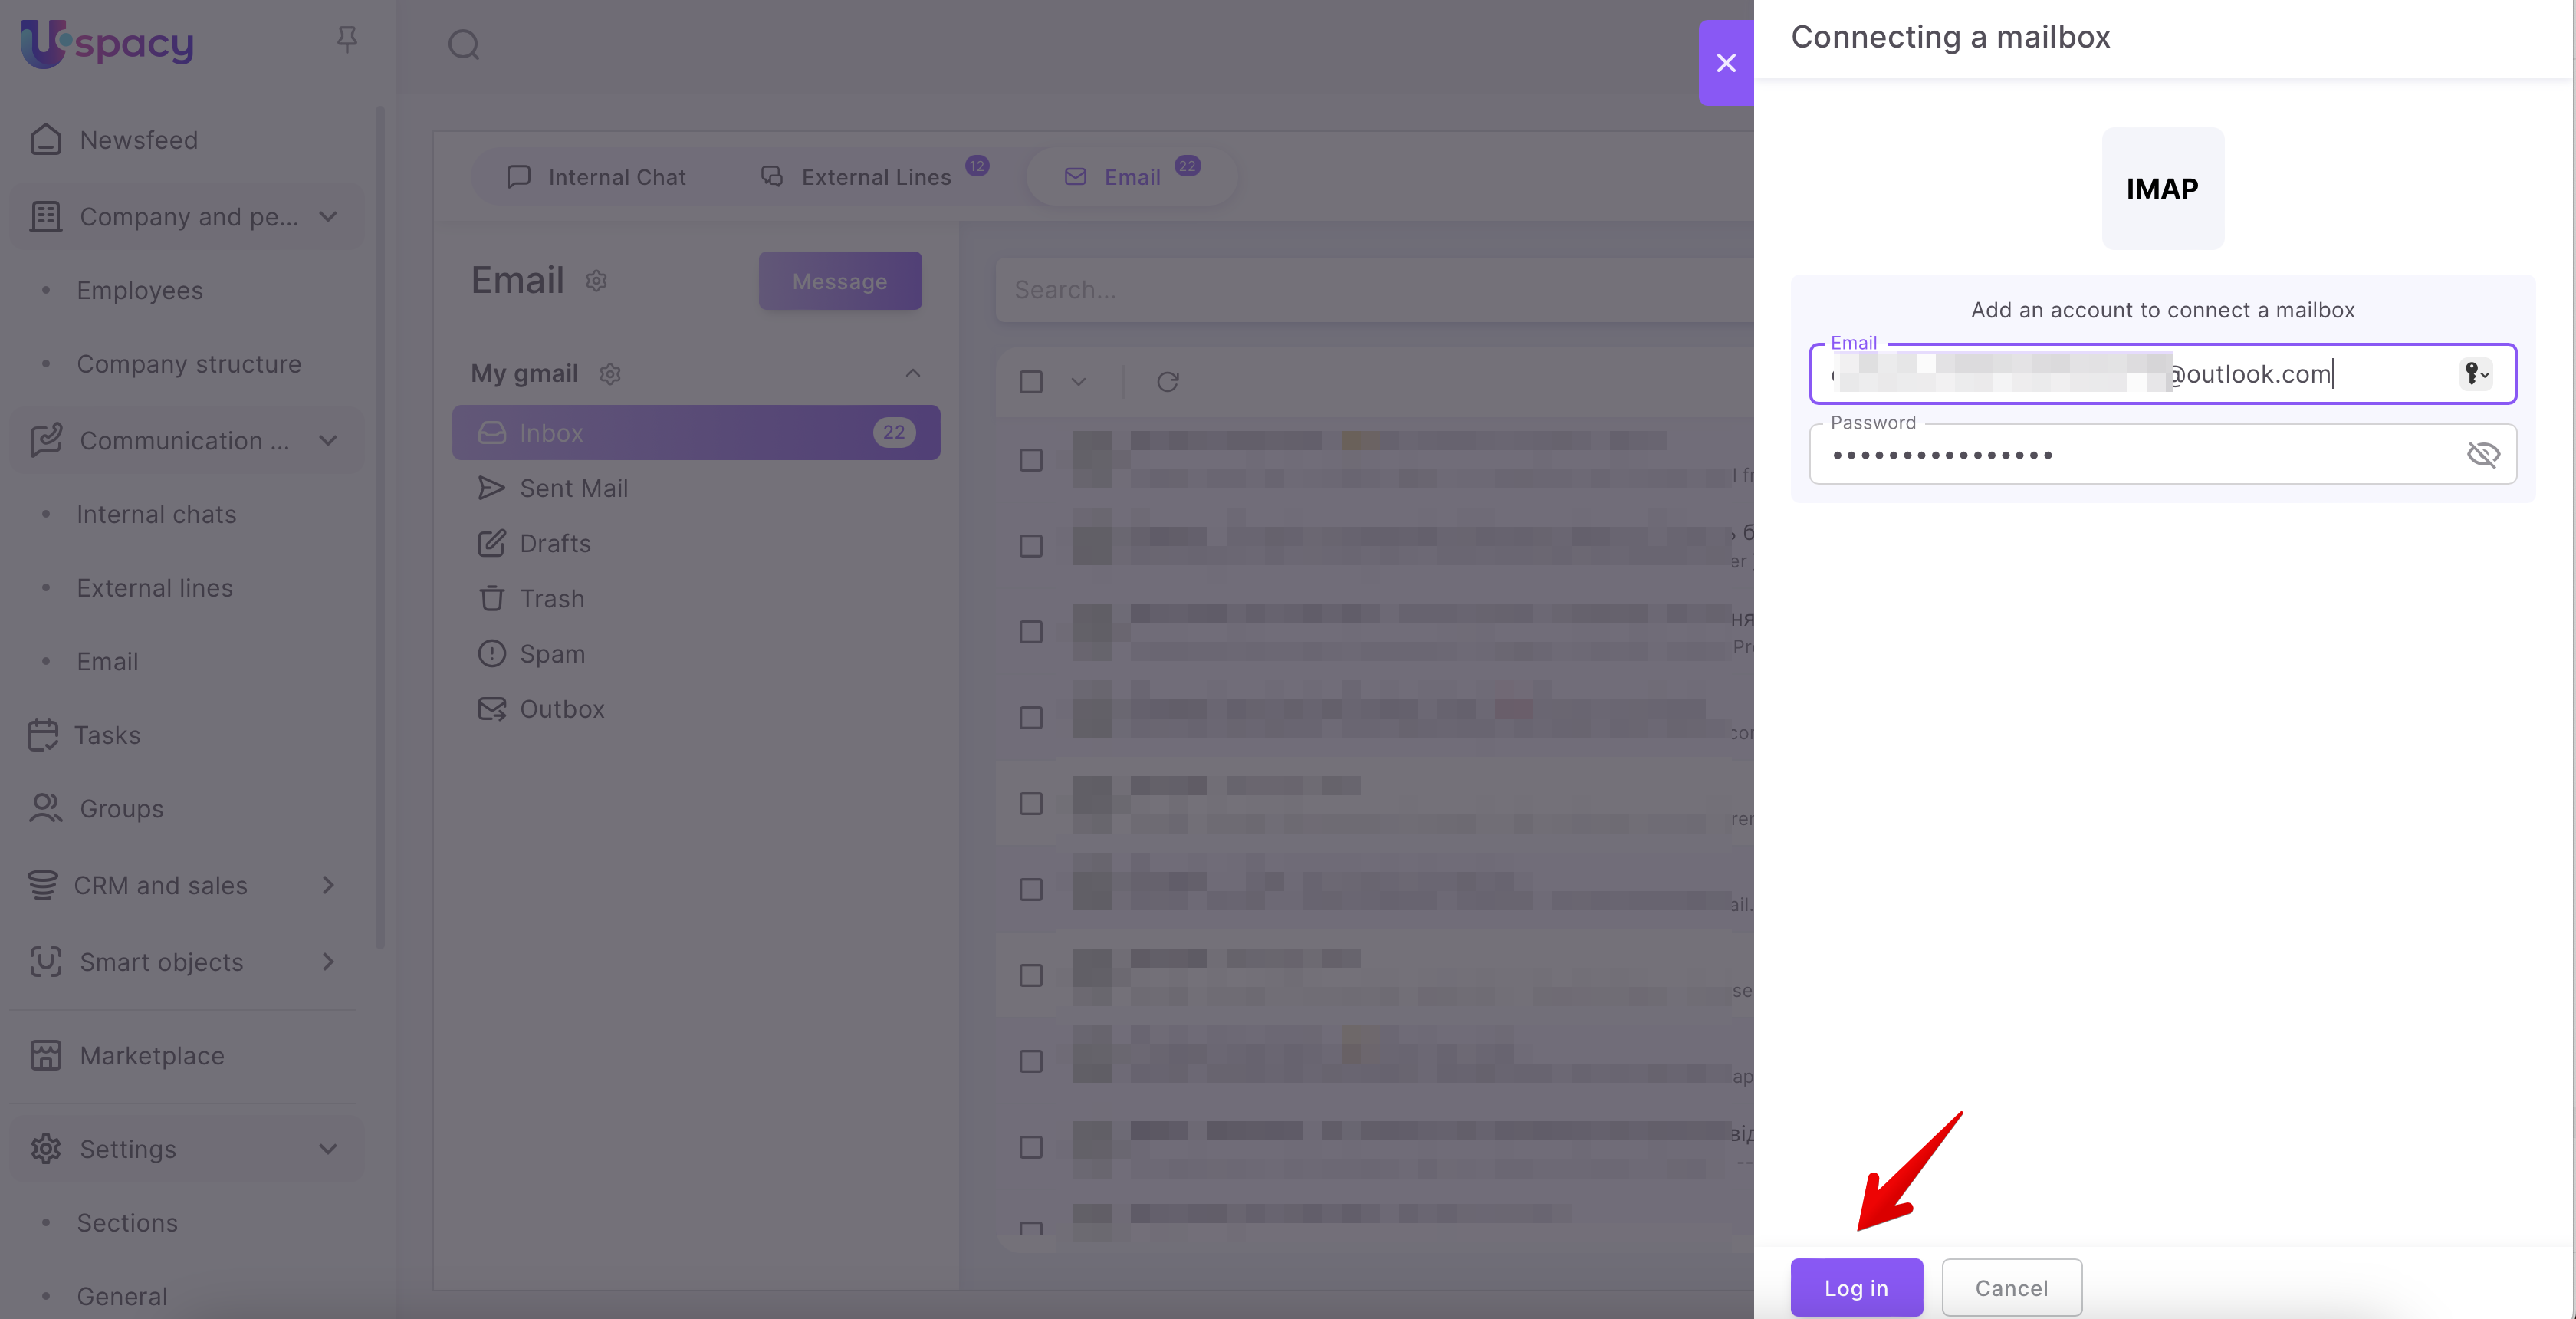
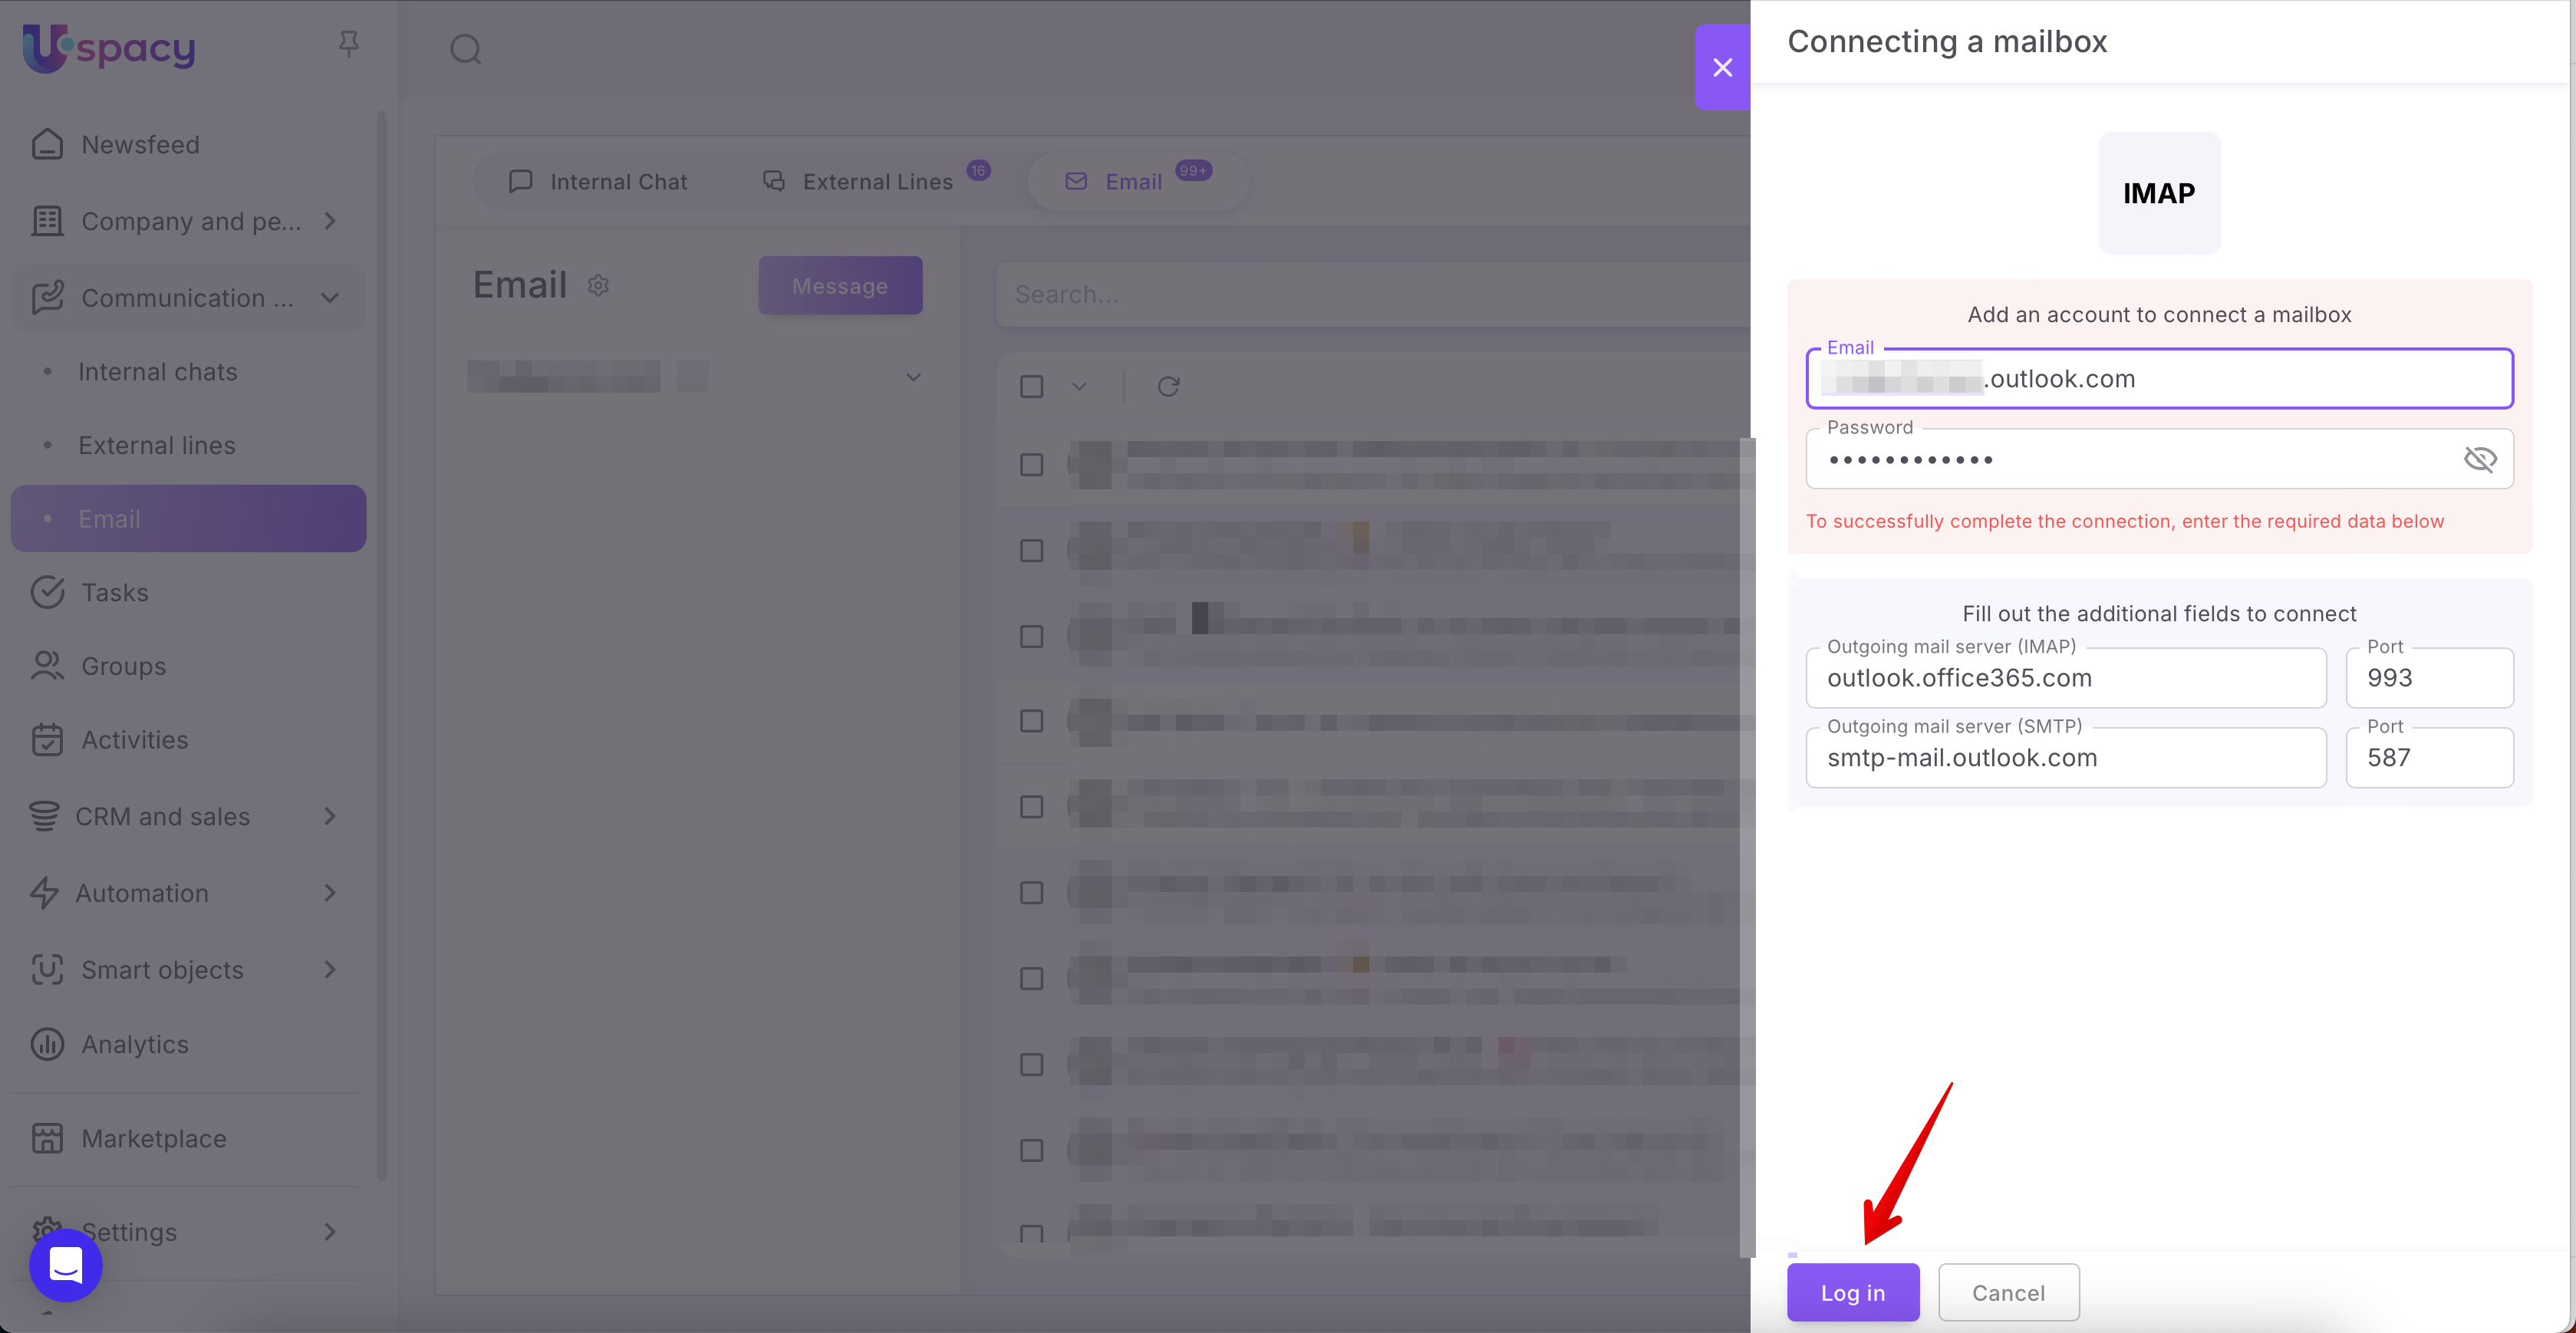
Next, enter the address of the mailbox you plan to connect, as well as the password that was generated in the Microsoft Outlook account settings. Finally, click Log in.
In order to successfully complete the process and connect the mailbox, enter the required data.
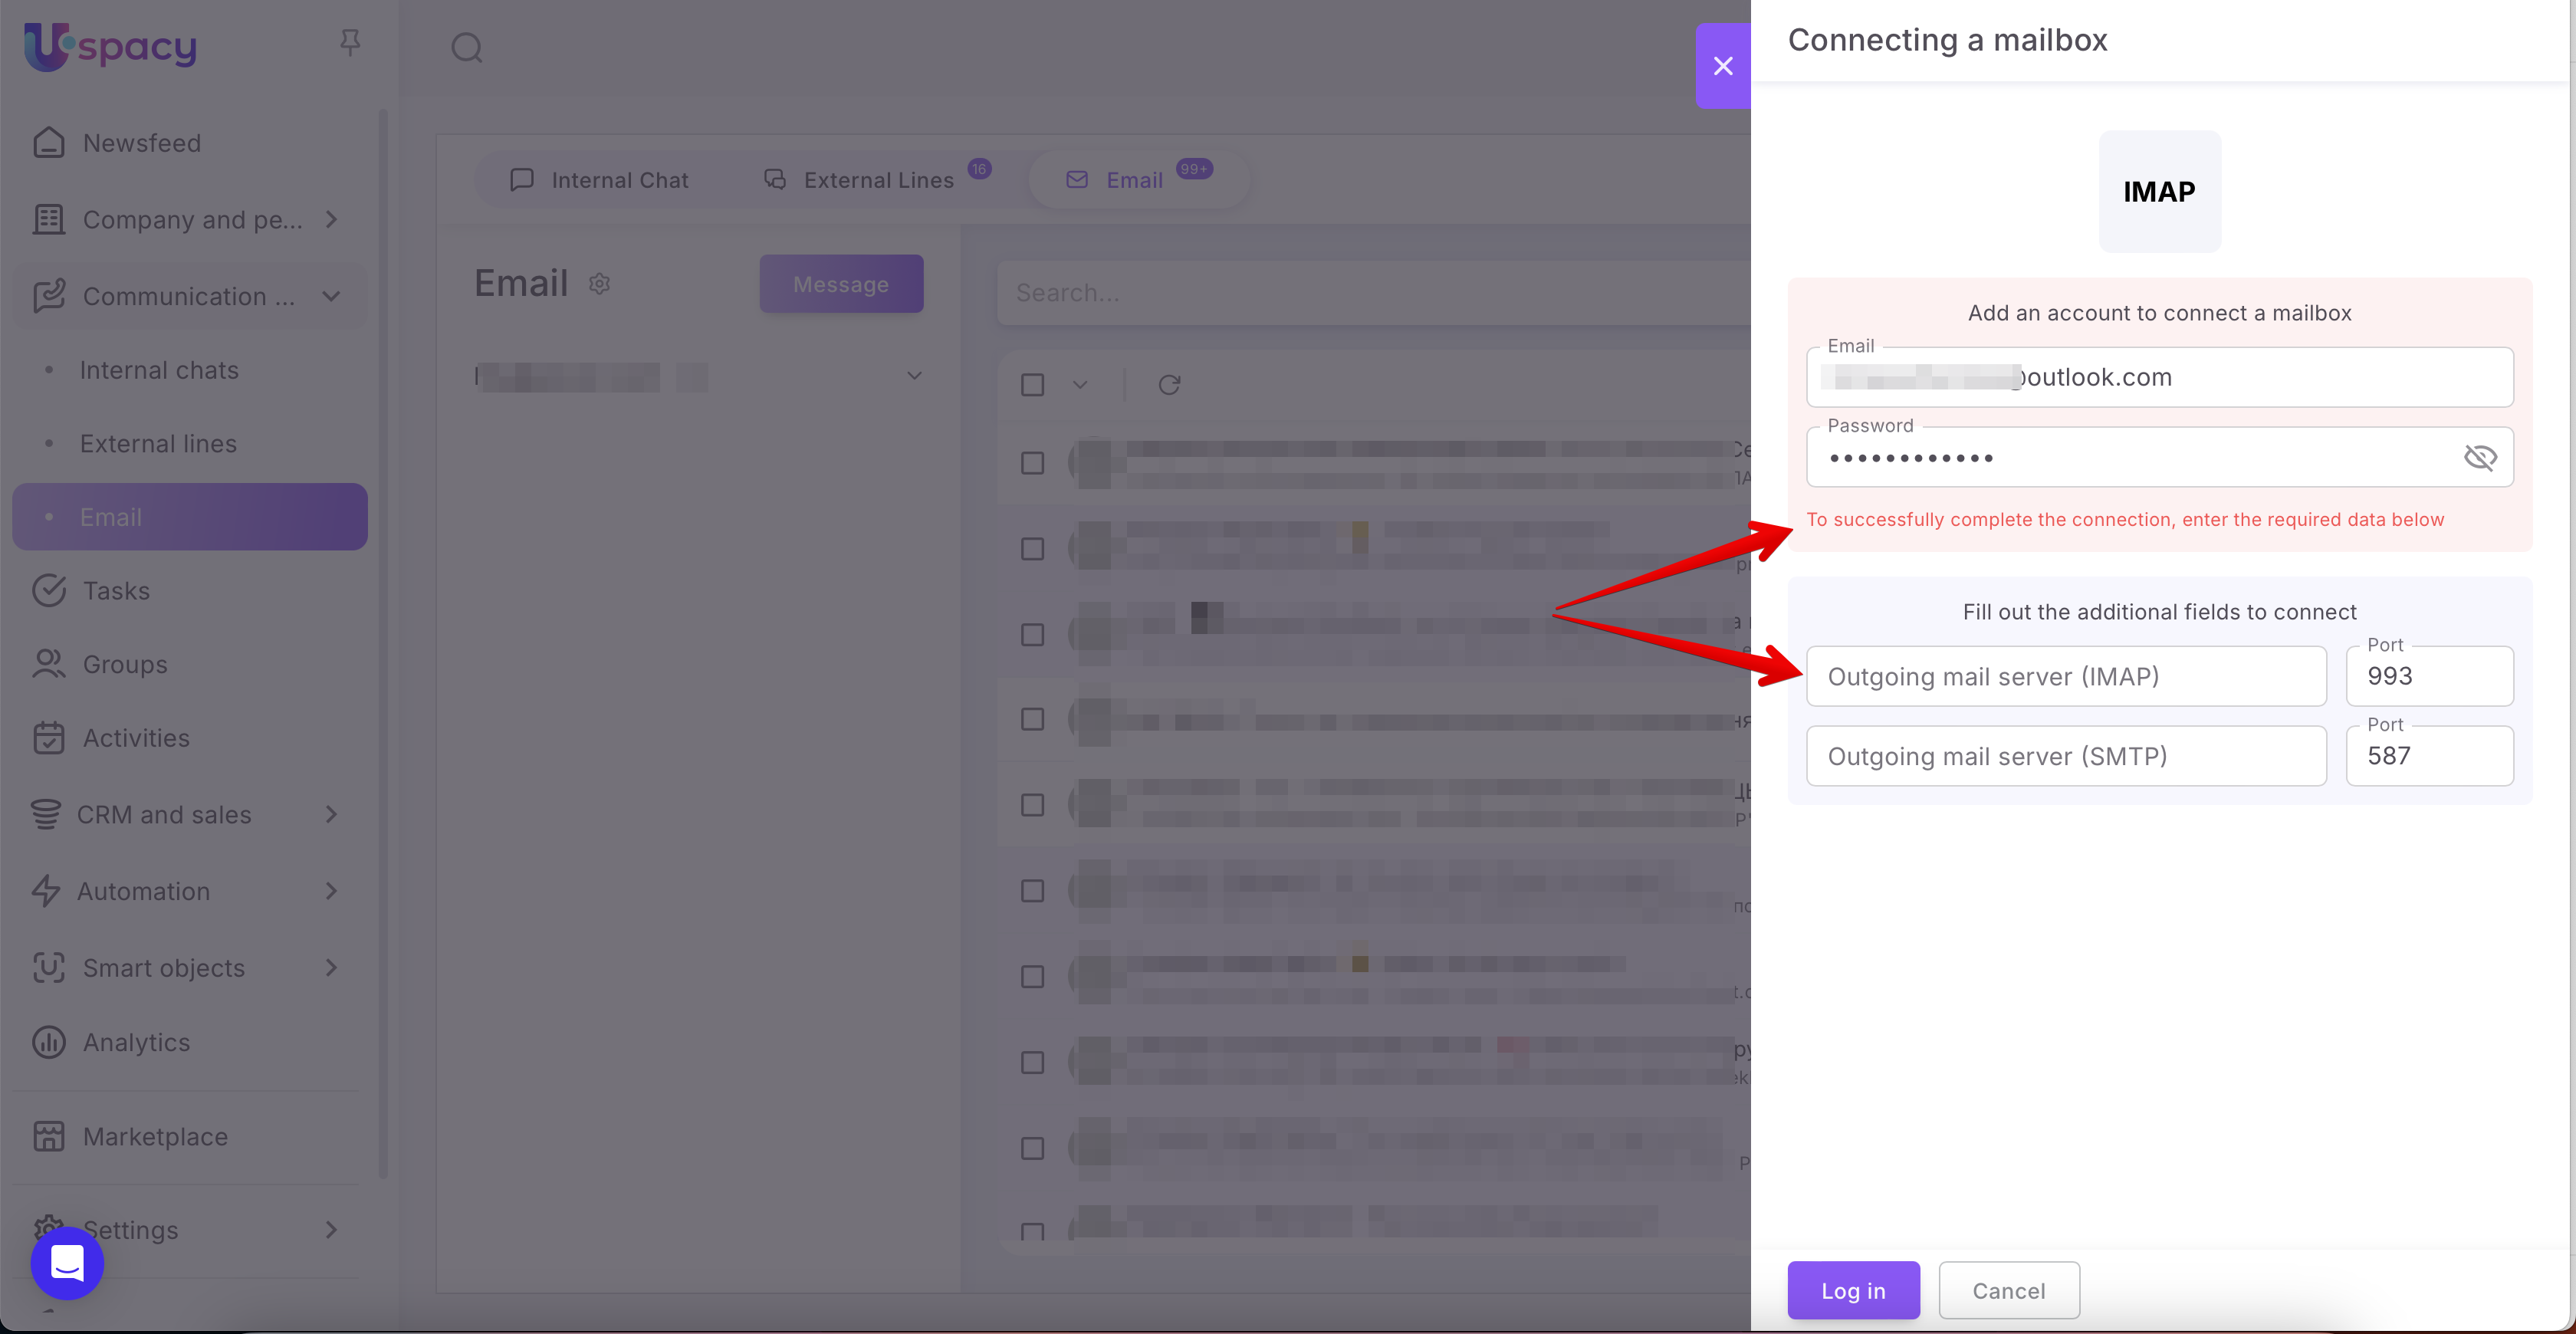
Such as:
🟣 Outgoing mail server (IMAP). In this field, you need to enter the value outlook.office365.com
Port. You can leave this field blank or enter the standard value 993.
🟣 Outgoing mail server (SMTP). In this field enter the value smtp-mail.outlook.com
Port. Here, you should use the standard value 587.
After that, click Log in again.
Almost done!
Step 5. Configure synchronization settings
You will need to specify the sender's name, the name of the mailbox, the access level, whether to establish connections between email and CRM, the period to pick up emails as well as the folders to be imported. Additionally, you can add signatures to be used when sending new emails.
🔍 Synchronization parameters are the same regardless of which email service you connect to. Therefore, we described all the settings in detail here.
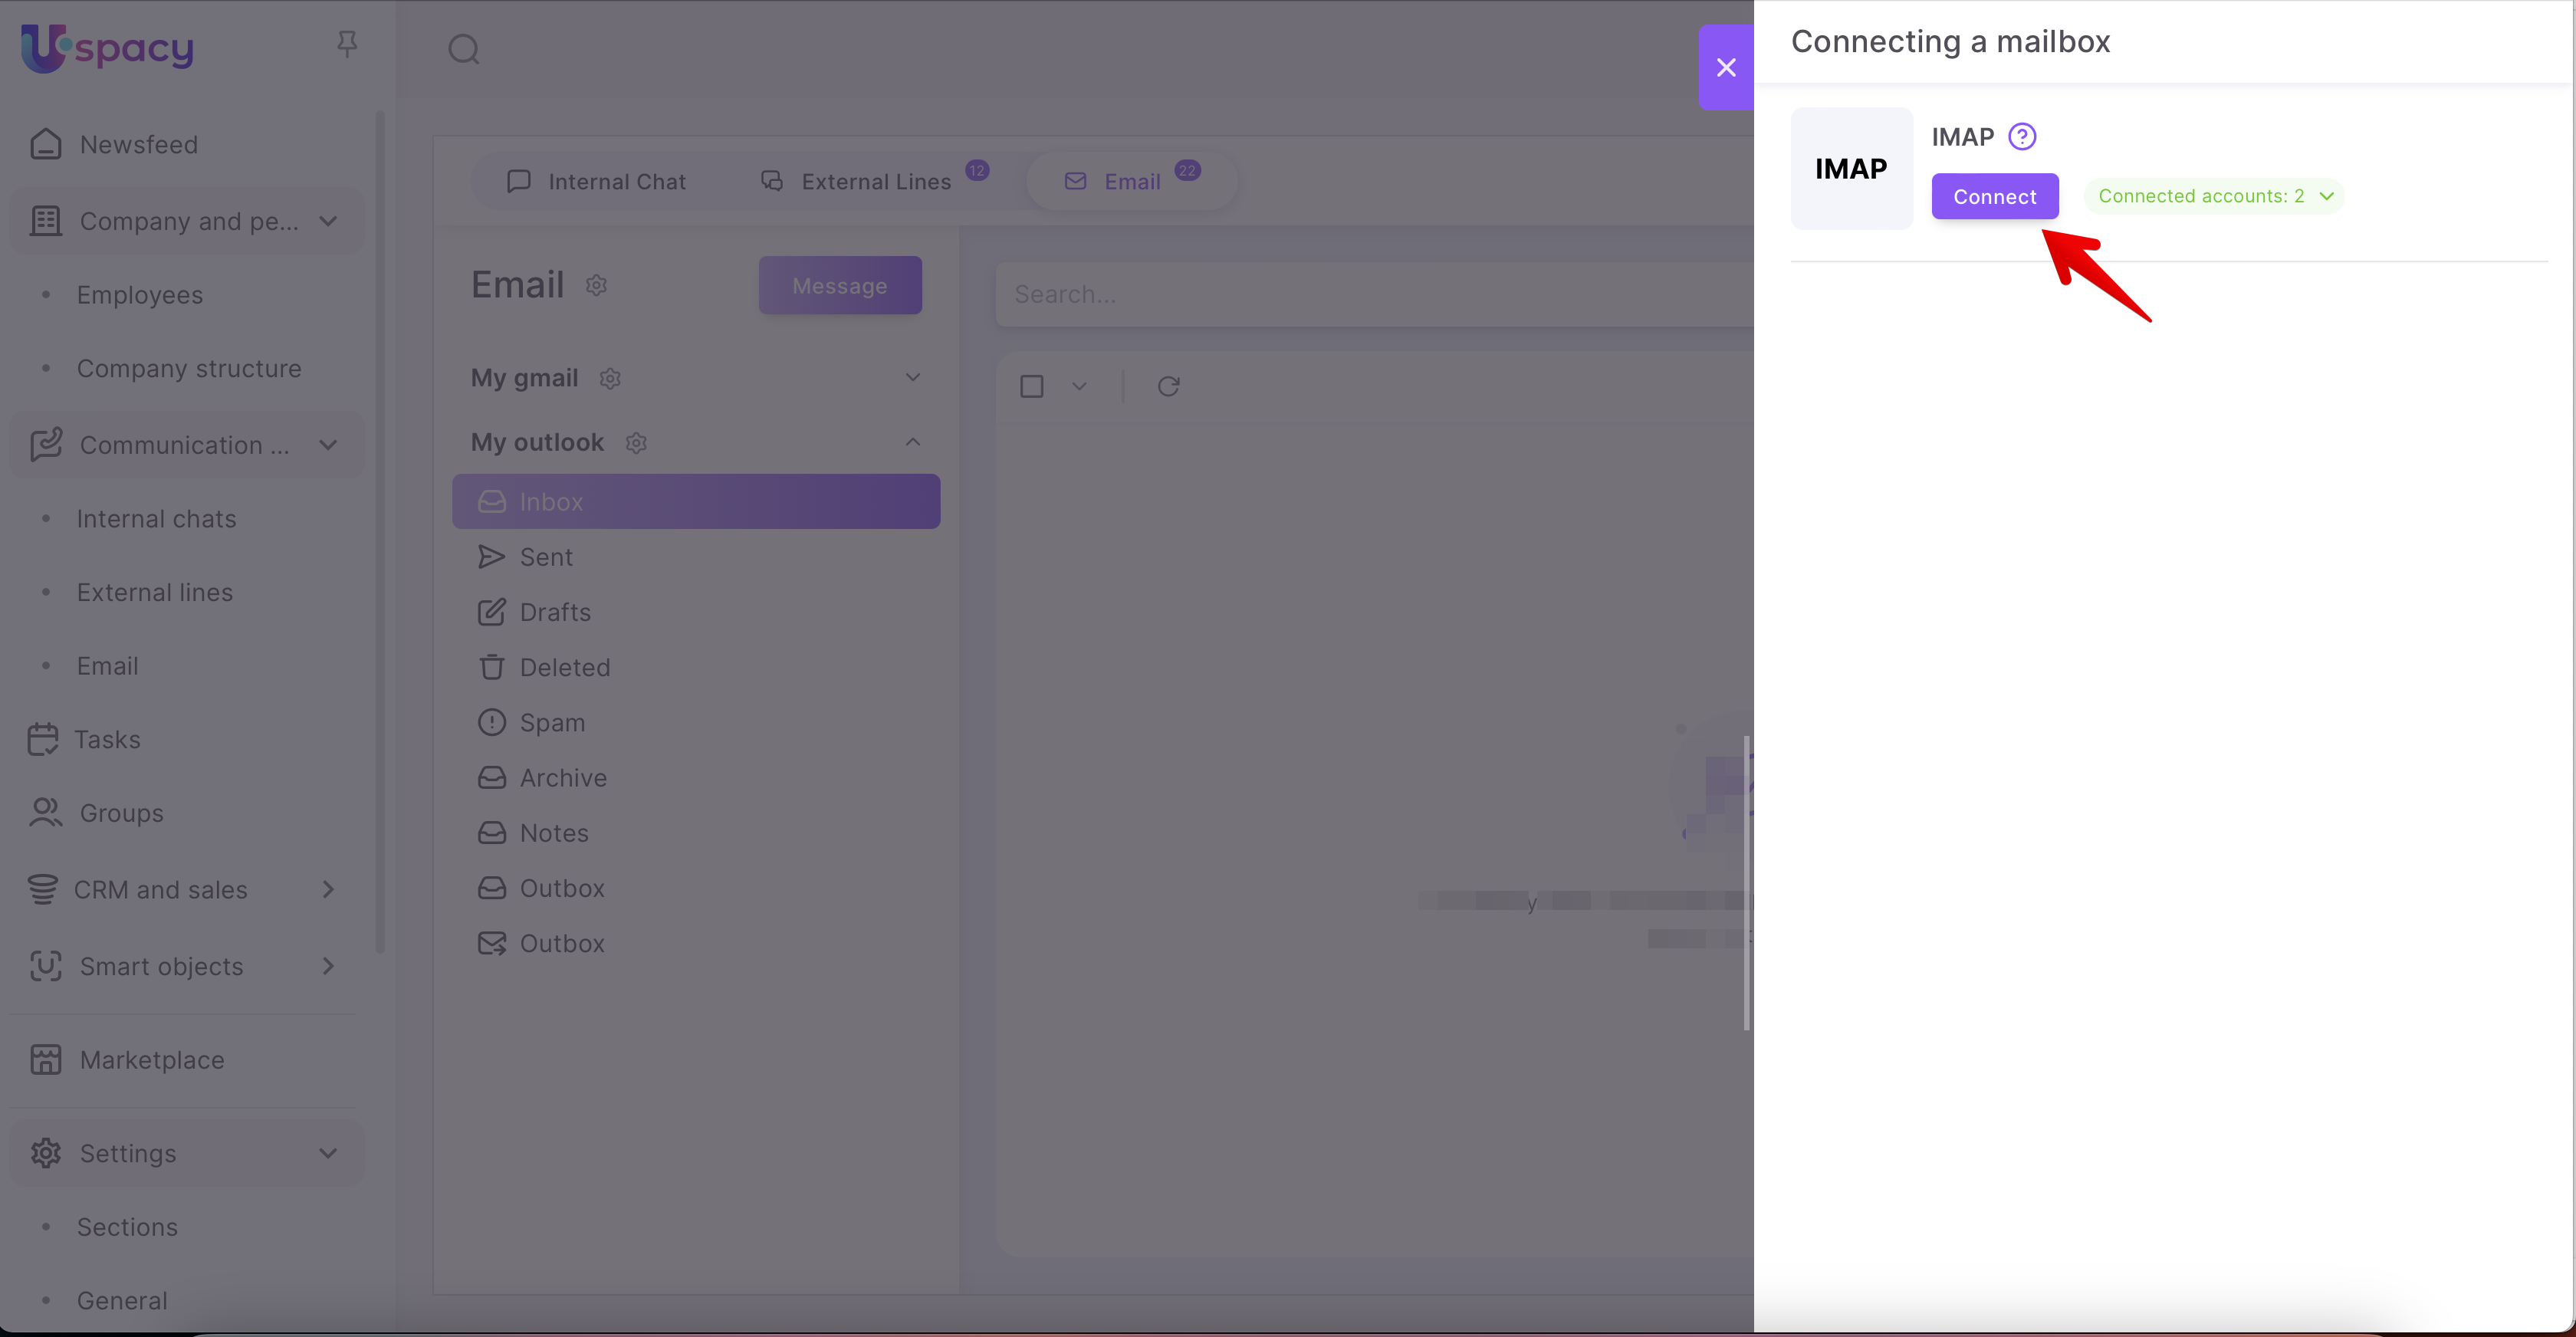
After clicking the Connect button, it will appear in the list of connected accounts.

After the synchronization is completed (it takes some time), you will be able to work with your emails from the Outlook mail directly in Space.
🌟Please note that the synchronization frequency depends on the plan:
How to connect email on your own domain?
To do this, you need to perform these three main steps.
Step 1. Configure mail settings for connecting via IMAP
It depends which hosting or service you use to connect your own email domain. The settings will vary.
Therefore, you need to contact the system administrator of your domain directly with a request about the need to connect mail to Uspacy using the IMAP protocol.
❗️ Important! Before connecting your mailbox, please ensure that your email server has the folder structure correctly configured. Specifically, the "Sent" and "Trash" folders must exist. If they aren't available, an error might occur during the connection process. Therefore, we recommend checking for or creating these folders in your email system first, and only then connecting your mailbox to the Uspacy Space.
Step 2. Authorize and connect the mailbox to Space
First, you need to go to the Communication center - Email item and click Connect.
Next, enter the address of the mailbox that you plan to connect, as well as the password from it. Then, click Log in.
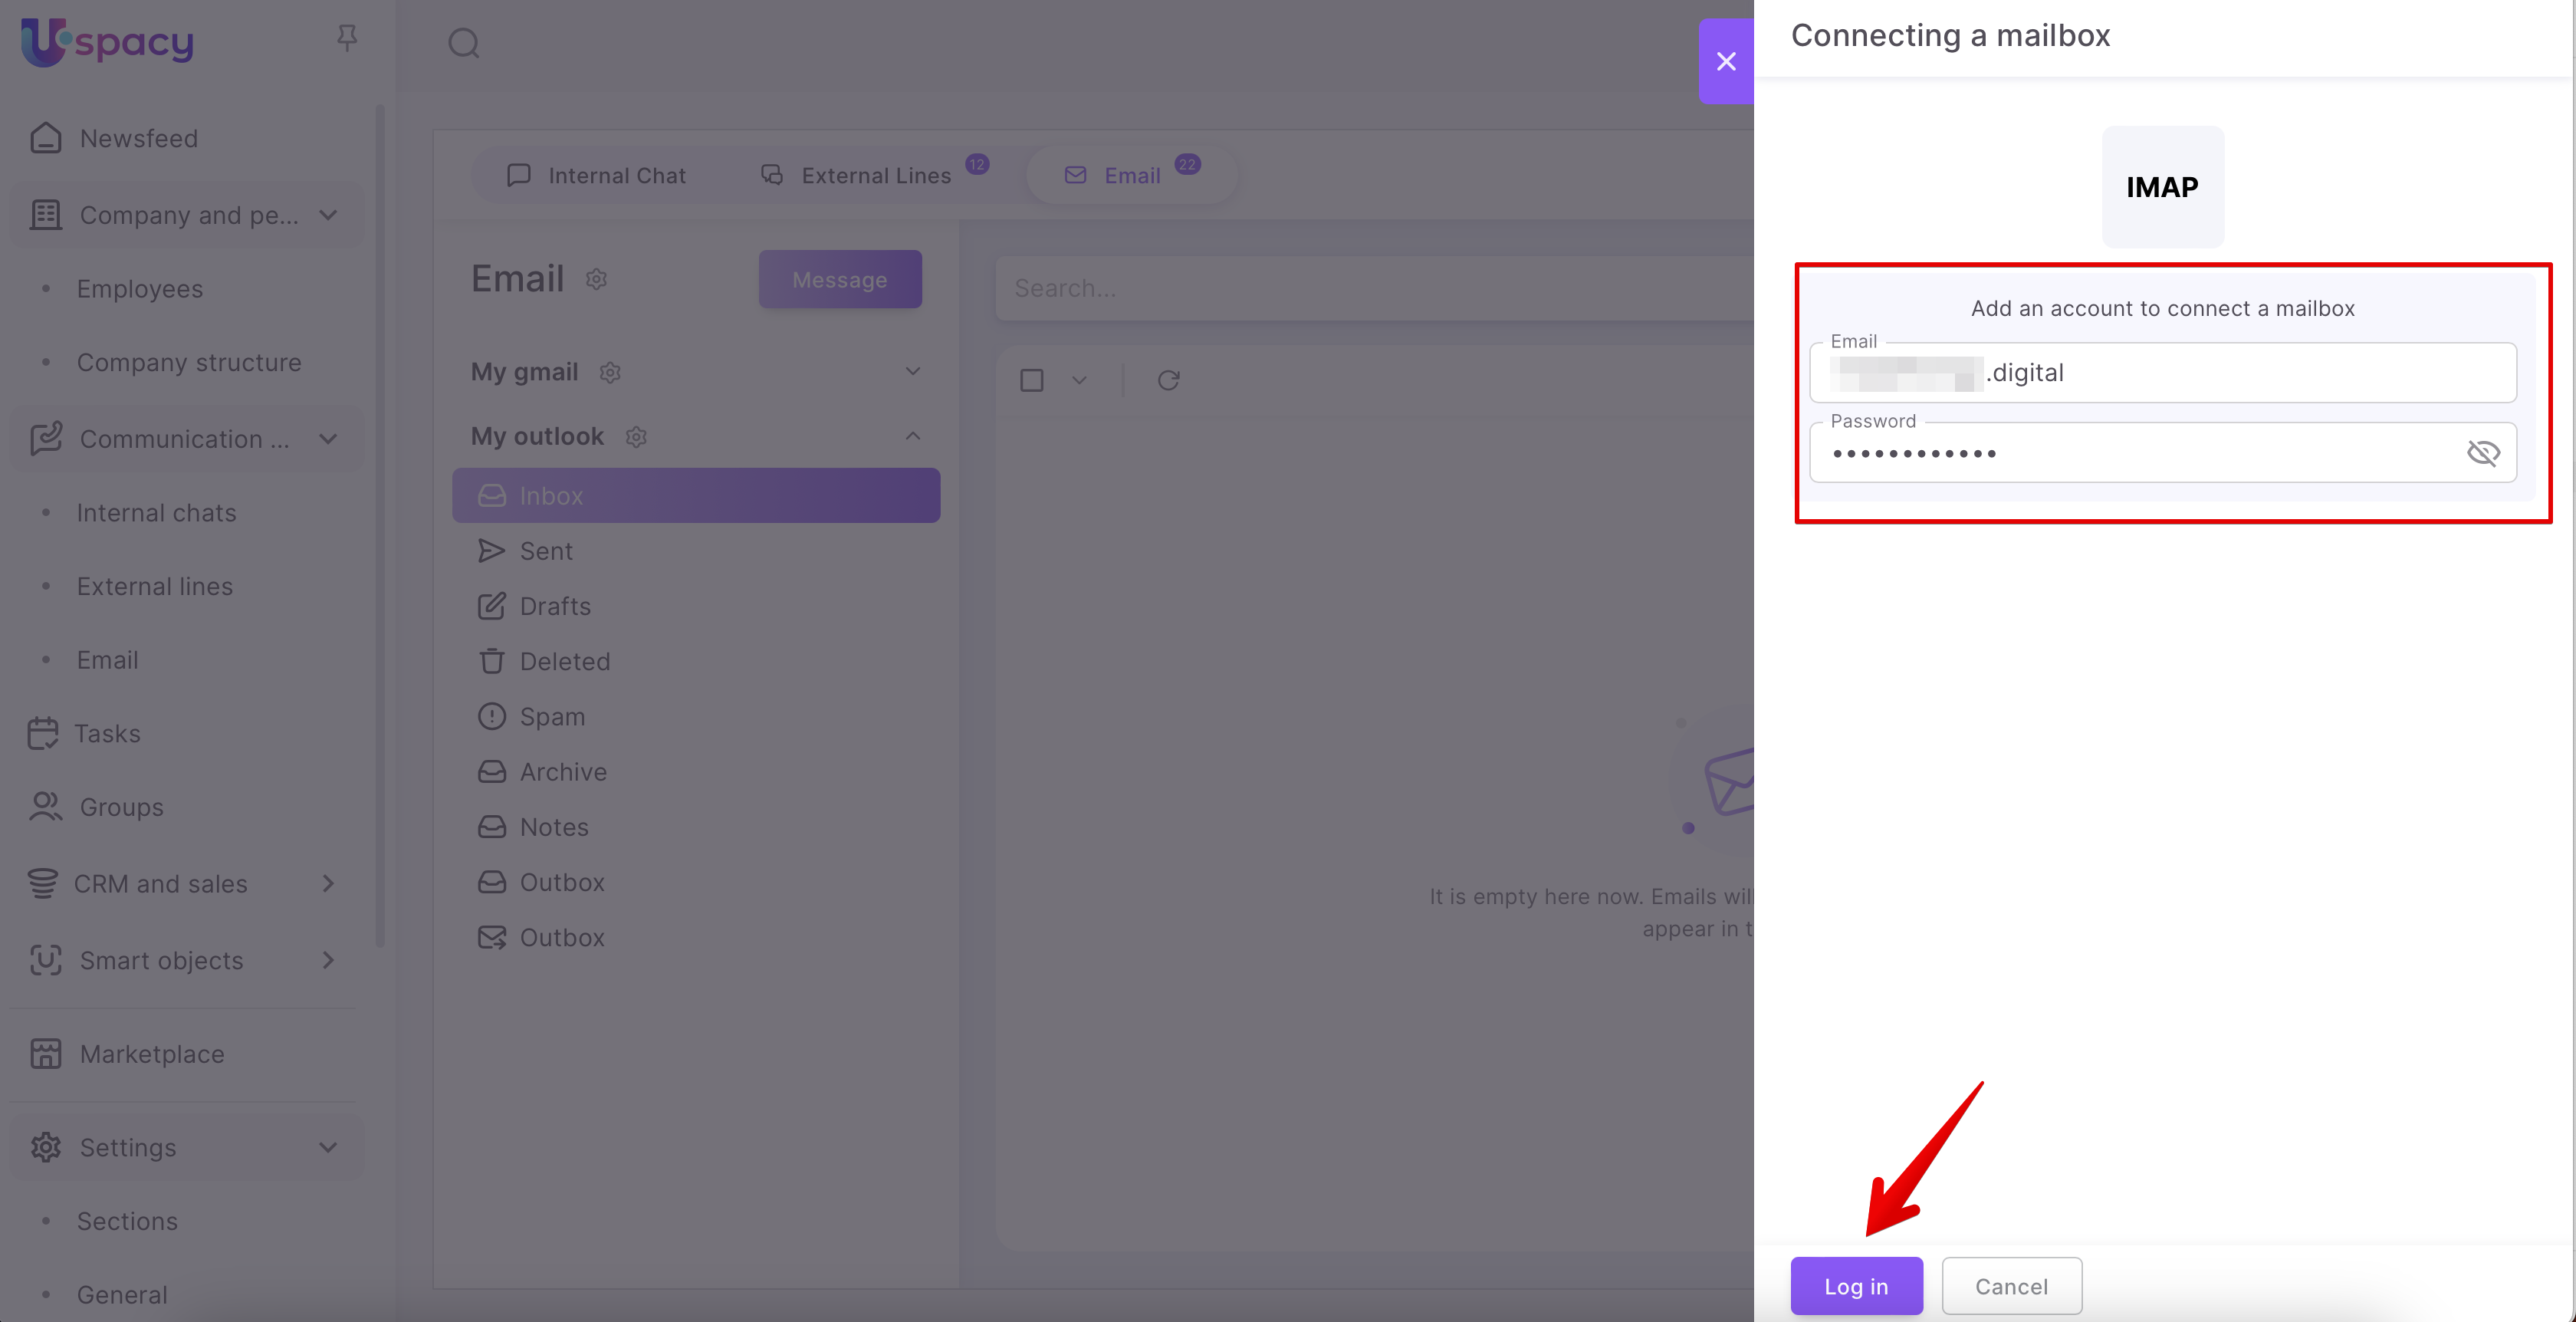
In order to successfully complete the process and connect the mailbox, enter the required data.
Such as:
🟣 Outgoing mail server (IMAP). Administrator of your mail domain will give you this data.
🟣 Port. This field can be left blank or filled out with the information provided by the domain administrator.
🟣 Outgoing mail server (SMTP). You can obtain this data from your email domain administrator.
Port. This field can be left blank or filled out with the one provided by the domain administrator.
After that, click Log in again.
Almost done!
Step 3. Configure synchronization settings
You will need to specify the sender's name, the name of the mailbox, the access level, whether to establish connections between email and CRM, the period to pick up emails as well as the folders to be imported. Additionally, you can add signatures to be used when sending new emails.
🔍 Synchronization parameters are the same regardless of which email service you connect. Therefore, we described all the settings in detail here.
After clicking the Connect button, it will appear in the list of connected accounts.
After the synchronization is completed (it takes some time), you will be able to work with your emails directly in Space.
🌟Please note that the synchronization frequency depends on the plan:
How to connect a corporate Outlook mailbox (Microsoft 365)?
Step 1: Enable SMTP AUTH for email
To do this, your corporate mail administrator needs to go to the Microsoft 365 Admin Center to enable or disable SMTP AUTH for specific mailboxes. Then follow these steps:
- Go to the Users section and click on Active users.
- Select the desired user (i.e., their mailbox) and in the drop-down menu, click on the Mail tab. Then click on Manage email apps in the Email apps section.
- To enable SMTP authentication for the mailbox, check the box next to Authenticated SMTP and click Save changes.
🔍 For more details on configuring SMTP, can be read in Microsoft’s knowledge base.
Step 2: Authorize and connect the mailbox to Uspacy
First, go to the Communication Hub and select Email. Then, use either the Outlook or Microsoft 365 block.
Click the Connect button.

You will be redirected to the authorization page. First, enter the email address of the corporate mailbox you want to connect.

Enter the password for that mailbox.

If it is successful, you will be redirected back to your Uspacy Space. A synchronization settings window will appear.
💡 If you use a personal email address for authorization instead of a corporate one, you will receive a message upon redirecting to Uspacy.
Step 3: Configure synchronization settings

You will need to specify the sender's name, the name of the mailbox, the access level, whether to establish connections between email and CRM, the period to pick up emails as well as the folders to be imported. Additionally, you can add signatures to be used when sending new emails.
🔍 The synchronization settings are the same, regardless of which email service you're connecting. We have detailed all the settings here.
After clicking Connect, the mailbox will appear in the list of connected accounts.

Once synchronization is complete (it may take some time), you will be able to work with your emails directly at Uspacy.
🌟Please note that the synchronization frequency depends on the plan:
If you have additional questions or you need to contact the support, send a request to this email [email protected]
Created: March 26, 2024 / Updated: June 10, 2025